Google Sheets Tutorial
How to Transpose Row to Column in Google Sheets
Learn how to transpose data in Google Sheets using methods like the TRANSPOSE function, Copy-Paste Special, and Google Apps Script.
Table of Contents
Transposing data is a fundamental aspect of data manipulation, especially in spreadsheet applications like Google Sheets. In this article, we'll delve into various methods to transpose row to column in Google Sheets, providing step-by-step instructions and tips for efficient transposing.
Transposing rows to columns in Google Sheets refers to converting data arranged in rows into columns. This transformation is useful when you need to reorganize your data for better analysis or presentation. For example, if you have data listed horizontally across rows, transposing it will rearrange the data vertically into columns.
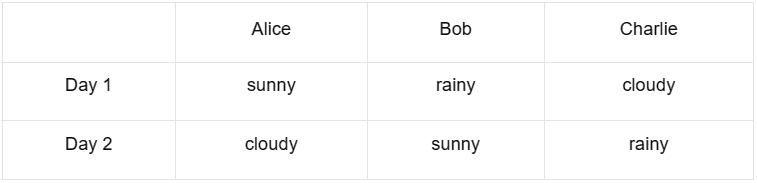
Here's an example of a transpose operation applied to a table:
Original Table:
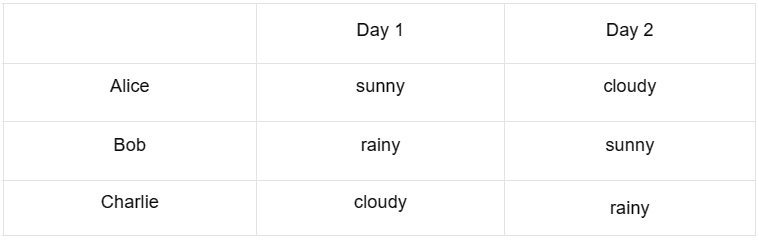
Transposed Table:
Transposing data offers several advantages, including improved data analysis, enhanced data presentation, and facilitating data manipulation in Google Sheets.
How to Transpose Row to Column in Google Sheets?
Basic Transposing Techniques
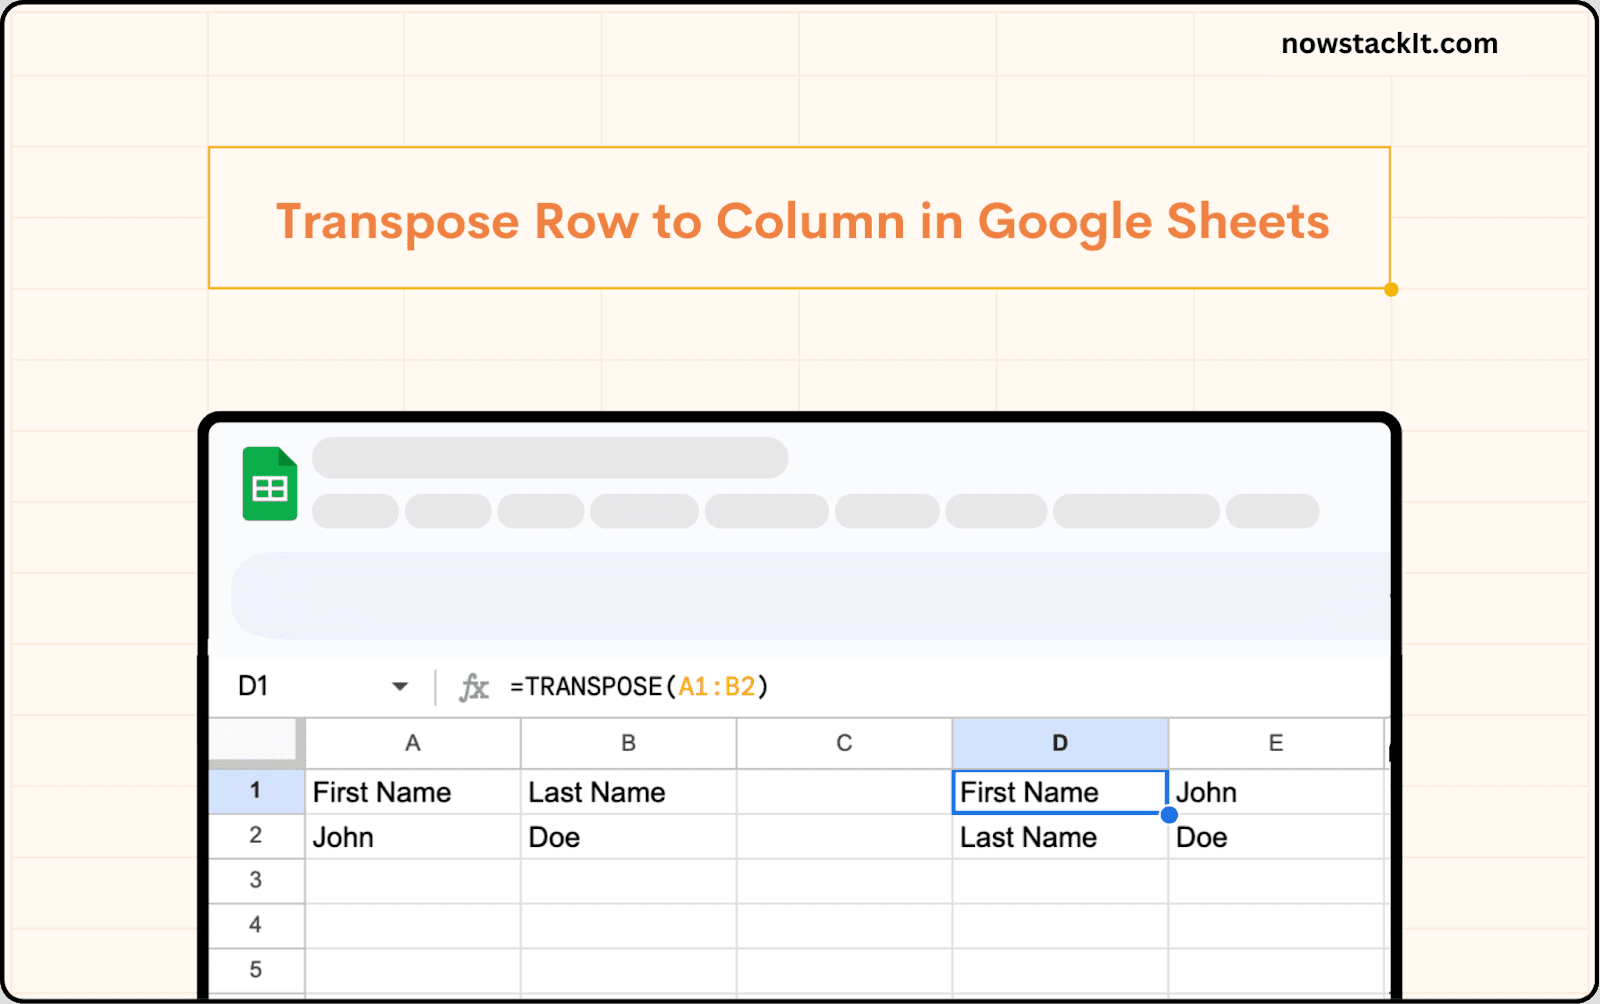
Method 1: Using the TRANSPOSE Function:
The TRANSPOSE function in Google Sheets allows you to flip the orientation of an array or range of cells. To transpose data using this function:
Select the cell you want the transpose to show up.
Enter `=TRANSPOSE(` into the formula bar.
Select the range or manually type the range reference.
Close the parentheses ‘)’ and press Enter.
When should you use this method?
This method is recommended when you need to quickly transpose a small range of data within a Google Sheets cell or range without altering the original data. It's straightforward and can be applied directly within a cell or range. However, it's less suitable for transposing large datasets or for dynamically transposing data based on changes.
Method 2: Using Copy and Paste Special:
Another method involves using the copy-and-paste special feature:
Select the range of cells you want to transpose.
Right-click on the selected cells and choose Copy from the context menu.
Right-click on the destination where you want to paste the transposed data.
Select Paste Special and then choose Transpose from the options.
When should you use this method?
This method is recommended when you need to transpose data along with performing other operations simultaneously, such as formatting changes, value conversion, or pasting data in a specific format. It offers more versatility beyond just transposing. For instance, you can opt to paste only values, formulas, or formats, or combine transposing with other transformations in a single step. However, it's worth noting that it's a manual process and may not be suitable for automating repetitive tasks or handling large datasets.
Tips for Efficient Transposing
Keep data consistent to avoid errors.
Utilize named ranges for easier referencing, especially with large datasets.
Double-check the transposed data to verify accuracy.
Common Mistakes to Avoid
Incomplete data selection may result in missing or incomplete results.
Don't forget to include headers when transposing data to maintain clarity and context.
Exercise caution to avoid overwriting existing information unintentionally.
Advanced Transposing Technique:
Method 3: Using Google Apps Script
Google Apps Script allows the automation of tasks in Google Sheets, including transposing data. You can write custom scripts to transpose data based on specific criteria or conditions.
Go to Google Sheets and open the spreadsheet where you want to run the Apps Script.
Click on Extensions in the top menu, then select Apps Script. This will open the Script Editor.
In the Script Editor, you can write your Google Apps Script code. This could be anything from automating tasks and creating custom functions to interacting with other Google services including transposing data.
Here's a basic script to transpose data in Google Sheets using Apps script:
function transposeData() {
  var sheet = SpreadsheetApp.getActiveSpreadsheet().getActiveSheet();
  var range = sheet.getDataRange();
  var values = range.getValues();
  var transposedValues = [];

  for (var i = 0; i < values[0].length; i++) {
    transposedValues.push([]);
    for (var j = 0; j < values.length; j++) {
      transposedValues[i].push(values[j][i]);
    }
  }

  sheet.getRange(1, 1, transposedValues.length, transposedValues[0].length).setValues(transposedValues);
}
Click on Save to save your changes. Now, click on Run to execute the function.
Upon completion, the data in the sheet will be transposed.
When should you use this method?
This method is recommended when you need to automate repetitive tasks, perform complex data manipulations, or handle large datasets beyond the capabilities of built-in functions like TRANSPOSE(). Google Apps Script offers greater flexibility and power for data manipulation. It can efficiently handle large datasets and can be scheduled to run at specific times. However, it requires some proficiency in JavaScript and might be an overkill for simple transposing tasks or one-time operations.
Conclusion
Transposing rows to columns in Google Sheets is a valuable skill that streamlines data analysis and presentation tasks. By understanding various methods and best practices for transposing data, you can effectively manipulate your data to suit your needs.
Say goodbye to tedious data exports! 🚀
Are you tired of the manual data juggling across your SaaS tools and Google Sheets? StackIt has your back with seamless integrations. Bid farewell to tedious exports and repetitive tasks. With StackIt, boost your team's efficiency and productivity with just a click.
Discover the full potential of StackIt's integrations tailored for B2B workflows. Take charge of your data analysis and reporting without the hassle. Ready to experience the difference? Dive in today with StackIt on your own or schedule a demo for personalized insights.
Transposing data is a fundamental aspect of data manipulation, especially in spreadsheet applications like Google Sheets. In this article, we'll delve into various methods to transpose row to column in Google Sheets, providing step-by-step instructions and tips for efficient transposing.
Transposing rows to columns in Google Sheets refers to converting data arranged in rows into columns. This transformation is useful when you need to reorganize your data for better analysis or presentation. For example, if you have data listed horizontally across rows, transposing it will rearrange the data vertically into columns.
Here's an example of a transpose operation applied to a table:
Original Table:
Transposed Table:
Transposing data offers several advantages, including improved data analysis, enhanced data presentation, and facilitating data manipulation in Google Sheets.
How to Transpose Row to Column in Google Sheets?
Basic Transposing Techniques
Method 1: Using the TRANSPOSE Function:
The TRANSPOSE function in Google Sheets allows you to flip the orientation of an array or range of cells. To transpose data using this function:
Select the cell you want the transpose to show up.
Enter `=TRANSPOSE(` into the formula bar.
Select the range or manually type the range reference.
Close the parentheses ‘)’ and press Enter.
When should you use this method?
This method is recommended when you need to quickly transpose a small range of data within a Google Sheets cell or range without altering the original data. It's straightforward and can be applied directly within a cell or range. However, it's less suitable for transposing large datasets or for dynamically transposing data based on changes.
Method 2: Using Copy and Paste Special:
Another method involves using the copy-and-paste special feature:
Select the range of cells you want to transpose.
Right-click on the selected cells and choose Copy from the context menu.
Right-click on the destination where you want to paste the transposed data.
Select Paste Special and then choose Transpose from the options.
When should you use this method?
This method is recommended when you need to transpose data along with performing other operations simultaneously, such as formatting changes, value conversion, or pasting data in a specific format. It offers more versatility beyond just transposing. For instance, you can opt to paste only values, formulas, or formats, or combine transposing with other transformations in a single step. However, it's worth noting that it's a manual process and may not be suitable for automating repetitive tasks or handling large datasets.
Tips for Efficient Transposing
Keep data consistent to avoid errors.
Utilize named ranges for easier referencing, especially with large datasets.
Double-check the transposed data to verify accuracy.
Common Mistakes to Avoid
Incomplete data selection may result in missing or incomplete results.
Don't forget to include headers when transposing data to maintain clarity and context.
Exercise caution to avoid overwriting existing information unintentionally.
Advanced Transposing Technique:
Method 3: Using Google Apps Script
Google Apps Script allows the automation of tasks in Google Sheets, including transposing data. You can write custom scripts to transpose data based on specific criteria or conditions.
Go to Google Sheets and open the spreadsheet where you want to run the Apps Script.
Click on Extensions in the top menu, then select Apps Script. This will open the Script Editor.
In the Script Editor, you can write your Google Apps Script code. This could be anything from automating tasks and creating custom functions to interacting with other Google services including transposing data.
Here's a basic script to transpose data in Google Sheets using Apps script:
function transposeData() {
  var sheet = SpreadsheetApp.getActiveSpreadsheet().getActiveSheet();
  var range = sheet.getDataRange();
  var values = range.getValues();
  var transposedValues = [];

  for (var i = 0; i < values[0].length; i++) {
    transposedValues.push([]);
    for (var j = 0; j < values.length; j++) {
      transposedValues[i].push(values[j][i]);
    }
  }

  sheet.getRange(1, 1, transposedValues.length, transposedValues[0].length).setValues(transposedValues);
}
Click on Save to save your changes. Now, click on Run to execute the function.
Upon completion, the data in the sheet will be transposed.
When should you use this method?
This method is recommended when you need to automate repetitive tasks, perform complex data manipulations, or handle large datasets beyond the capabilities of built-in functions like TRANSPOSE(). Google Apps Script offers greater flexibility and power for data manipulation. It can efficiently handle large datasets and can be scheduled to run at specific times. However, it requires some proficiency in JavaScript and might be an overkill for simple transposing tasks or one-time operations.
Conclusion
Transposing rows to columns in Google Sheets is a valuable skill that streamlines data analysis and presentation tasks. By understanding various methods and best practices for transposing data, you can effectively manipulate your data to suit your needs.
Say goodbye to tedious data exports! 🚀
Are you tired of the manual data juggling across your SaaS tools and Google Sheets? StackIt has your back with seamless integrations. Bid farewell to tedious exports and repetitive tasks. With StackIt, boost your team's efficiency and productivity with just a click.
Discover the full potential of StackIt's integrations tailored for B2B workflows. Take charge of your data analysis and reporting without the hassle. Ready to experience the difference? Dive in today with StackIt on your own or schedule a demo for personalized insights.
FAQs
Can I transpose data across multiple sheets in Google Sheets?
Can I transpose data across multiple sheets in Google Sheets?
Does transposing data affect the original data in Google Sheets?
Does transposing data affect the original data in Google Sheets?
Are there any shortcuts for transposing data in Google Sheets?
Are there any shortcuts for transposing data in Google Sheets?
Automatic Data Pulls
Visual Data Preview
Set Alerts
other related blogs

Try it now