Product
How to connect Redshift to Google Sheets in one-click
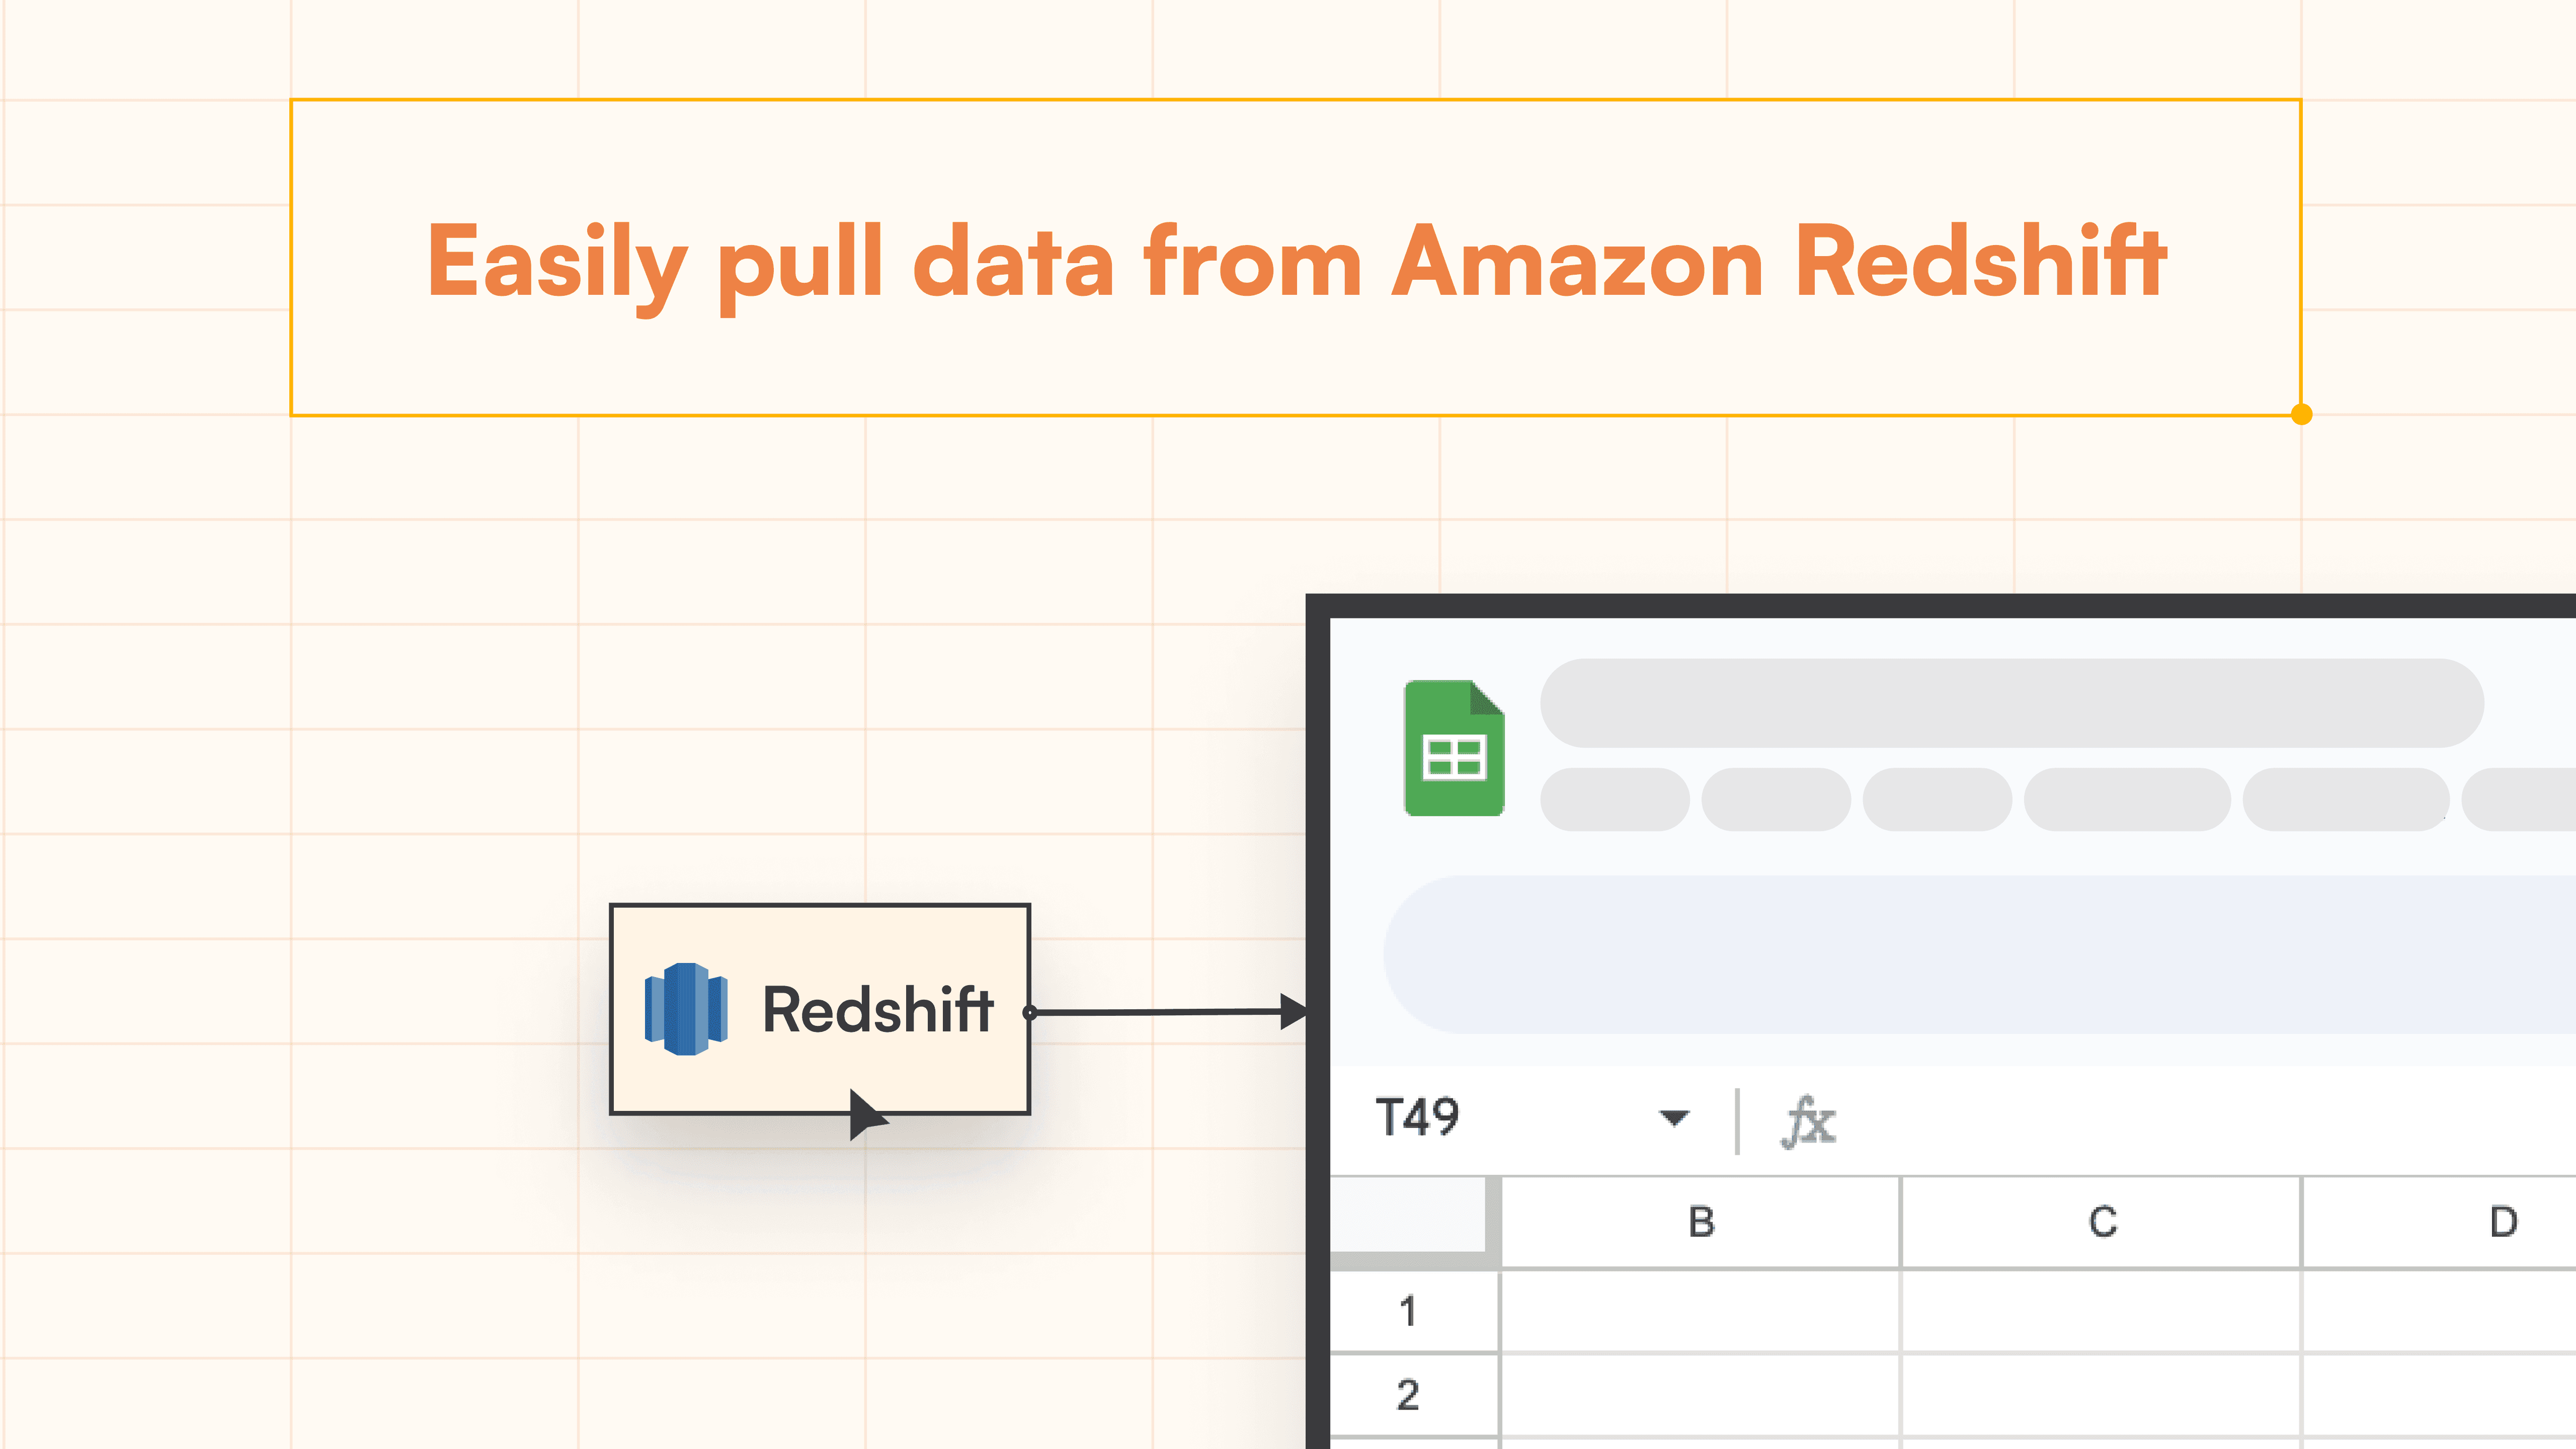
Streamline RedShift to Google Sheets connection with StackIt. Say goodbye to tedious manual exports and embrace automated, one-click data integration
Table of Contents
How to Connect Redshift to Google Sheets?
Connecting your Redshift to Google Sheets used to be a challenging task for non-technical teams such as sales, marketing, revenue ops, and finance. These teams often had to rely on analysts or developers to export Redshift data to a Google Spreadsheet, which could take multiple reminders and emails. Even when they received the data on time, these teams would have to spend hours cleaning it.
Best Ways to Connect Redshift to Google Sheets
Using StackIt - One-click solution to connect Redshift to Google Sheets.
Using Google Apps Script – Requires coding knowledge and a more complex setup.
Using Zapier - Can be costly and requires more setup and maintenance.
Using StackIt
While you can use the likes of Zapier and Google Apps script which requires some technical know-how, high setup cost, or even developer/data team’s assistance, StackIt provides the fastest and easiest way to connect PostgreSQL to Google Sheets without any help.
Why Export Data from Redshift to Google Sheets Using StackIt?
StackIt offers an easy way to establish a Redshift connection directly from Google Sheets. This means you can effortlessly import data into Google Sheets without having to manually export and import CSV files, turning it into a seamless Google Sheets Redshift integration. With StackIt, you can:
Effortlessly connect Redshift to Google Sheets.
Regularly refresh data to keep your Google Sheets up to date.
Write SQL queries to get the precise data you need.
A seamless Google Sheets Redshift integration without manual exports.
Furthermore, if you are looking for a Redshift to Google Sheets connector, StackIt is a great choice. So, why wait? Start your Google Sheets journey and get data from Redshift today with StackIt.
Step-by-Step Walkthrough: How to Connect Redshift to Google Sheets
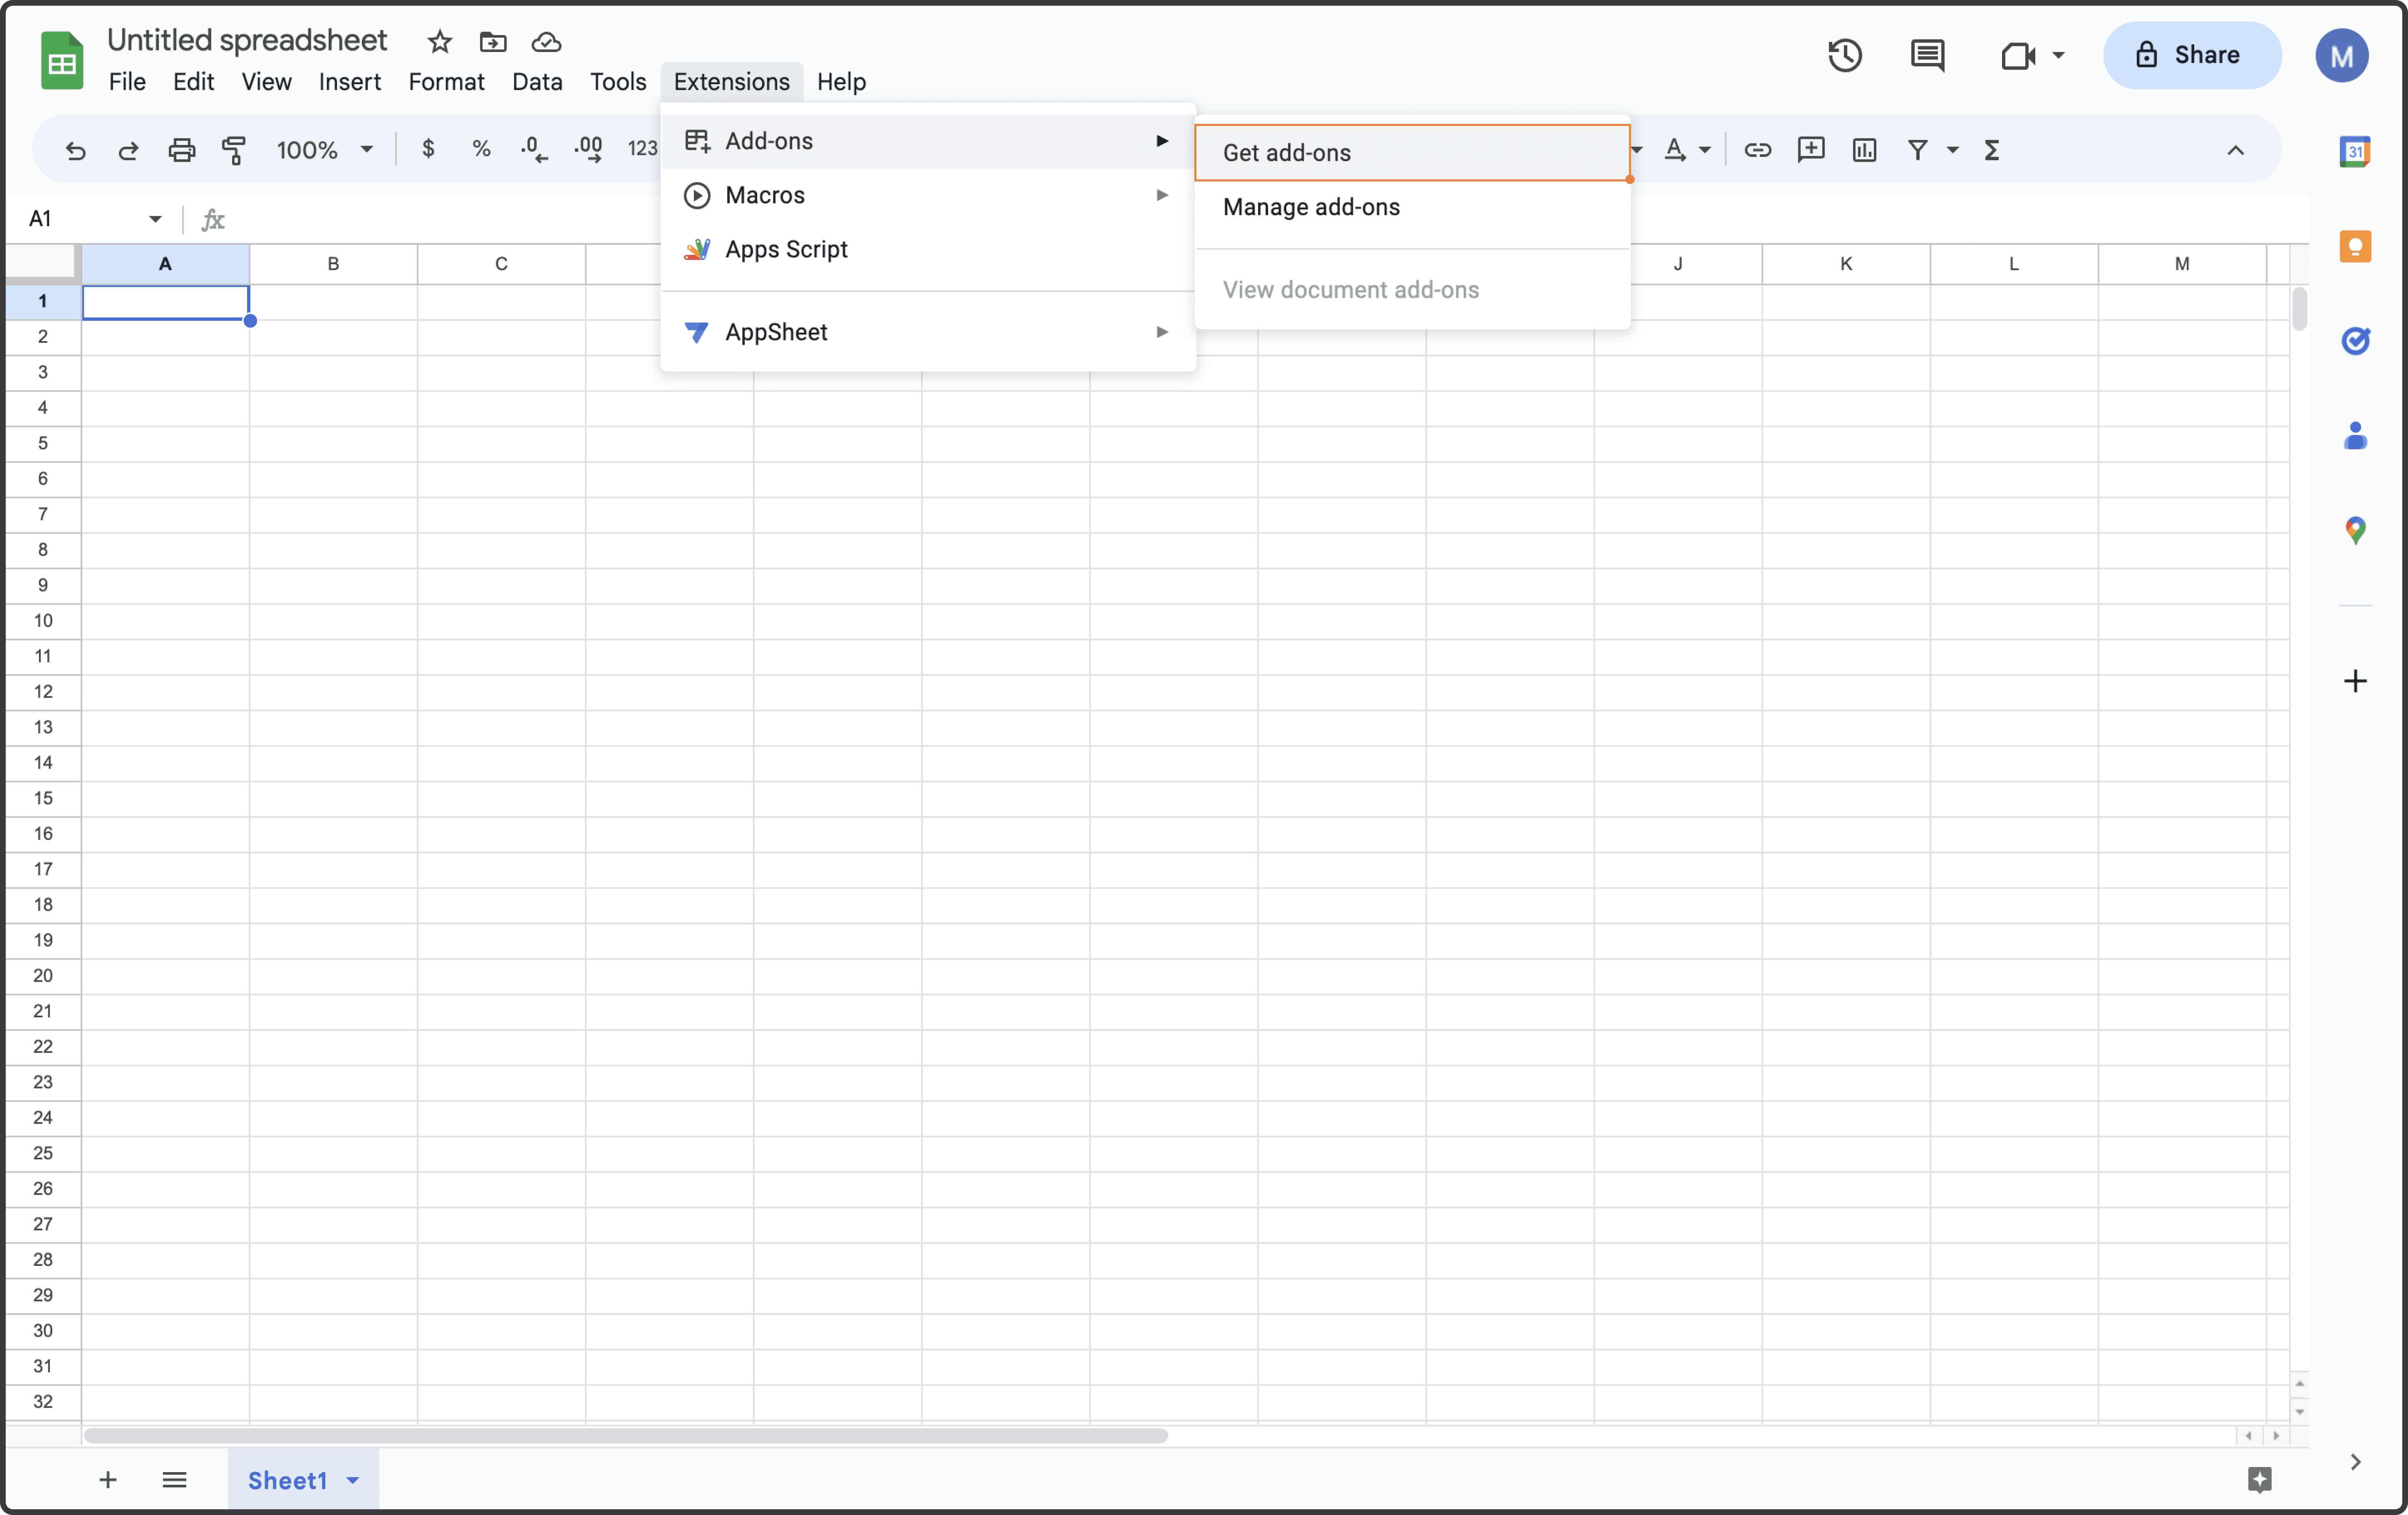
Step 1: Click Extensions from the Google Sheets menu. Select Add-ons and choose to Get Add-ons. This will bring you to the Google Workspace Marketplace.
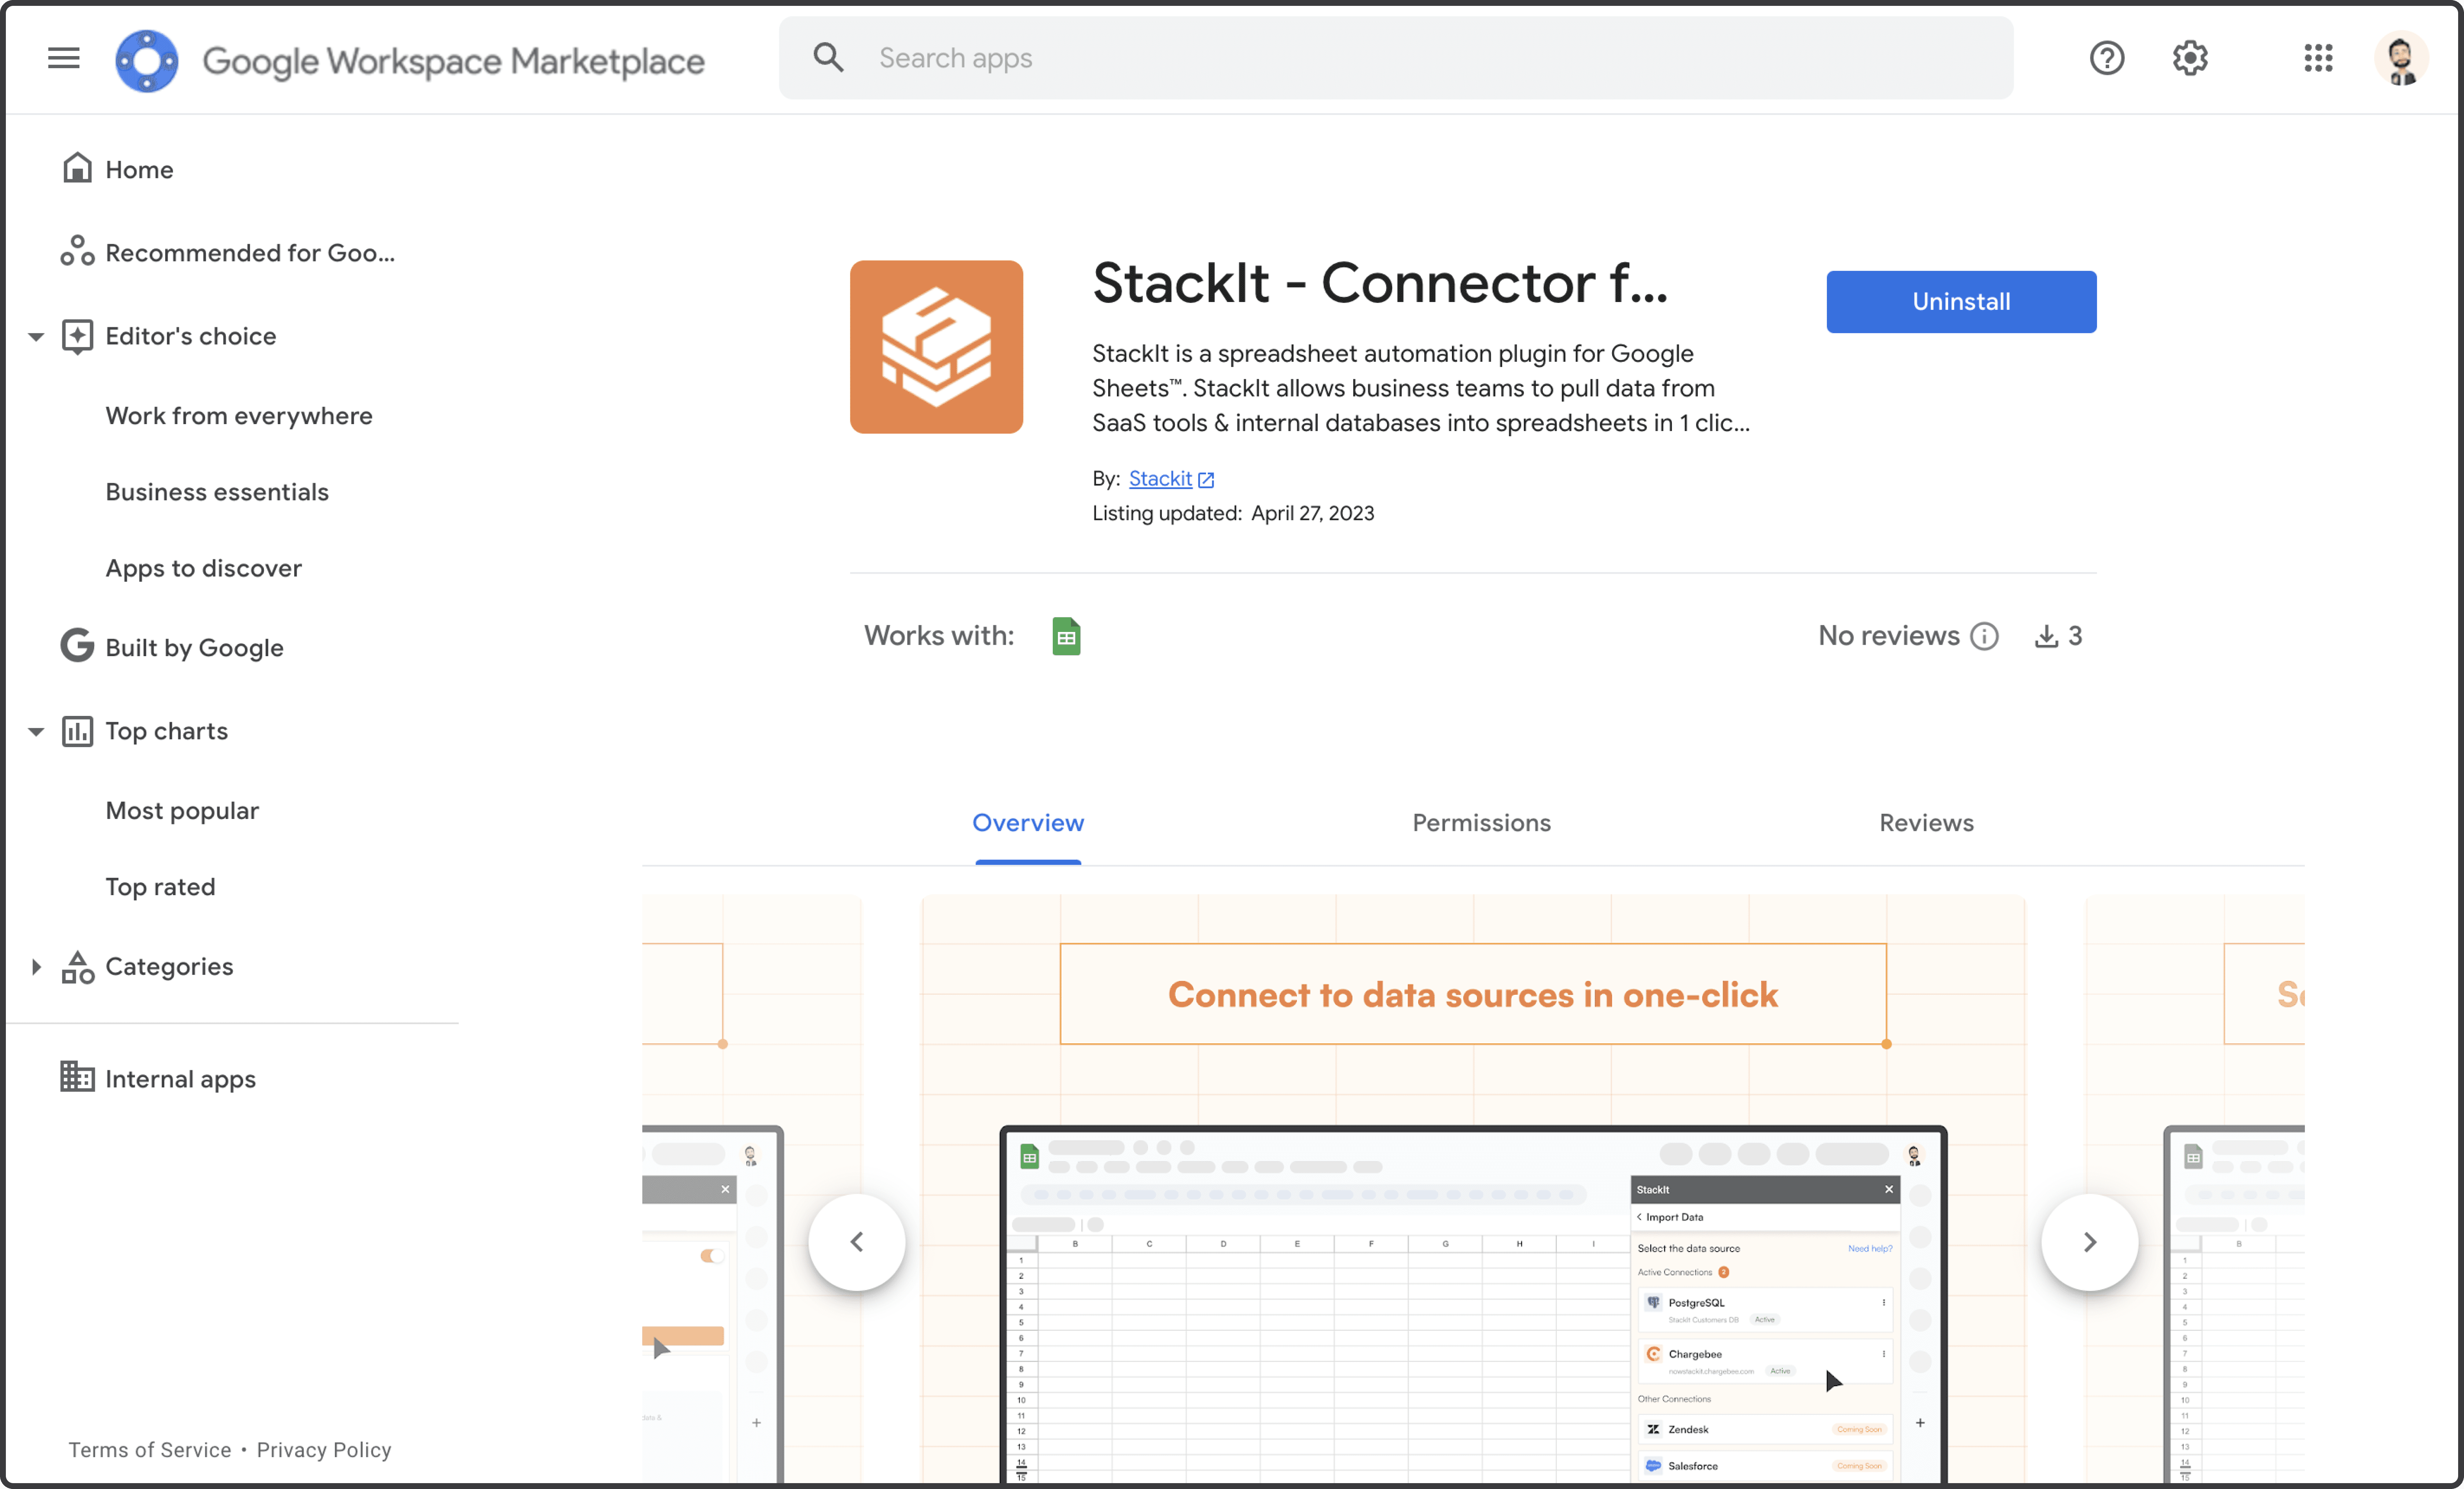
Step 2: Look for StackIt in the Google Marketplace pop-up window and install the app by following the prompts.
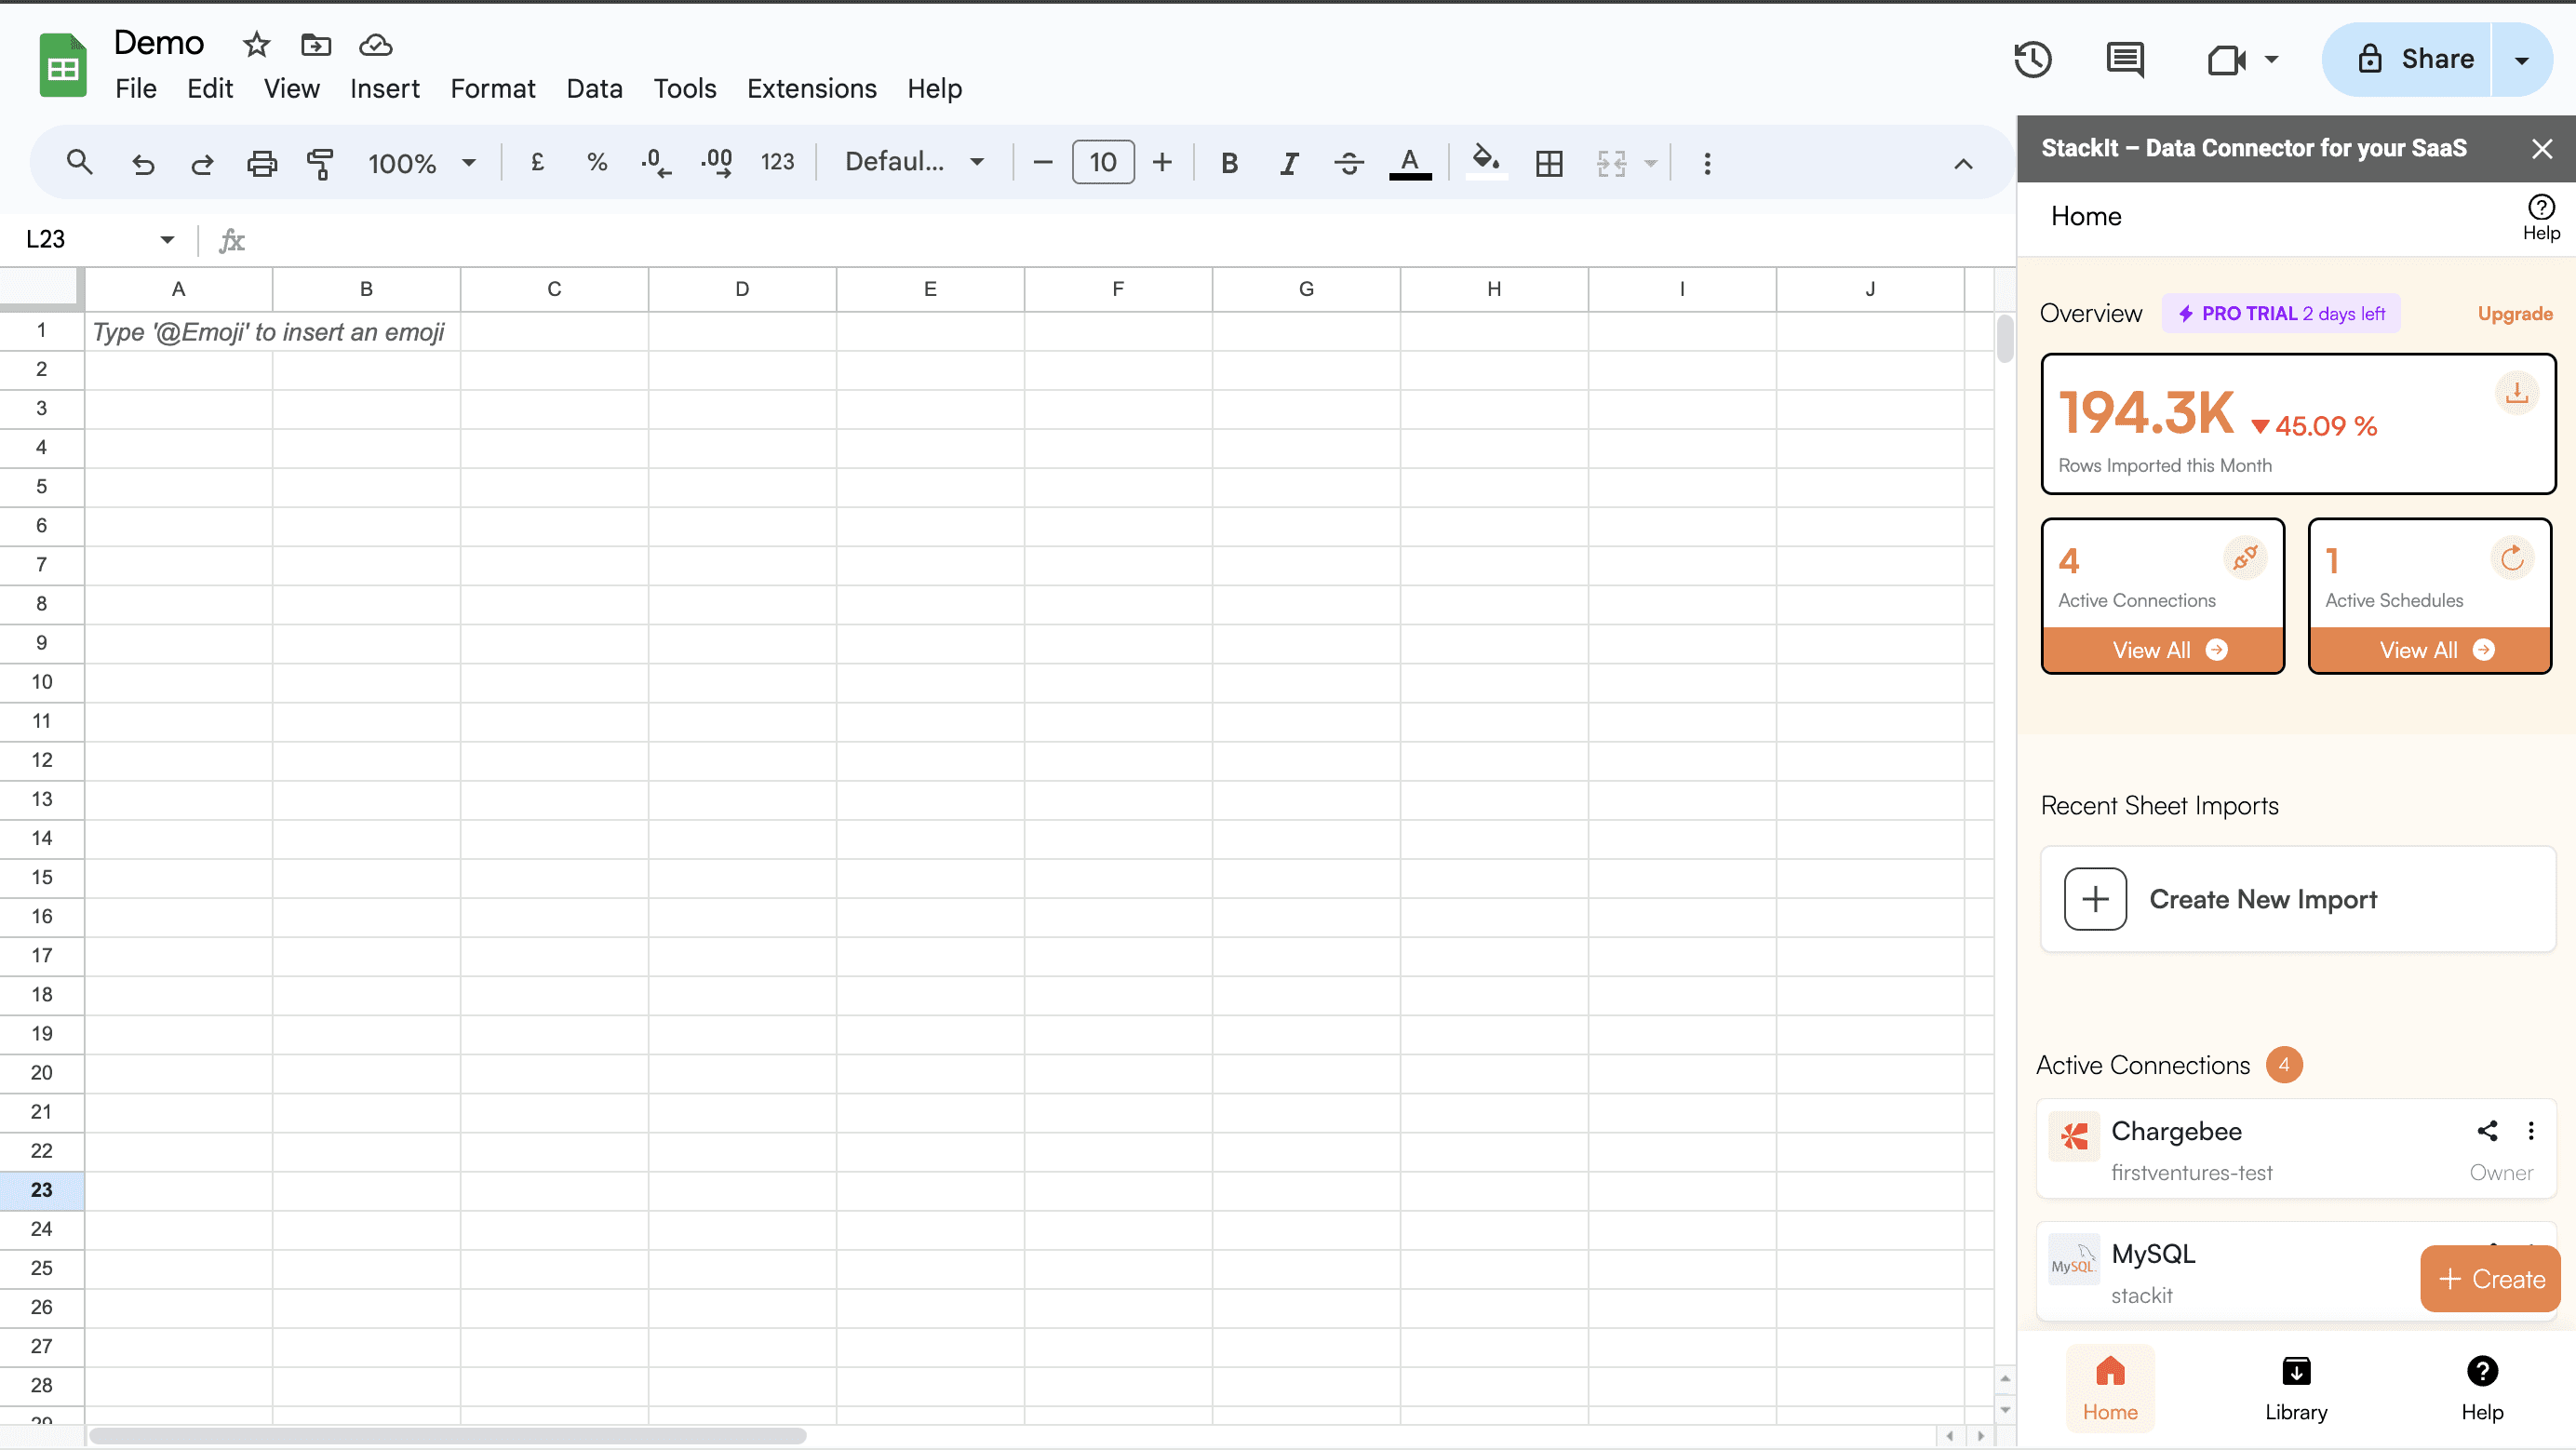
After installing StackIt, go back to Google Sheets.
Step 3: Once you are on Google Sheets, go to "Extensions", you will see StackIt there. Launch StackIt from there.
If StackIt is not visible, wait for 10 seconds for Google Sheets to load completely.
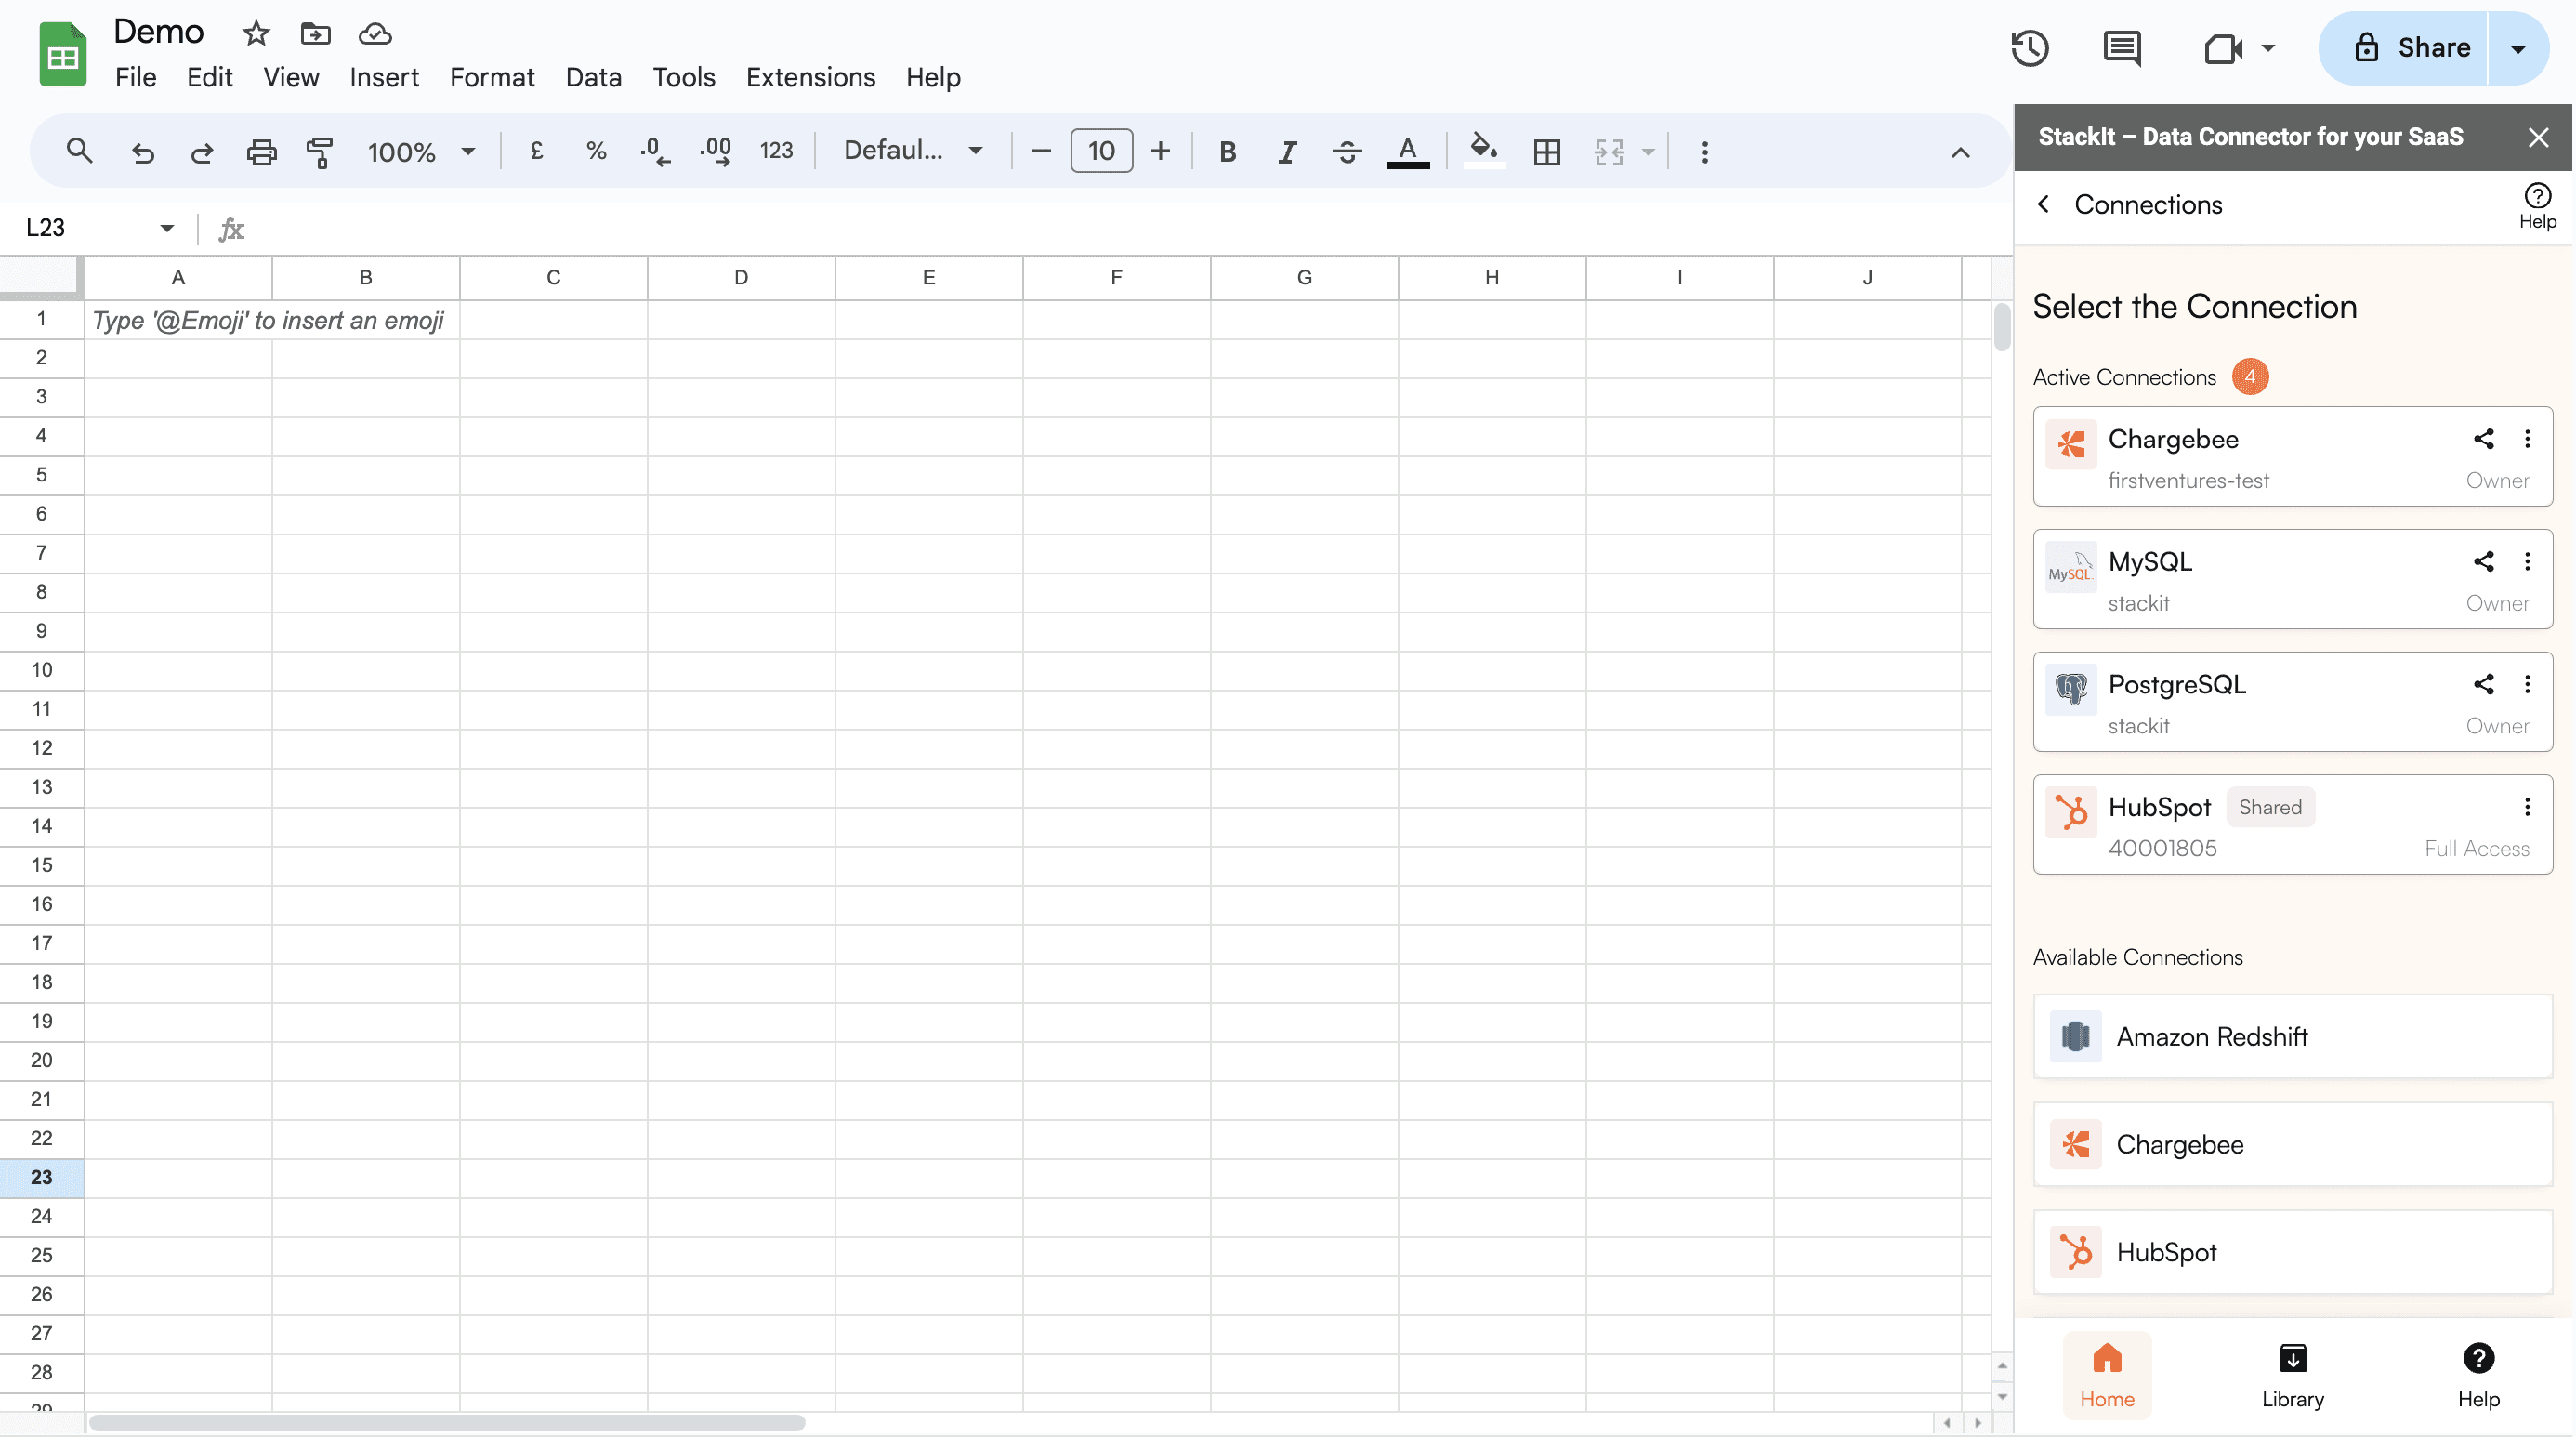
You should see StackIt running as a Google Sheets side panel on the right side of your screen. Click on "Connect your first source"

Step 4: Select Redshift from the list.
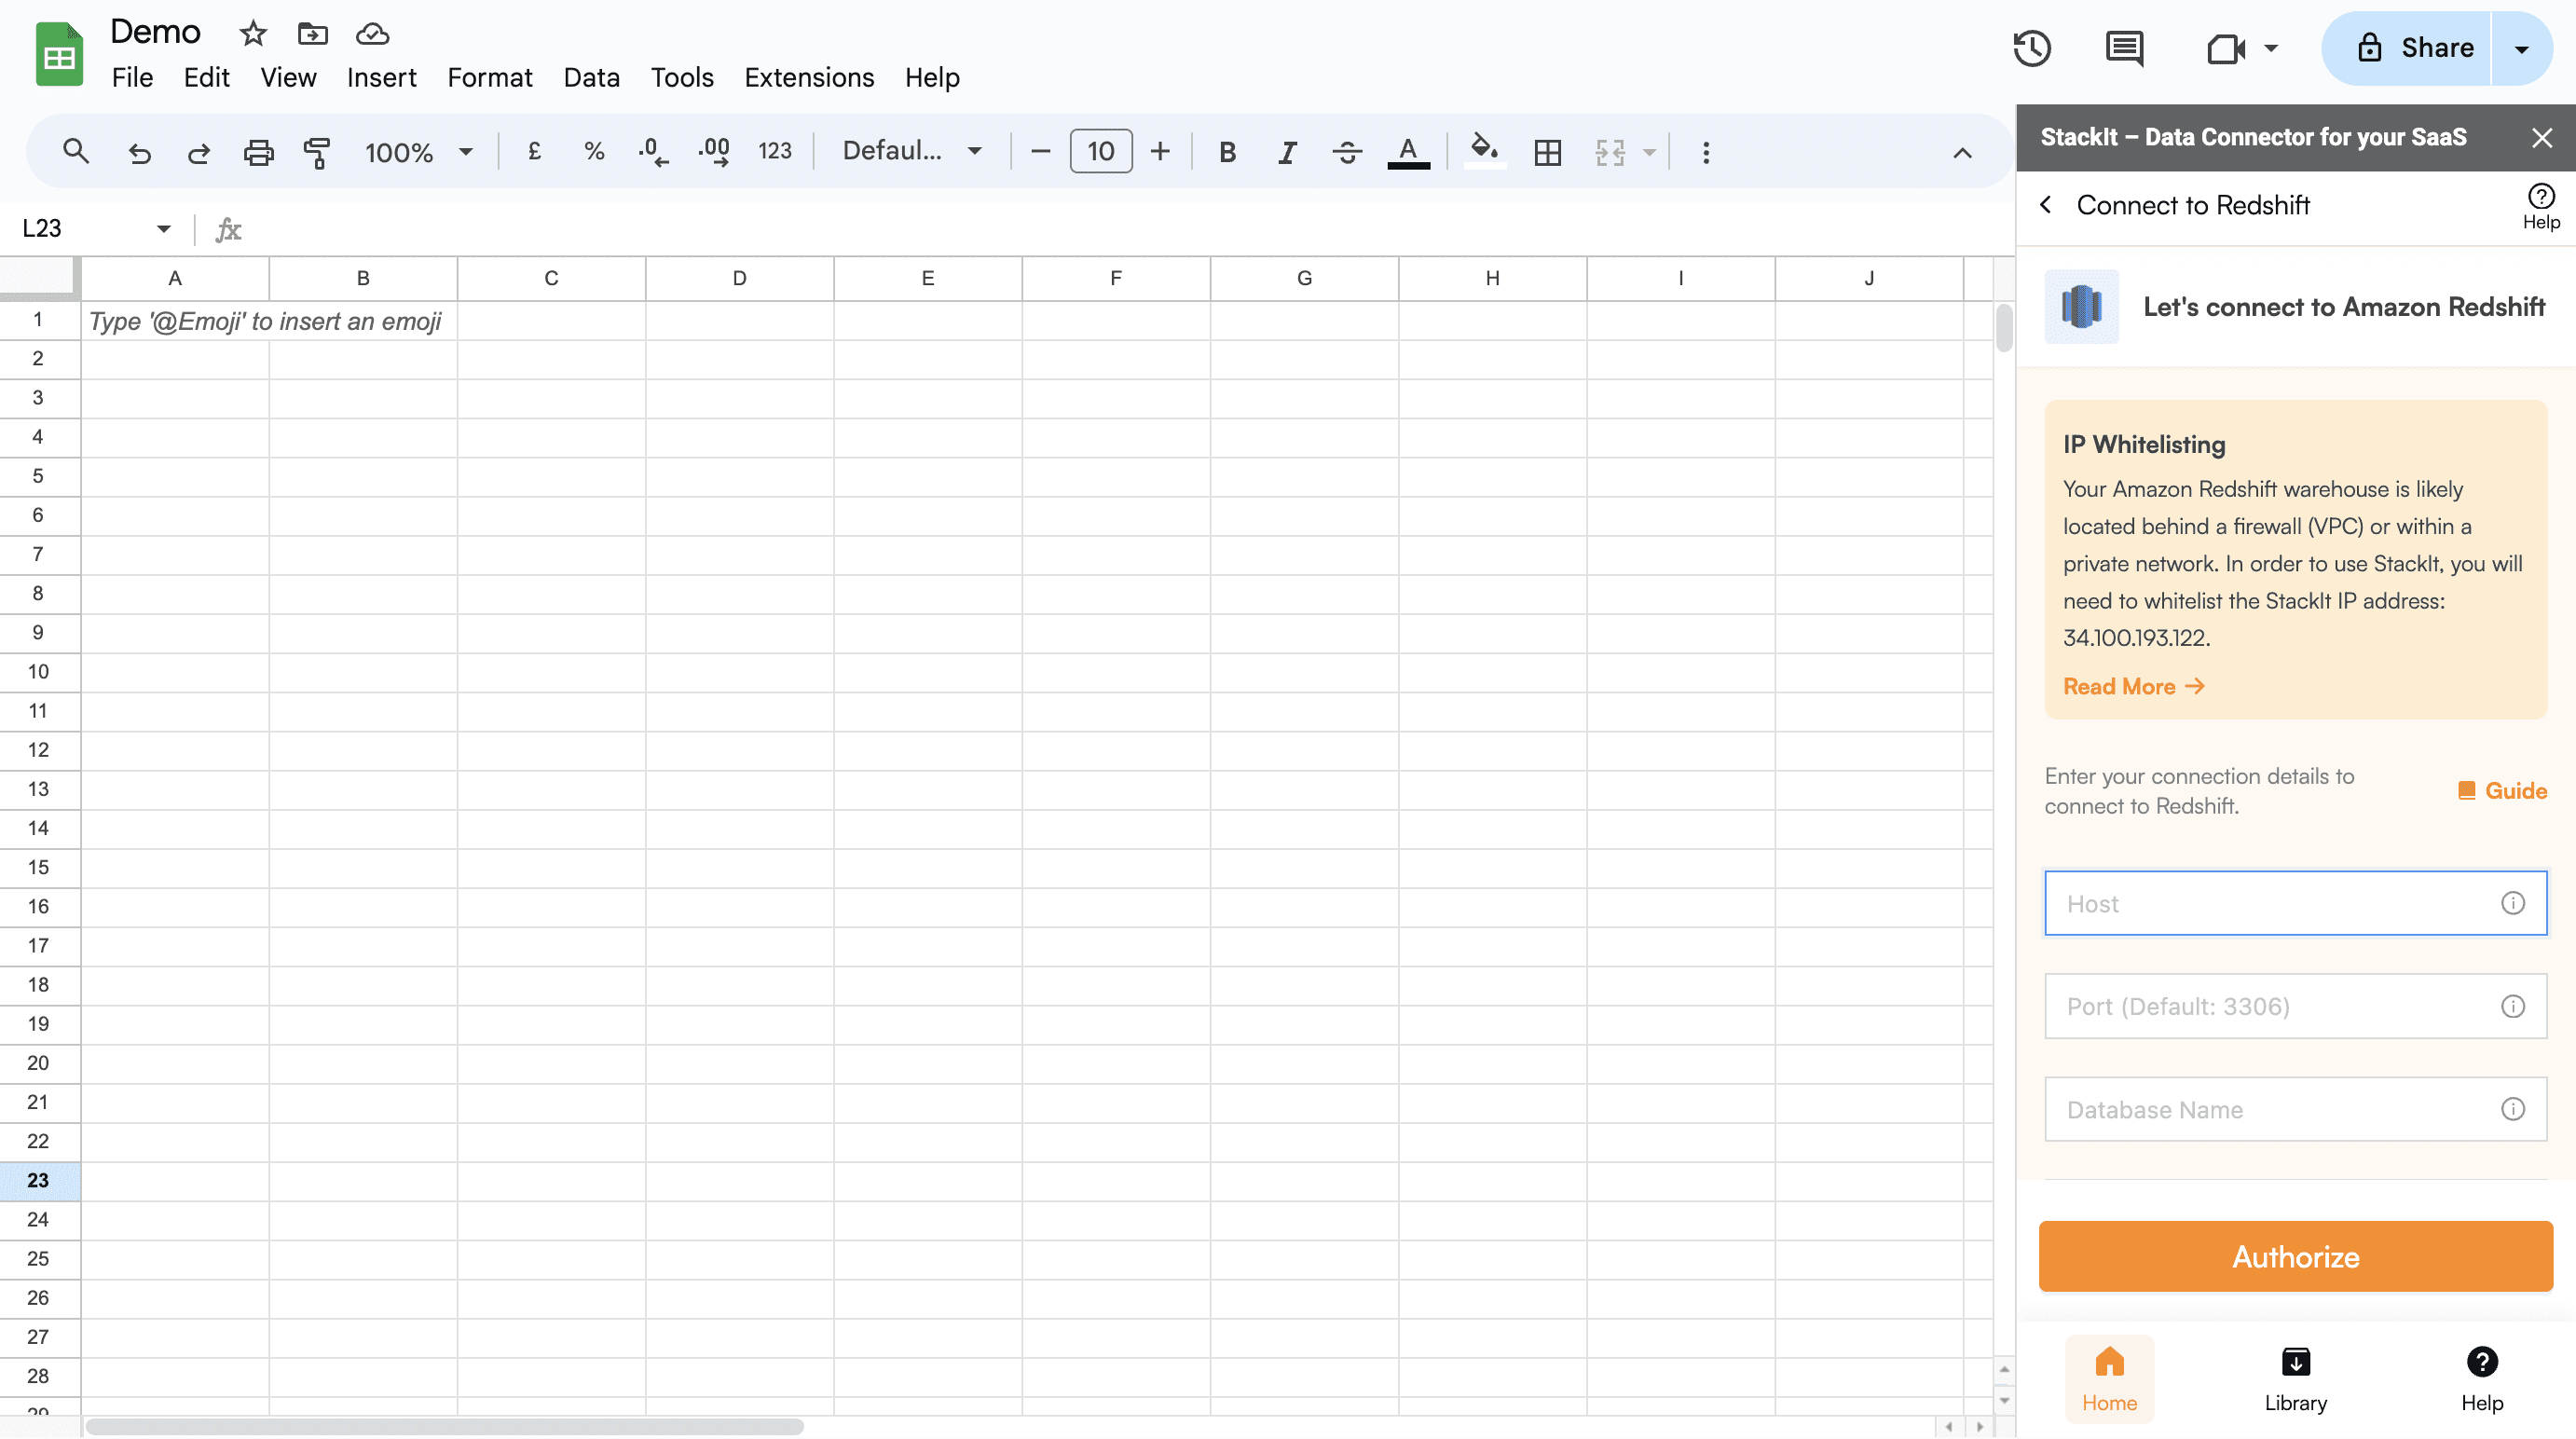
Step 5: Once you have selected Redshift, enter your host, database username, password, port, and IP address.
In some cases, you might have to whitelist our IP address. Talk to your system admin, DevOps, or engineering head to whitelist the IP and click on connect.
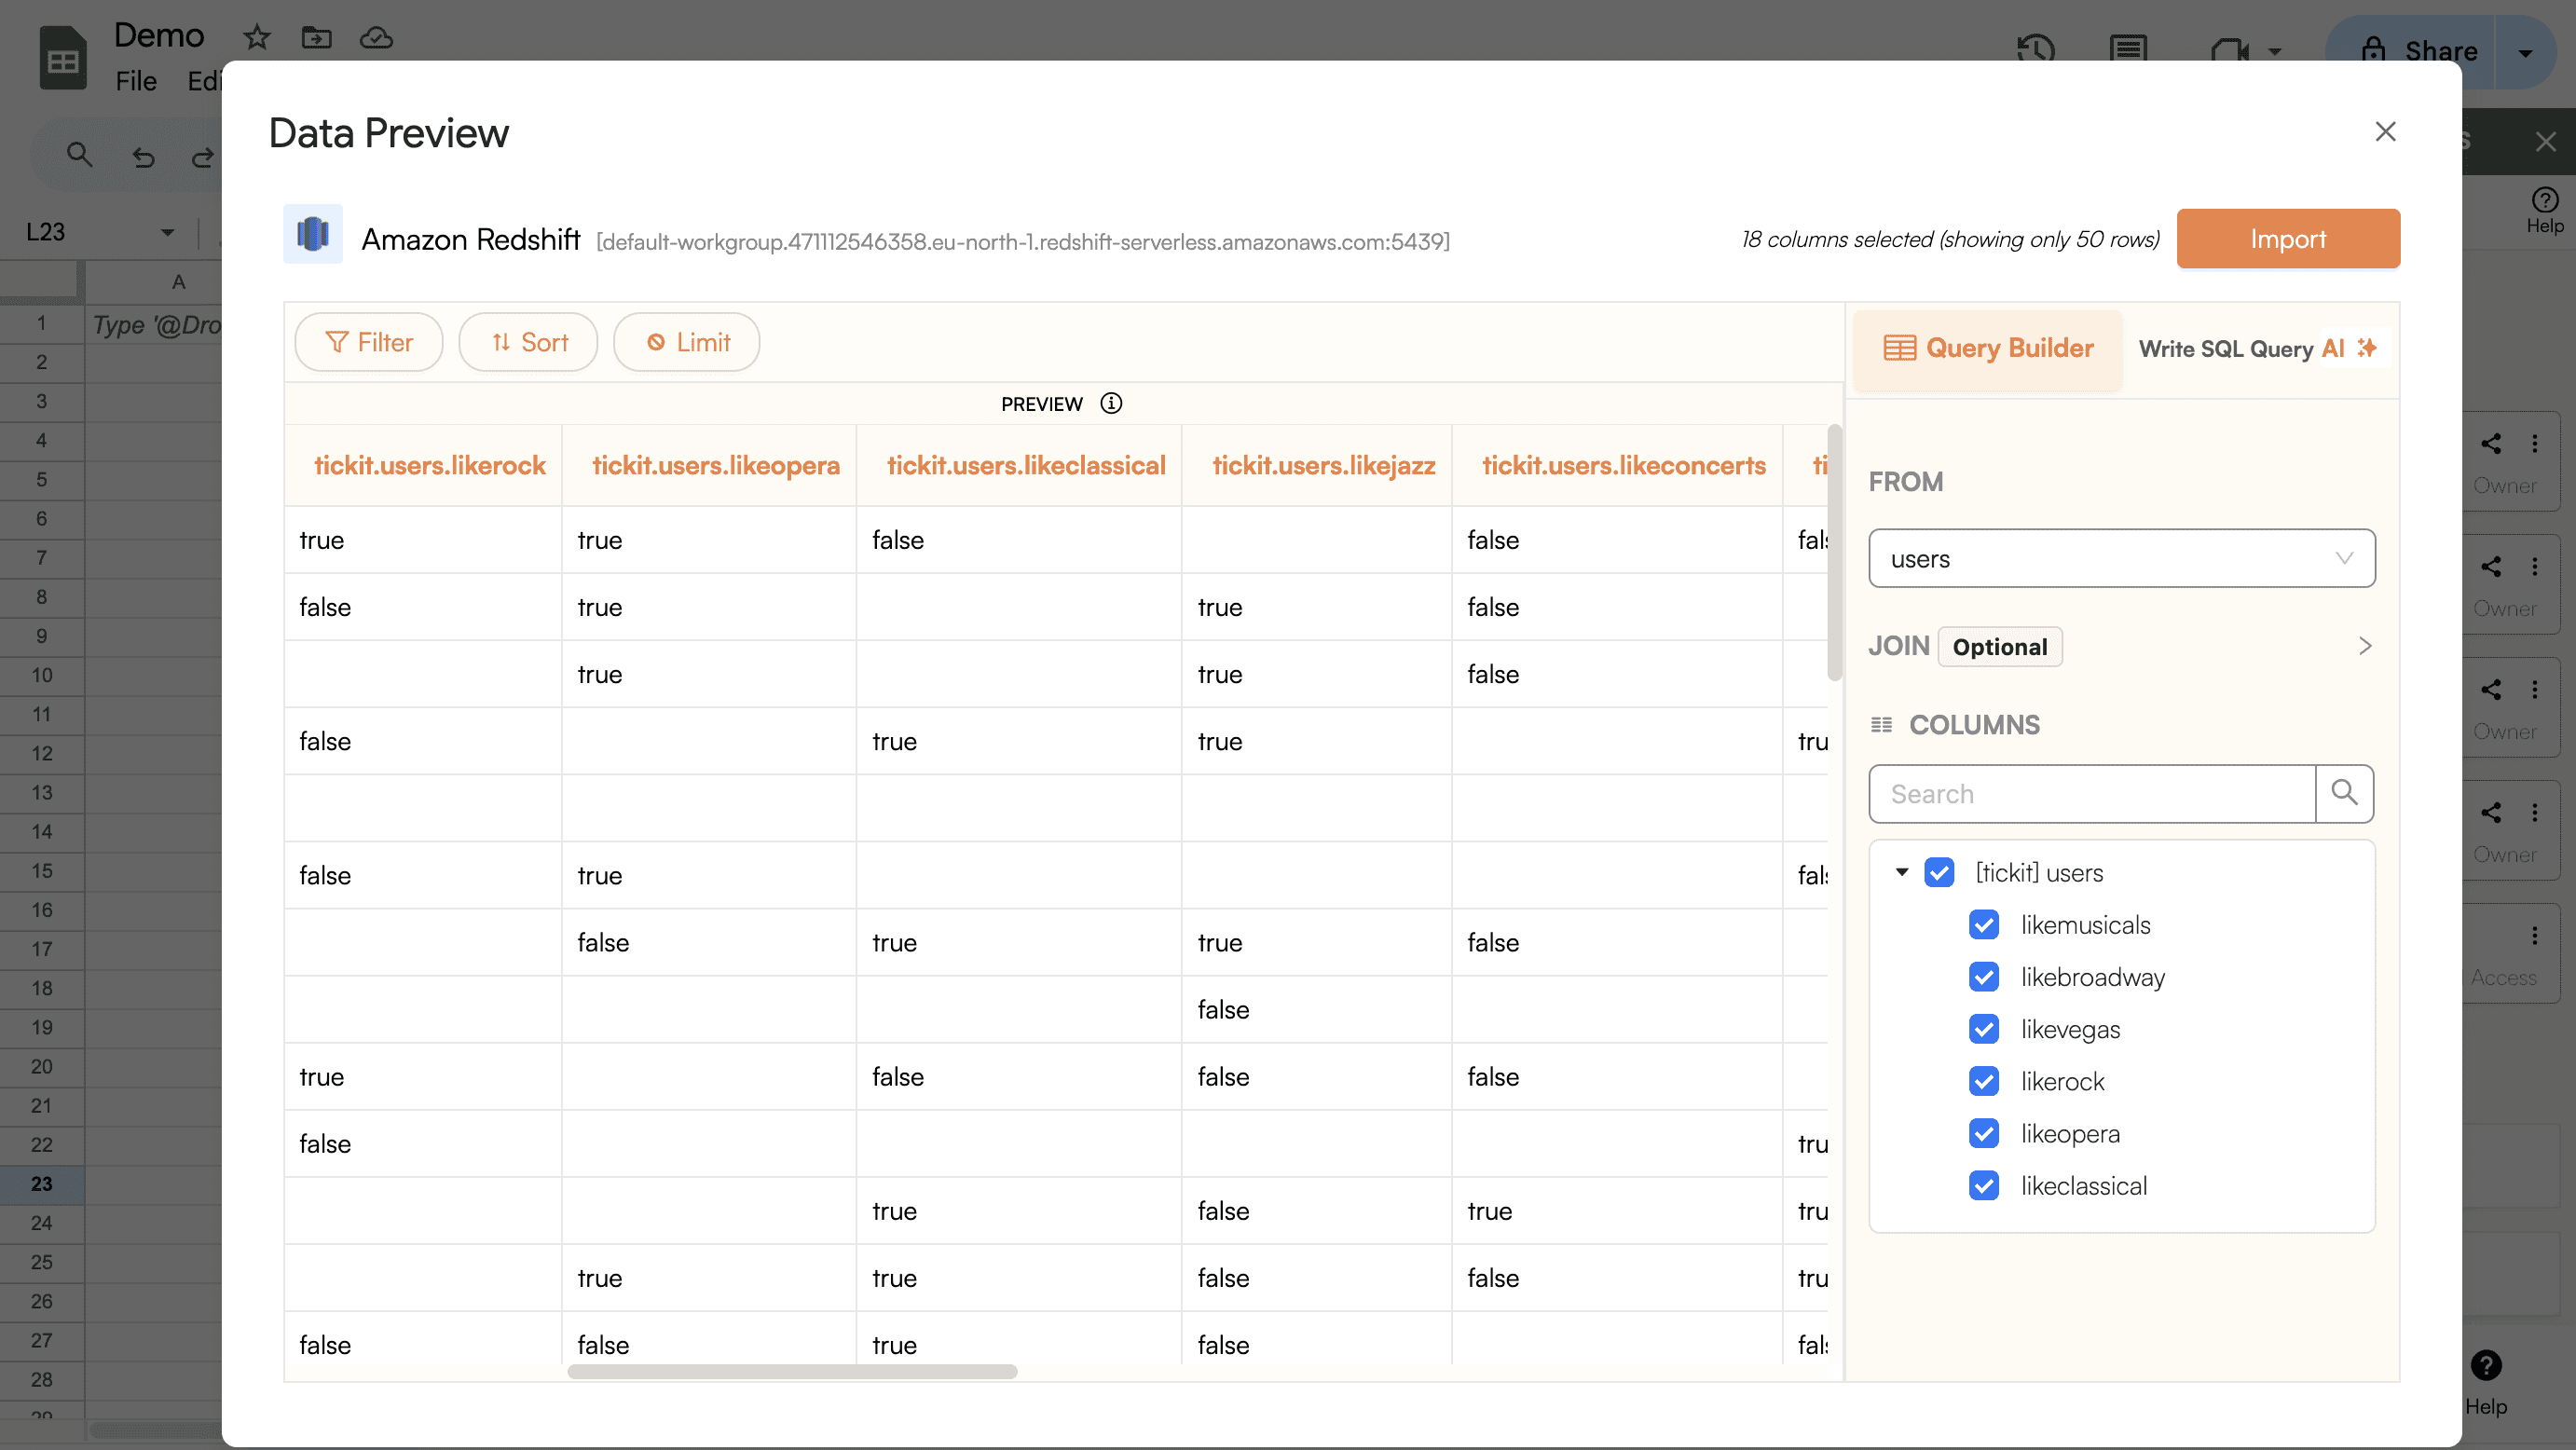
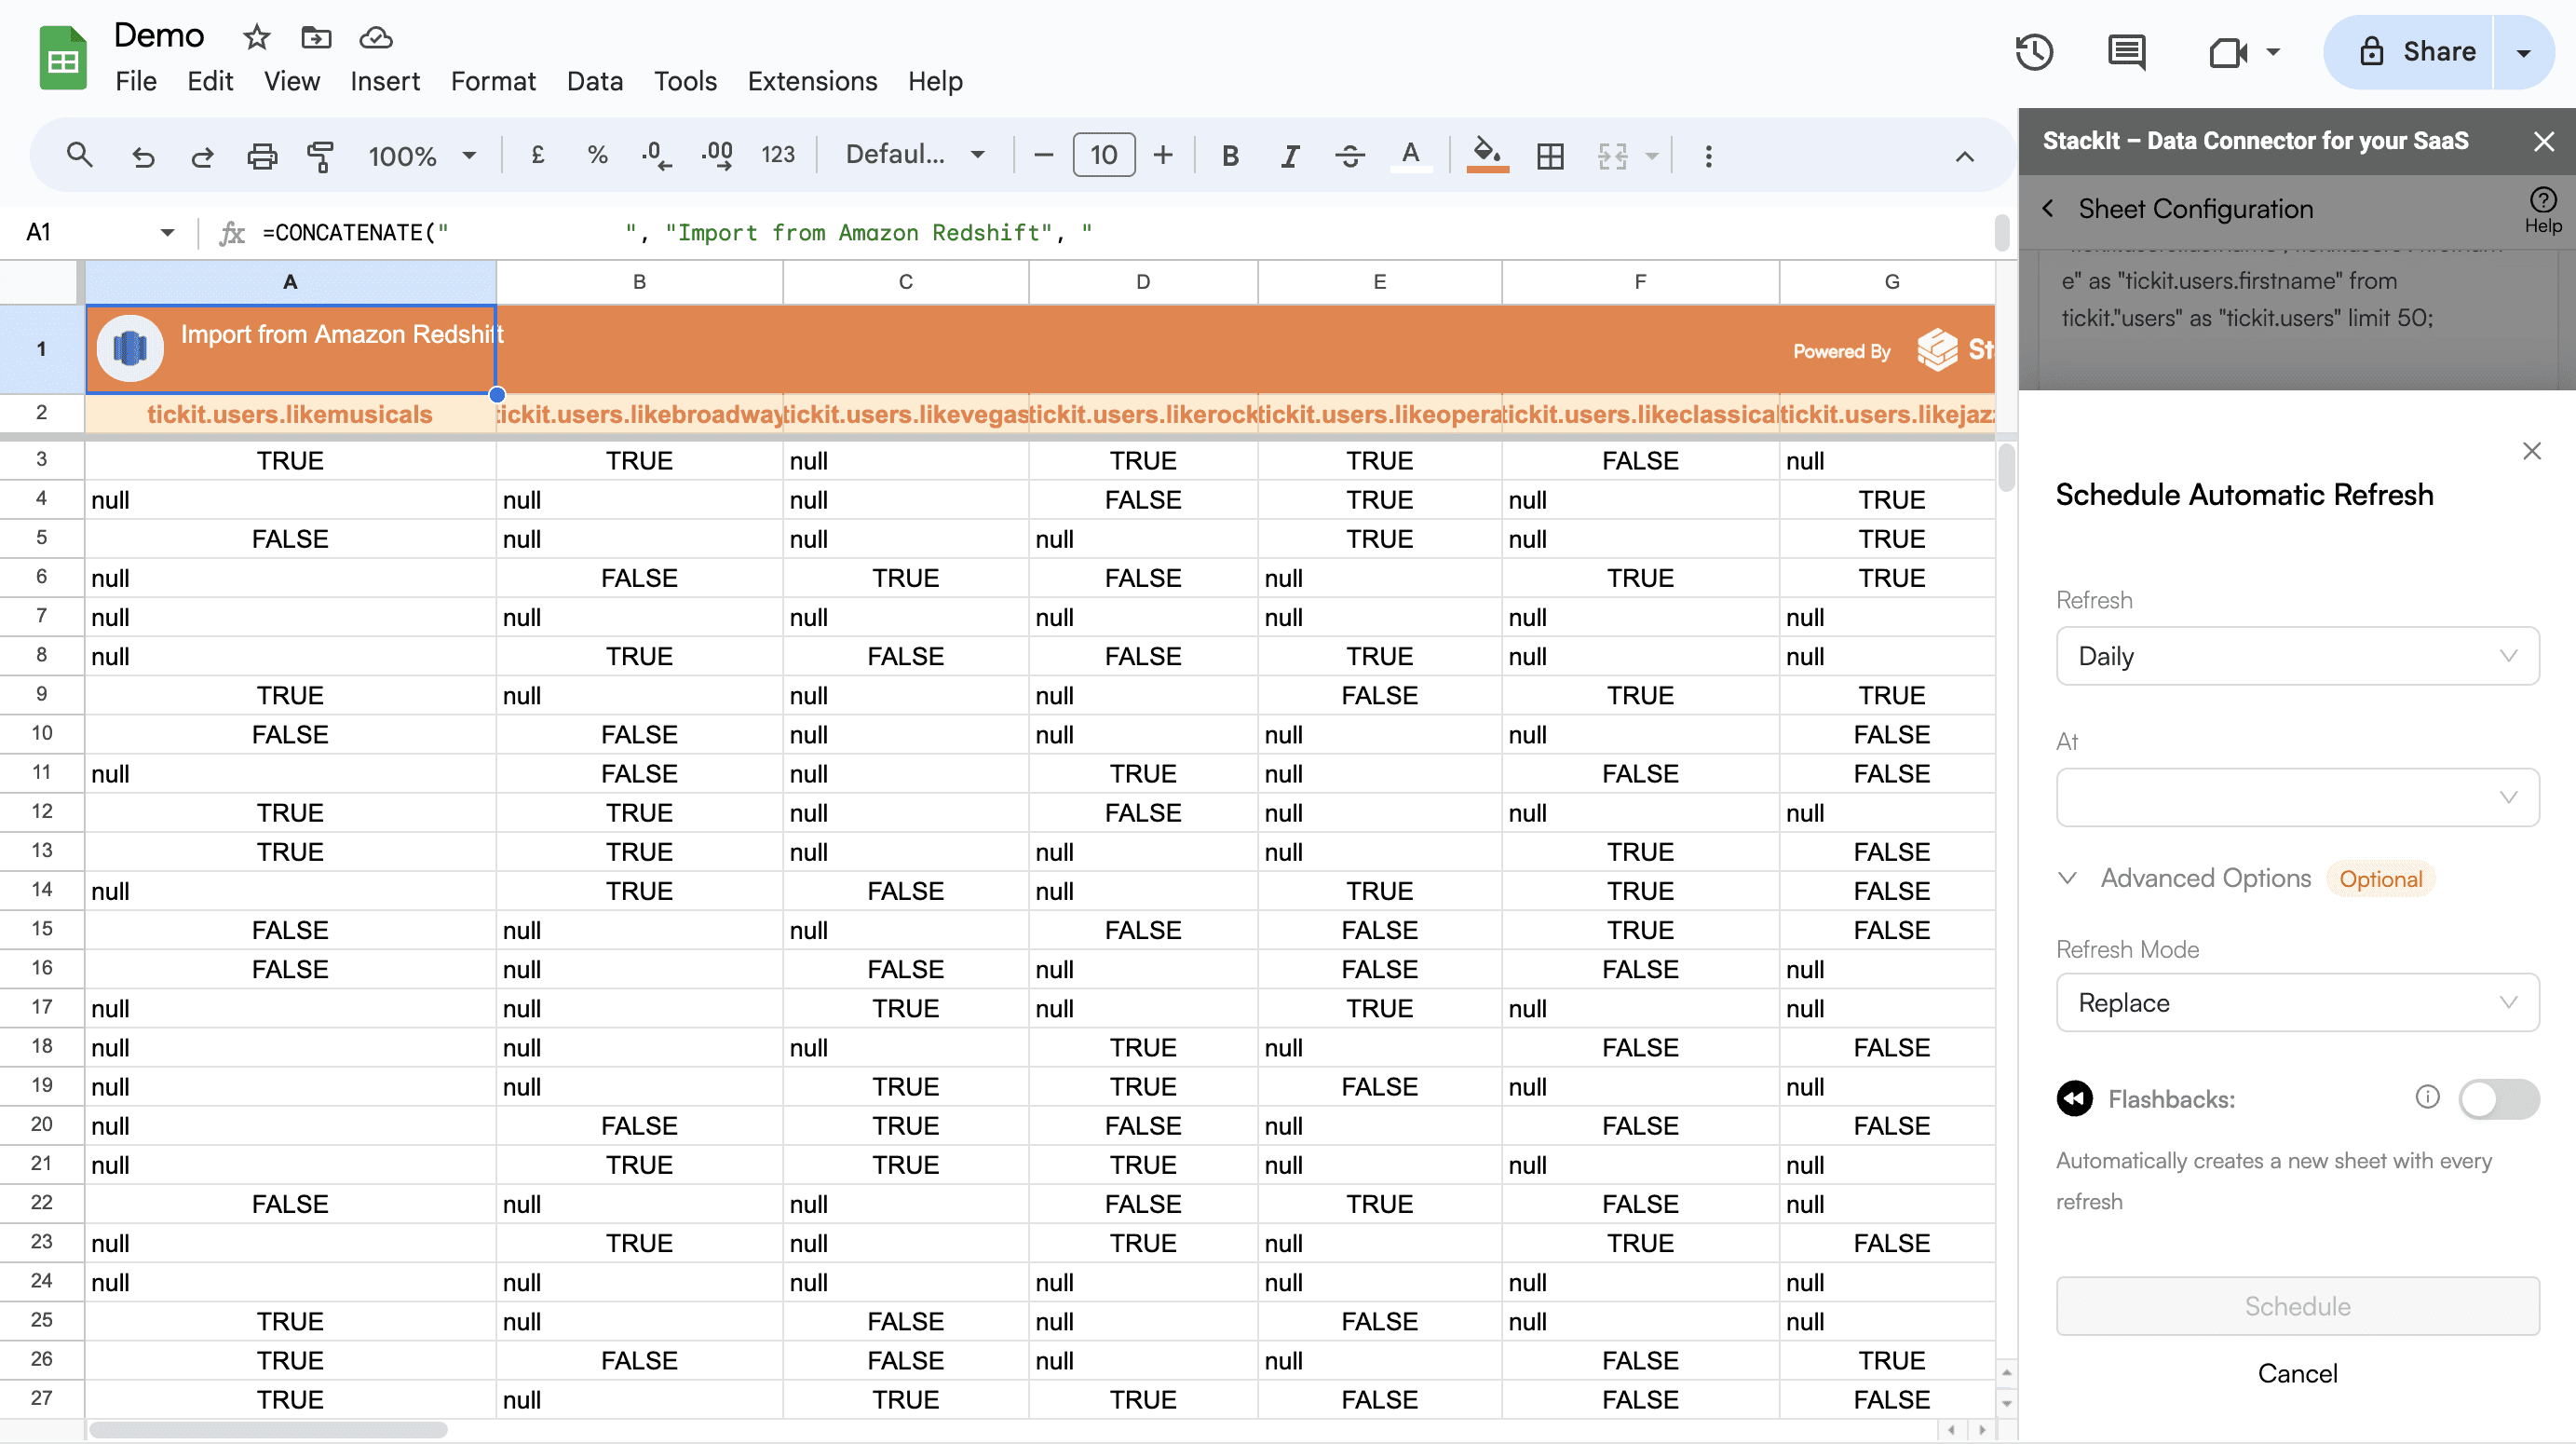
Step 6: Write a SQL query into the text box and click on “Import Data”.
Step 7: And that's it! You now have your Redshift data in Google Sheets. Without even writing a single line of code. Now let's set up refresh schedules.
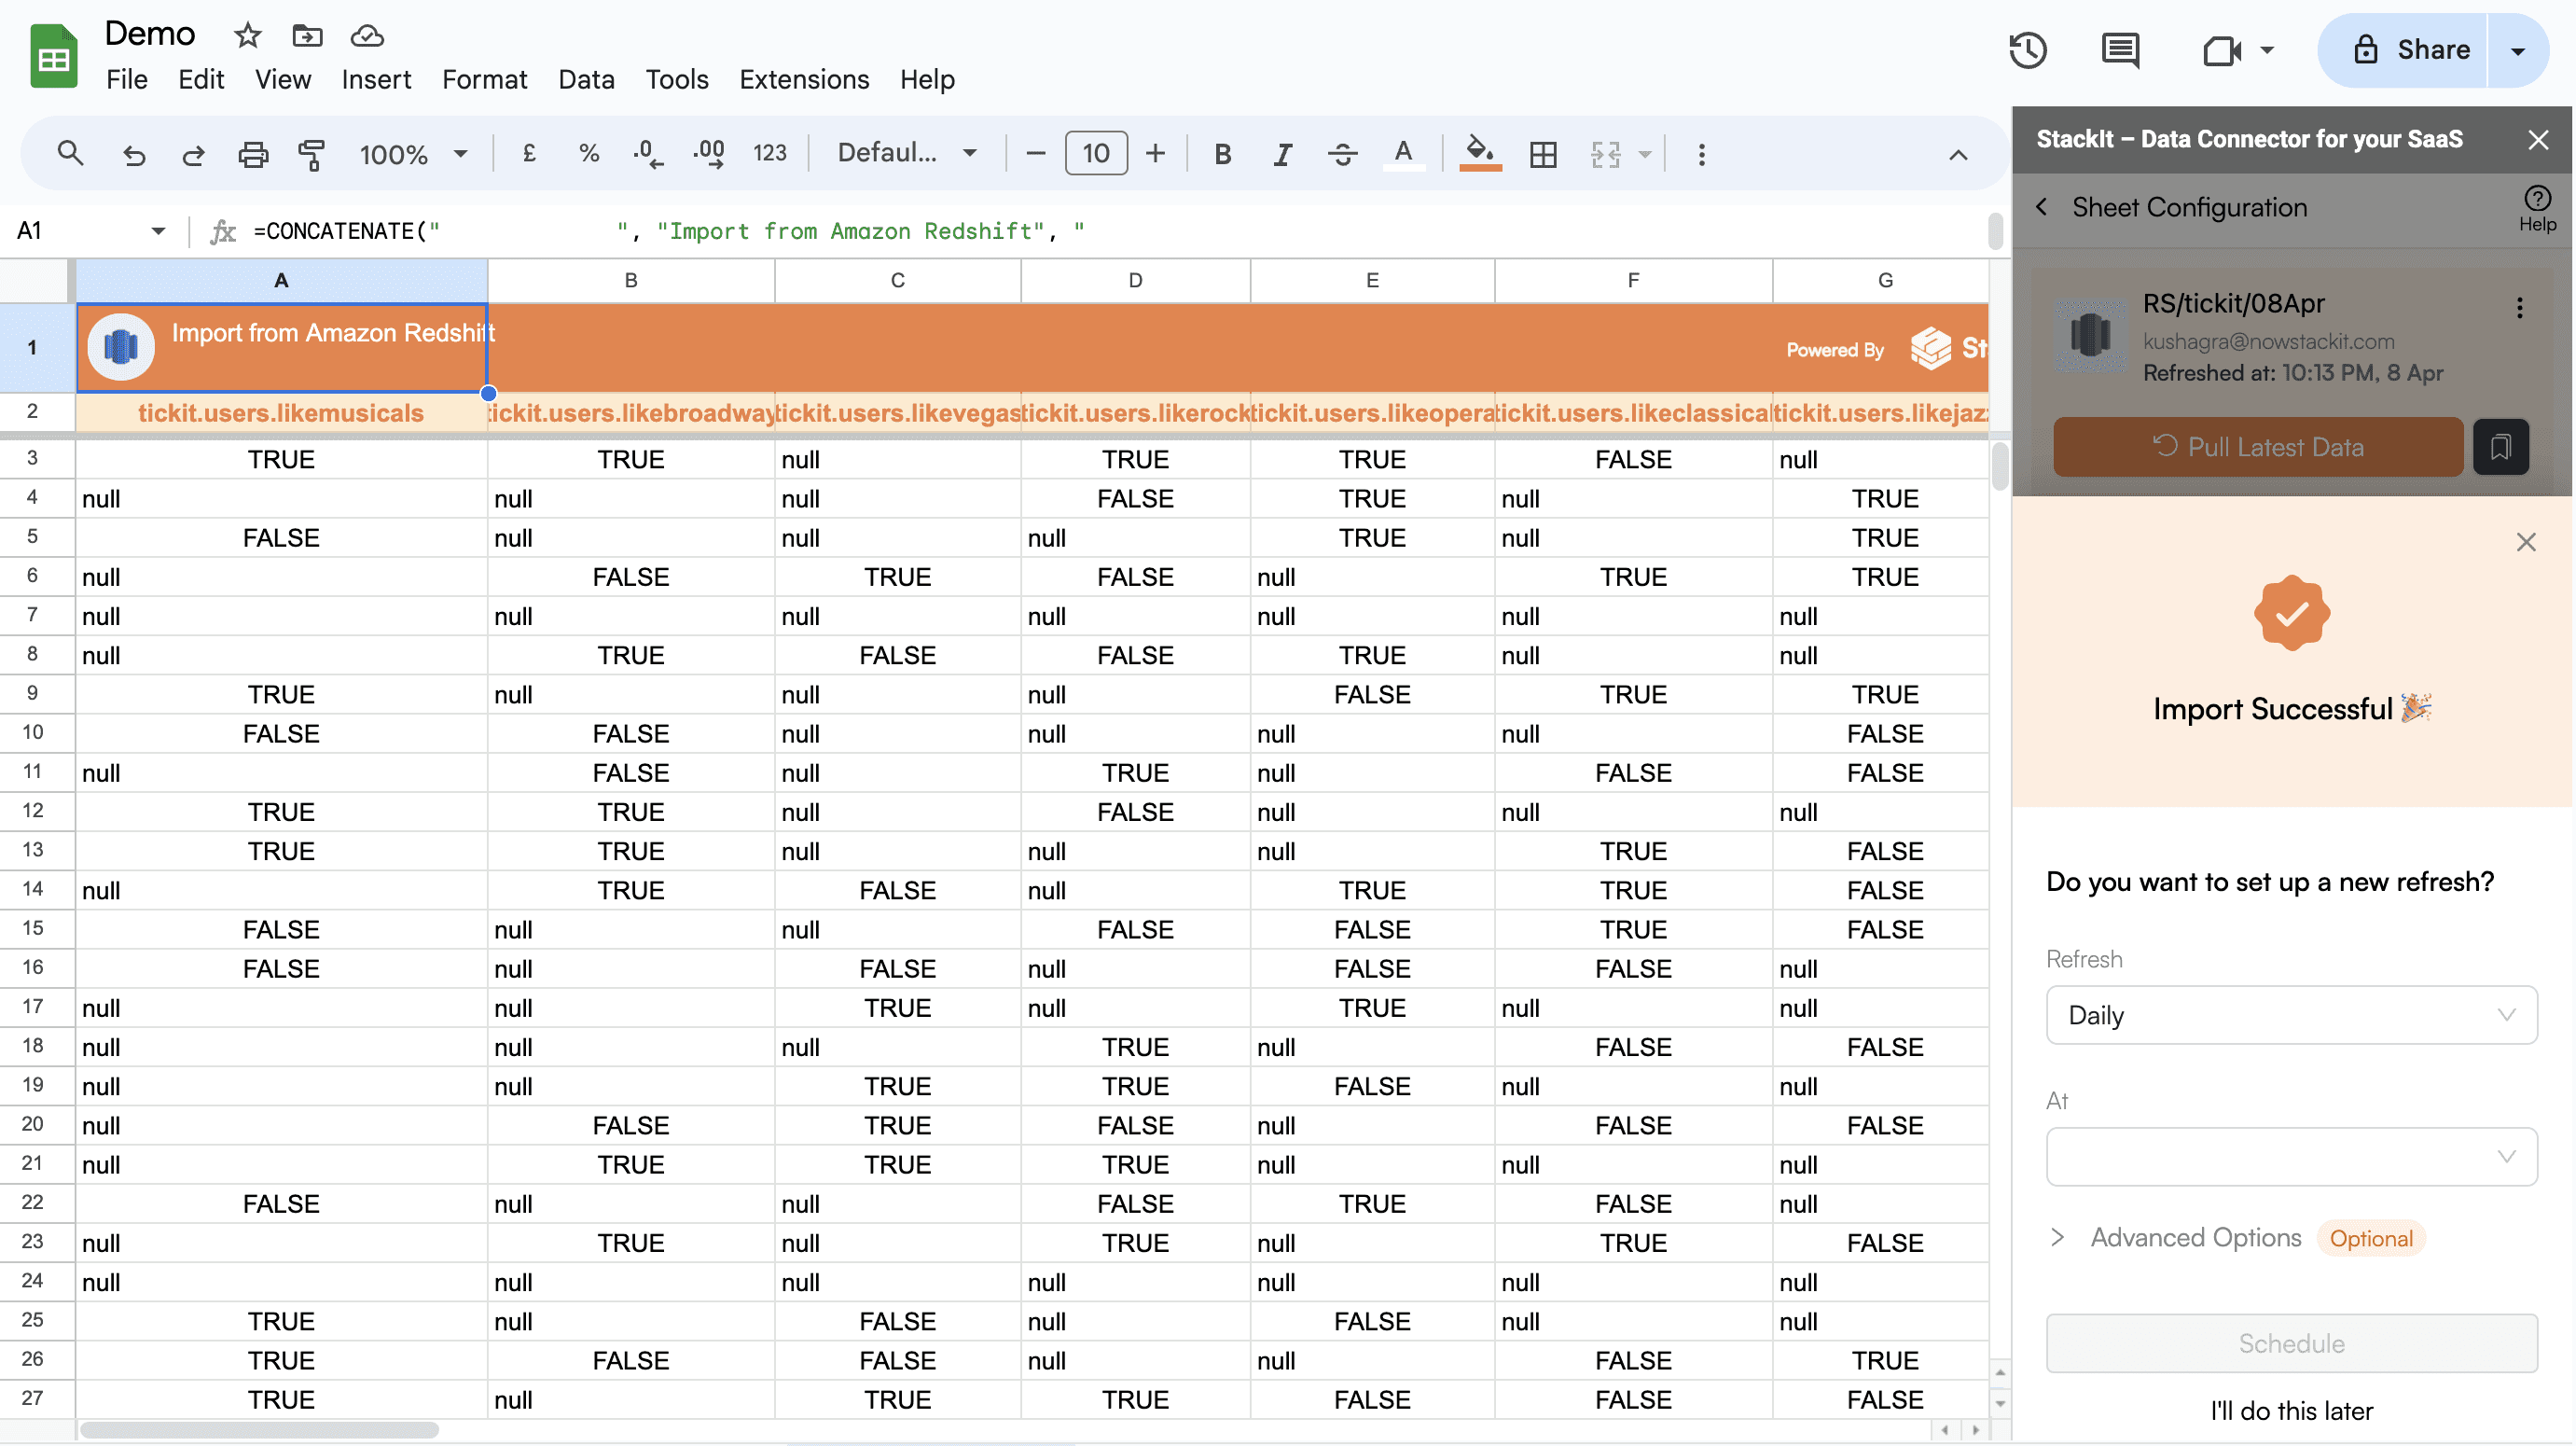
Step 8: StackIt lets you refresh your imported data instantly with one click or set it to auto-refresh on a pre-set schedule.
This way, you won’t need to manually update your Redshift data in Google Sheets to reflect changes from the source.
Voila, you've successfully imported your Redshift data to Google Sheets using StackIt! StackIt offers a more accessible, secure, and efficient solution for those looking to integrate Redshift with Google Sheets without having to delve into code. With StackIt, you can ensure that your data handling capabilities are both robust and user-friendly.
Using Apps Script
Google Apps Script, a cloud-based scripting language for lightweight application development in the G-Suite platform, can be a useful tool to connect Redshift to Google Sheets.
Before we begin, please make sure that your Redshift server is set to accept connections from your script's IP address. For Google Apps Script, Google does not provide specific IP addresses that you can whitelist, as they use a wide, dynamic range of IPs. You can adjust your database settings to allow all IP addresses, but this could make your database vulnerable.
Setting Up the Connection - In your Google Sheets, navigate to
Extensions > Apps Script. This will open a new tab where you can write your script. Here's a template for establishing the connection:
function connectToRedshift() {
  var conn = Jdbc.getConnection('jdbc:redshift://<Your-Redshift-Endpoint>:5439/<database>', '<username>', '<password>');
  return conn;
}
Replace <Your-Redshift-Endpoint>, <database>, <username>, and <password> with your Redshift details.
Writing and Executing the Query - Now that the connection is established, let's write a SQL query to fetch data.
function fetchDataFromRedshift() {
  var conn = connectToRedshift();
  var stmt = conn.createStatement();
  var results = stmt.executeQuery('SELECT * FROM <Your-Table-Name>');
  return results;
}
Replace <Your-Table-Name> with the name of your table in Redshift.
Transferring Data to Google Sheets - Finally, write the data to Google Sheets.
function writeDataToSheet() {
  var sheet = SpreadsheetApp.getActiveSpreadsheet().getActiveSheet();
  var results = fetchDataFromRedshift();
  var resultSetMetaData = results.getMetaData();
  var numCols = resultSetMetaData.getColumnCount();
  var spreadsheetData = [];

  // Get column names
  var columnNames = [];
  for (var col = 0; col < numCols; col++) {
    columnNames.push(resultSetMetaData.getColumnName(col + 1));
  }
  spreadsheetData.push(columnNames);

  // Get row data
  while (results.next()) {
    var rowData = [];
    for (var col = 0; col < numCols; col++) {
      rowData.push(results.getString(col + 1));
    }
    spreadsheetData.push(rowData);
  }

  // Write data to the active sheet
  sheet.getRange(1, 1, spreadsheetData.length, numCols).setValues(spreadsheetData);
}
Note: This is a basic example and might need adjustments based on your specific needs. Ensure that your Redshift server is set to accept connections from your script's IP address. Google Apps Script uses a wide range of dynamic IPs, so you might need to adjust your database settings accordingly. Also, remember to enable the JDBC service in your Google Apps Script project.
Why Choose StackIt for Redshift to Google Sheets Connection?
In light of the limitations of Google Apps Script, StackIt emerges as a formidable alternative that overcomes many of these restrictions:
User-Friendly for Non-Technical Teams: While Google Apps Script requires a certain level of coding knowledge, StackIt is designed for no-code users, making it accessible for teams like sales, marketing, revenue ops, and finance.
Time Efficiency: StackIt allows for quick data import without a maximum execution time, making it perfect for handling large data sets.
Secure Connection: StackIt provides a secure connection to your Redshift database, eliminating potential security risks.
Rich Functionality: StackIt enables you to perform complex operations like writing SQL queries directly from Google Sheets, without needing to know how to code.
Automatic Updates: With StackIt, your data will automatically refresh, keeping your sheets always up-to-date.
Using Zapier
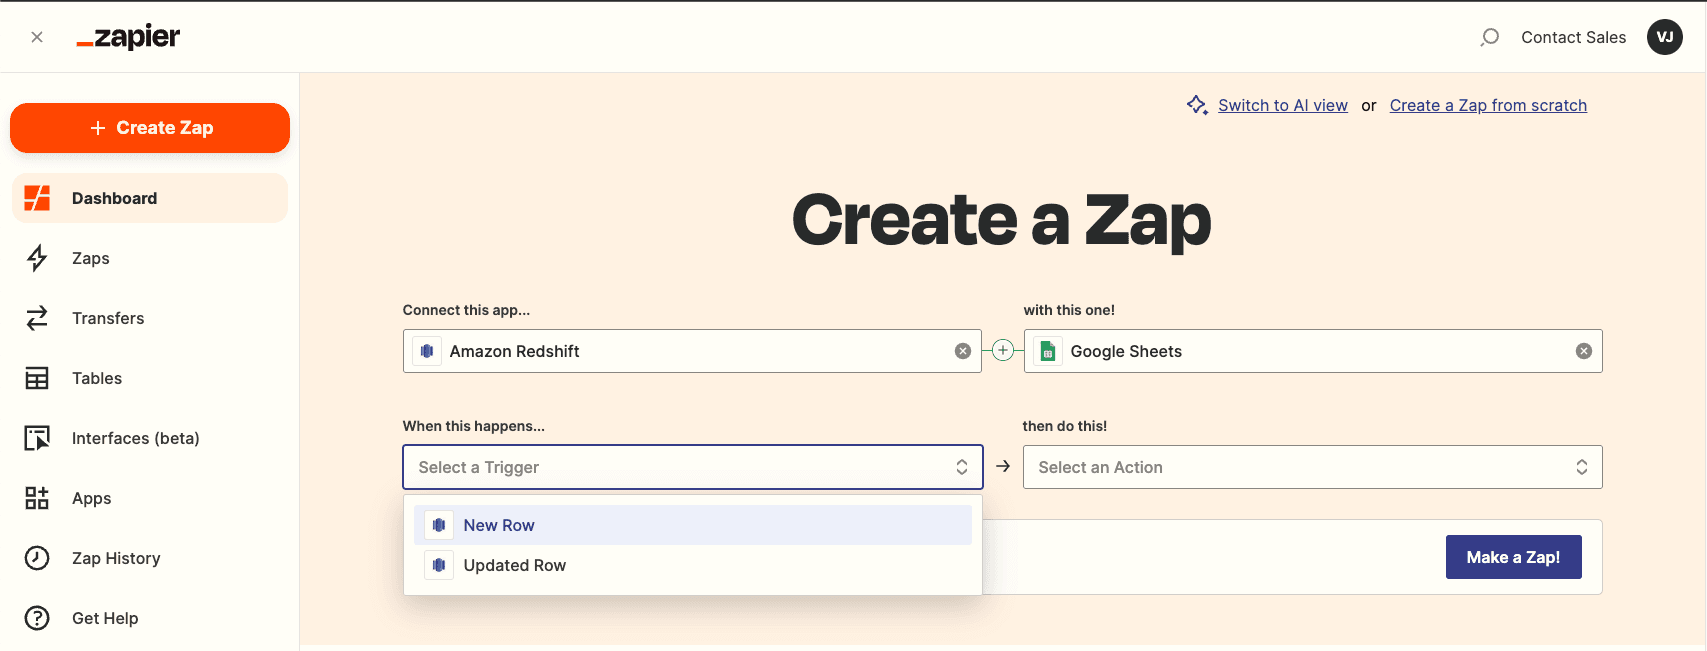
Zapier can establish connections between Redshift and Google Sheets through automated, no-code workflows, known as Zaps.
For instance, a Zap can
Reflect changes in your database when alterations are made to Google Sheets cells
Introduce a new row in Google Sheets from Redshift
Update Google Sheets information based on changes in Redshift
Creating a Zap involves determining triggers and actions that automate repetitive tasks. Triggers initiate your Zaps, and actions are the tasks undertaken by the Zaps. Here are the fundamental steps to set up a Zap:
Authenticate Your Accounts: Sign in to Zapier and authenticate your Redshift and Google Sheets accounts.
Set Triggers and Actions: Decide what will initiate your Zap (the trigger) and what action will follow. For instance, a new row in Redshift could trigger the addition of a new row in Google Sheets.
Configure Your Zap: Choose the specific data from Redshift you wish to send to Google Sheets and map the fields accordingly.
Test Your Zap: Run a test to ensure that data flows correctly from Redshift to Google Sheets.
Activate Your Zap: Once you're satisfied with the setup, turn on your Zap. It will now automatically run the action whenever the trigger event occurs.
Drawbacks of Zapier
Complex setup and maintenance: Zapier requires users to build personalized workflows, known as “Zaps”. Users are responsible for creating and adjusting these Zaps independently, often needing a bit of SQL or API knowledge to create and configure specific automated workflows. As a result, none of Zapier’s integrations come pre-built.
Cost implications: The creation and management of Zap workflows can quickly escalate in costs. Having multiple integrations can result in a compounding of expenses. The more data involved, the more Zapier tends to cost.
User experience: Zapier operates outside of Google Sheets, causing a more fragmented user experience. On the other hand, StackIt allows users to stay within Google Sheets, resulting in a more efficient workflow.
In conclusion, while Google Apps Script might work for those comfortable with scripting, StackIt offers a more accessible, secure, and efficient solution for those looking to integrate Redshift with Google Sheets without having to delve into code. The creation and management of Zap workflows can quickly escalate costs. With StackIt, you can ensure that your data handling capabilities are both robust and user-friendly.
How to Connect Redshift to Google Sheets?
Connecting your Redshift to Google Sheets used to be a challenging task for non-technical teams such as sales, marketing, revenue ops, and finance. These teams often had to rely on analysts or developers to export Redshift data to a Google Spreadsheet, which could take multiple reminders and emails. Even when they received the data on time, these teams would have to spend hours cleaning it.
Best Ways to Connect Redshift to Google Sheets
Using StackIt - One-click solution to connect Redshift to Google Sheets.
Using Google Apps Script – Requires coding knowledge and a more complex setup.
Using Zapier - Can be costly and requires more setup and maintenance.
Using StackIt
While you can use the likes of Zapier and Google Apps script which requires some technical know-how, high setup cost, or even developer/data team’s assistance, StackIt provides the fastest and easiest way to connect PostgreSQL to Google Sheets without any help.
Why Export Data from Redshift to Google Sheets Using StackIt?
StackIt offers an easy way to establish a Redshift connection directly from Google Sheets. This means you can effortlessly import data into Google Sheets without having to manually export and import CSV files, turning it into a seamless Google Sheets Redshift integration. With StackIt, you can:
Effortlessly connect Redshift to Google Sheets.
Regularly refresh data to keep your Google Sheets up to date.
Write SQL queries to get the precise data you need.
A seamless Google Sheets Redshift integration without manual exports.
Furthermore, if you are looking for a Redshift to Google Sheets connector, StackIt is a great choice. So, why wait? Start your Google Sheets journey and get data from Redshift today with StackIt.
Step-by-Step Walkthrough: How to Connect Redshift to Google Sheets
Step 1: Click Extensions from the Google Sheets menu. Select Add-ons and choose to Get Add-ons. This will bring you to the Google Workspace Marketplace.
Step 2: Look for StackIt in the Google Marketplace pop-up window and install the app by following the prompts.
After installing StackIt, go back to Google Sheets.
Step 3: Once you are on Google Sheets, go to "Extensions", you will see StackIt there. Launch StackIt from there.
If StackIt is not visible, wait for 10 seconds for Google Sheets to load completely.
You should see StackIt running as a Google Sheets side panel on the right side of your screen. Click on "Connect your first source"
Step 4: Select Redshift from the list.
Step 5: Once you have selected Redshift, enter your host, database username, password, port, and IP address.
In some cases, you might have to whitelist our IP address. Talk to your system admin, DevOps, or engineering head to whitelist the IP and click on connect.
Step 6: Write a SQL query into the text box and click on “Import Data”.
Step 7: And that's it! You now have your Redshift data in Google Sheets. Without even writing a single line of code. Now let's set up refresh schedules.
Step 8: StackIt lets you refresh your imported data instantly with one click or set it to auto-refresh on a pre-set schedule.
This way, you won’t need to manually update your Redshift data in Google Sheets to reflect changes from the source.
Voila, you've successfully imported your Redshift data to Google Sheets using StackIt! StackIt offers a more accessible, secure, and efficient solution for those looking to integrate Redshift with Google Sheets without having to delve into code. With StackIt, you can ensure that your data handling capabilities are both robust and user-friendly.
Using Apps Script
Google Apps Script, a cloud-based scripting language for lightweight application development in the G-Suite platform, can be a useful tool to connect Redshift to Google Sheets.
Before we begin, please make sure that your Redshift server is set to accept connections from your script's IP address. For Google Apps Script, Google does not provide specific IP addresses that you can whitelist, as they use a wide, dynamic range of IPs. You can adjust your database settings to allow all IP addresses, but this could make your database vulnerable.
Setting Up the Connection - In your Google Sheets, navigate to
Extensions > Apps Script. This will open a new tab where you can write your script. Here's a template for establishing the connection:
function connectToRedshift() {
  var conn = Jdbc.getConnection('jdbc:redshift://<Your-Redshift-Endpoint>:5439/<database>', '<username>', '<password>');
  return conn;
}
Replace <Your-Redshift-Endpoint>, <database>, <username>, and <password> with your Redshift details.
Writing and Executing the Query - Now that the connection is established, let's write a SQL query to fetch data.
function fetchDataFromRedshift() {
  var conn = connectToRedshift();
  var stmt = conn.createStatement();
  var results = stmt.executeQuery('SELECT * FROM <Your-Table-Name>');
  return results;
}
Replace <Your-Table-Name> with the name of your table in Redshift.
Transferring Data to Google Sheets - Finally, write the data to Google Sheets.
function writeDataToSheet() {
  var sheet = SpreadsheetApp.getActiveSpreadsheet().getActiveSheet();
  var results = fetchDataFromRedshift();
  var resultSetMetaData = results.getMetaData();
  var numCols = resultSetMetaData.getColumnCount();
  var spreadsheetData = [];

  // Get column names
  var columnNames = [];
  for (var col = 0; col < numCols; col++) {
    columnNames.push(resultSetMetaData.getColumnName(col + 1));
  }
  spreadsheetData.push(columnNames);

  // Get row data
  while (results.next()) {
    var rowData = [];
    for (var col = 0; col < numCols; col++) {
      rowData.push(results.getString(col + 1));
    }
    spreadsheetData.push(rowData);
  }

  // Write data to the active sheet
  sheet.getRange(1, 1, spreadsheetData.length, numCols).setValues(spreadsheetData);
}
Note: This is a basic example and might need adjustments based on your specific needs. Ensure that your Redshift server is set to accept connections from your script's IP address. Google Apps Script uses a wide range of dynamic IPs, so you might need to adjust your database settings accordingly. Also, remember to enable the JDBC service in your Google Apps Script project.
Why Choose StackIt for Redshift to Google Sheets Connection?
In light of the limitations of Google Apps Script, StackIt emerges as a formidable alternative that overcomes many of these restrictions:
User-Friendly for Non-Technical Teams: While Google Apps Script requires a certain level of coding knowledge, StackIt is designed for no-code users, making it accessible for teams like sales, marketing, revenue ops, and finance.
Time Efficiency: StackIt allows for quick data import without a maximum execution time, making it perfect for handling large data sets.
Secure Connection: StackIt provides a secure connection to your Redshift database, eliminating potential security risks.
Rich Functionality: StackIt enables you to perform complex operations like writing SQL queries directly from Google Sheets, without needing to know how to code.
Automatic Updates: With StackIt, your data will automatically refresh, keeping your sheets always up-to-date.
Using Zapier
Zapier can establish connections between Redshift and Google Sheets through automated, no-code workflows, known as Zaps.
For instance, a Zap can
Reflect changes in your database when alterations are made to Google Sheets cells
Introduce a new row in Google Sheets from Redshift
Update Google Sheets information based on changes in Redshift
Creating a Zap involves determining triggers and actions that automate repetitive tasks. Triggers initiate your Zaps, and actions are the tasks undertaken by the Zaps. Here are the fundamental steps to set up a Zap:
Authenticate Your Accounts: Sign in to Zapier and authenticate your Redshift and Google Sheets accounts.
Set Triggers and Actions: Decide what will initiate your Zap (the trigger) and what action will follow. For instance, a new row in Redshift could trigger the addition of a new row in Google Sheets.
Configure Your Zap: Choose the specific data from Redshift you wish to send to Google Sheets and map the fields accordingly.
Test Your Zap: Run a test to ensure that data flows correctly from Redshift to Google Sheets.
Activate Your Zap: Once you're satisfied with the setup, turn on your Zap. It will now automatically run the action whenever the trigger event occurs.
Drawbacks of Zapier
Complex setup and maintenance: Zapier requires users to build personalized workflows, known as “Zaps”. Users are responsible for creating and adjusting these Zaps independently, often needing a bit of SQL or API knowledge to create and configure specific automated workflows. As a result, none of Zapier’s integrations come pre-built.
Cost implications: The creation and management of Zap workflows can quickly escalate in costs. Having multiple integrations can result in a compounding of expenses. The more data involved, the more Zapier tends to cost.
User experience: Zapier operates outside of Google Sheets, causing a more fragmented user experience. On the other hand, StackIt allows users to stay within Google Sheets, resulting in a more efficient workflow.
In conclusion, while Google Apps Script might work for those comfortable with scripting, StackIt offers a more accessible, secure, and efficient solution for those looking to integrate Redshift with Google Sheets without having to delve into code. The creation and management of Zap workflows can quickly escalate costs. With StackIt, you can ensure that your data handling capabilities are both robust and user-friendly.
FAQs
How often can I refresh the Redshift data in my Google Sheet?
How often can I refresh the Redshift data in my Google Sheet?
How does StackIt compare to Google Apps Script for connecting Redshift to Google Sheets?
How does StackIt compare to Google Apps Script for connecting Redshift to Google Sheets?
How does StackIt compare to Zapier for Redshift to Google Sheets integration?
How does StackIt compare to Zapier for Redshift to Google Sheets integration?
Automatic Data Pulls
Visual Data Preview
Set Alerts
other related blogs
Try it now