Product
How to Integrate HubSpot to Google Sheets Seamlessly
Learn how to connect HubSpot with Google Sheets using StackIt, HubSpot Workflows, and Zapier. Quick and efficient methods outlined here!
Table of Contents
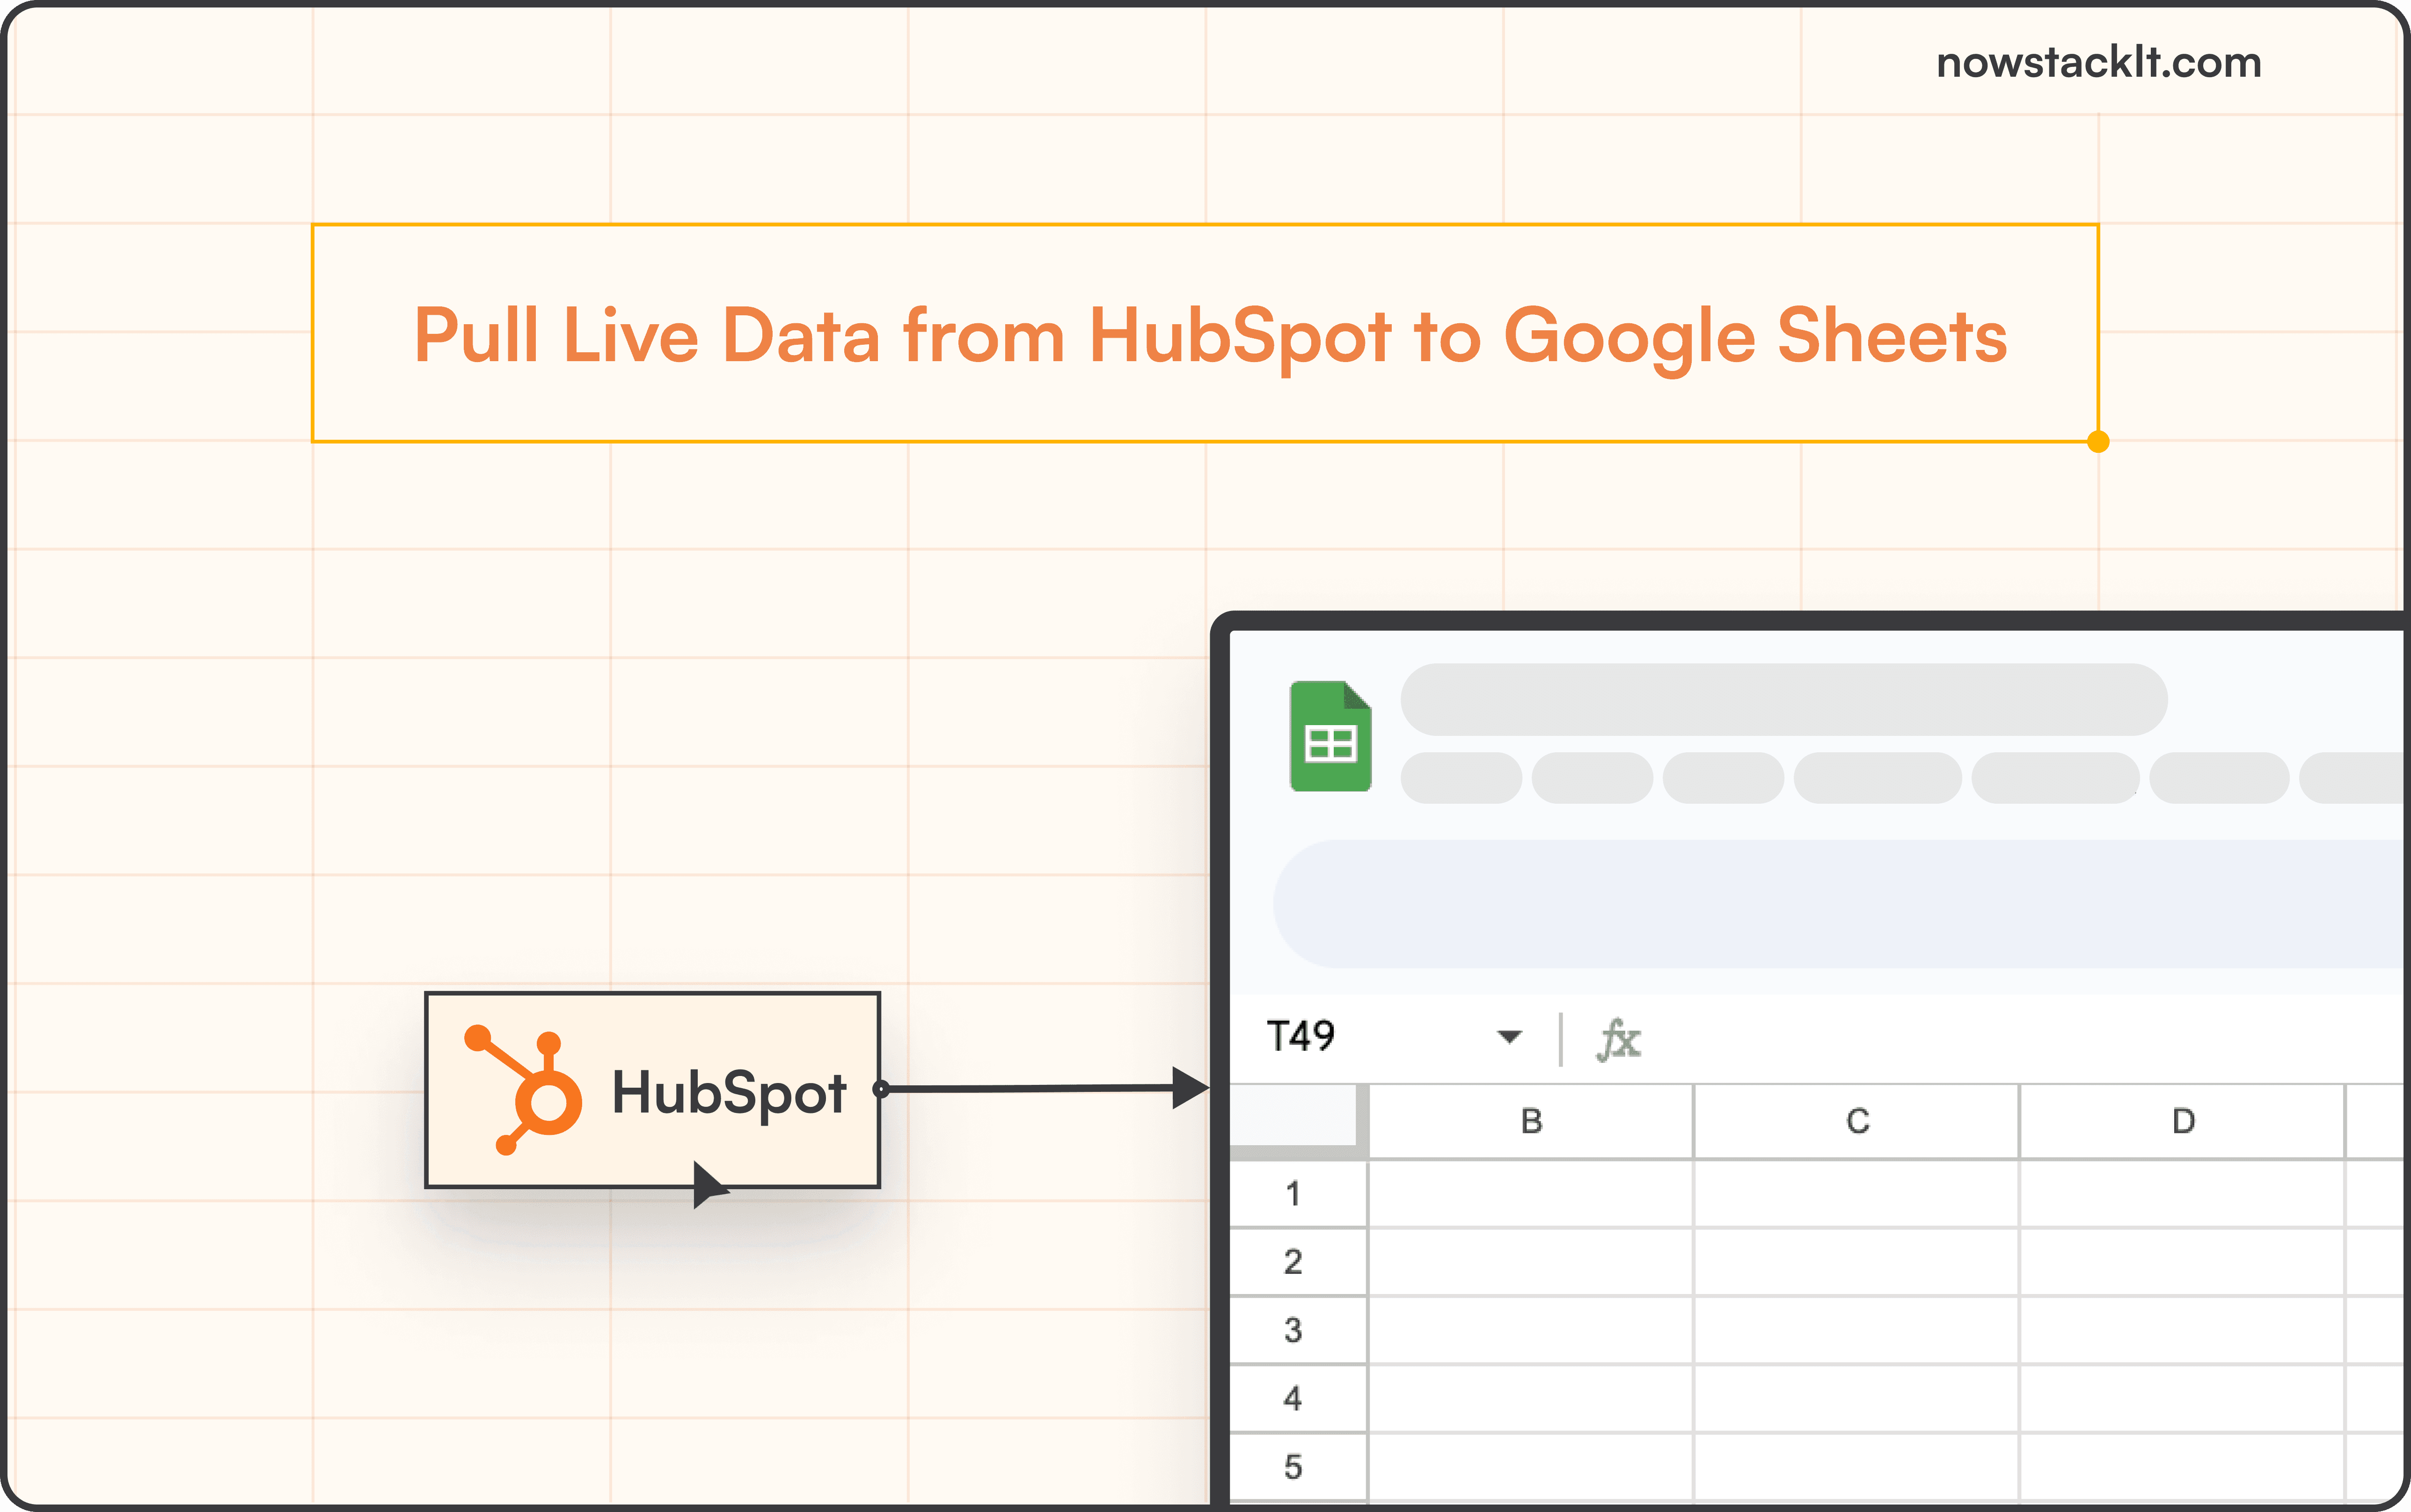
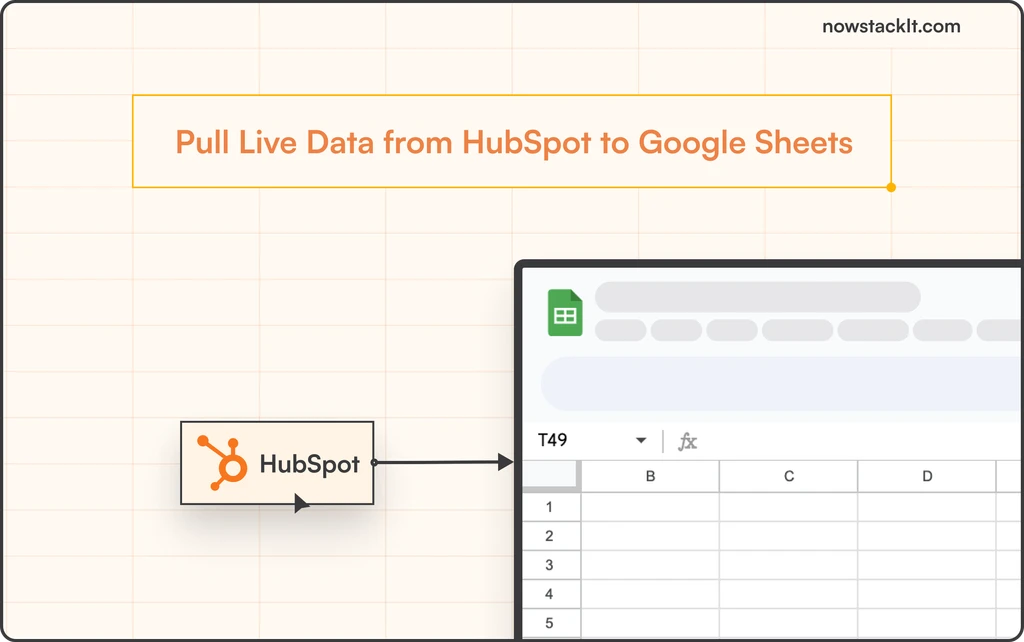
Connecting HubSpot to Google Sheets opens up a world of possibilities for streamlining your data management, reporting and analytics. By seamlessly integrating these two powerful platforms, you can enhance productivity, gain valuable insights, and drive better decision-making.
Whether you're a marketer tracking leads, a sales professional managing deals, or a business owner analyzing performance metrics, the ability to transfer data effortlessly between HubSpot and Google Sheets can significantly boost your efficiency and effectiveness.
Let’s explore various methods for establishing this connection and highlight the benefits of each approach.
Top 3 Methods to Integrate HubSpot to Google Sheets
When it comes to integrating HubSpot with Google Sheets, there are several methods available. Let's explore the three most efficient ways to achieve this seamless integration:
Using StackIt: Recommended for quick integration and automated data imports
Using Hubspot Workflows: Recommended for one-time data imports
Using Zapier: Recommended for limited, pre-designed workflows
Method 1: Using StackIt
Why opt for StackIt’s Google Sheets-Hubspot Integration?
1. Quick and Easy Integration: With StackIt's seamless integration with HubSpot, connecting your sheets becomes effortless. We've meticulously organized the data points to ensure easy accessibility in a format you're already familiar with.
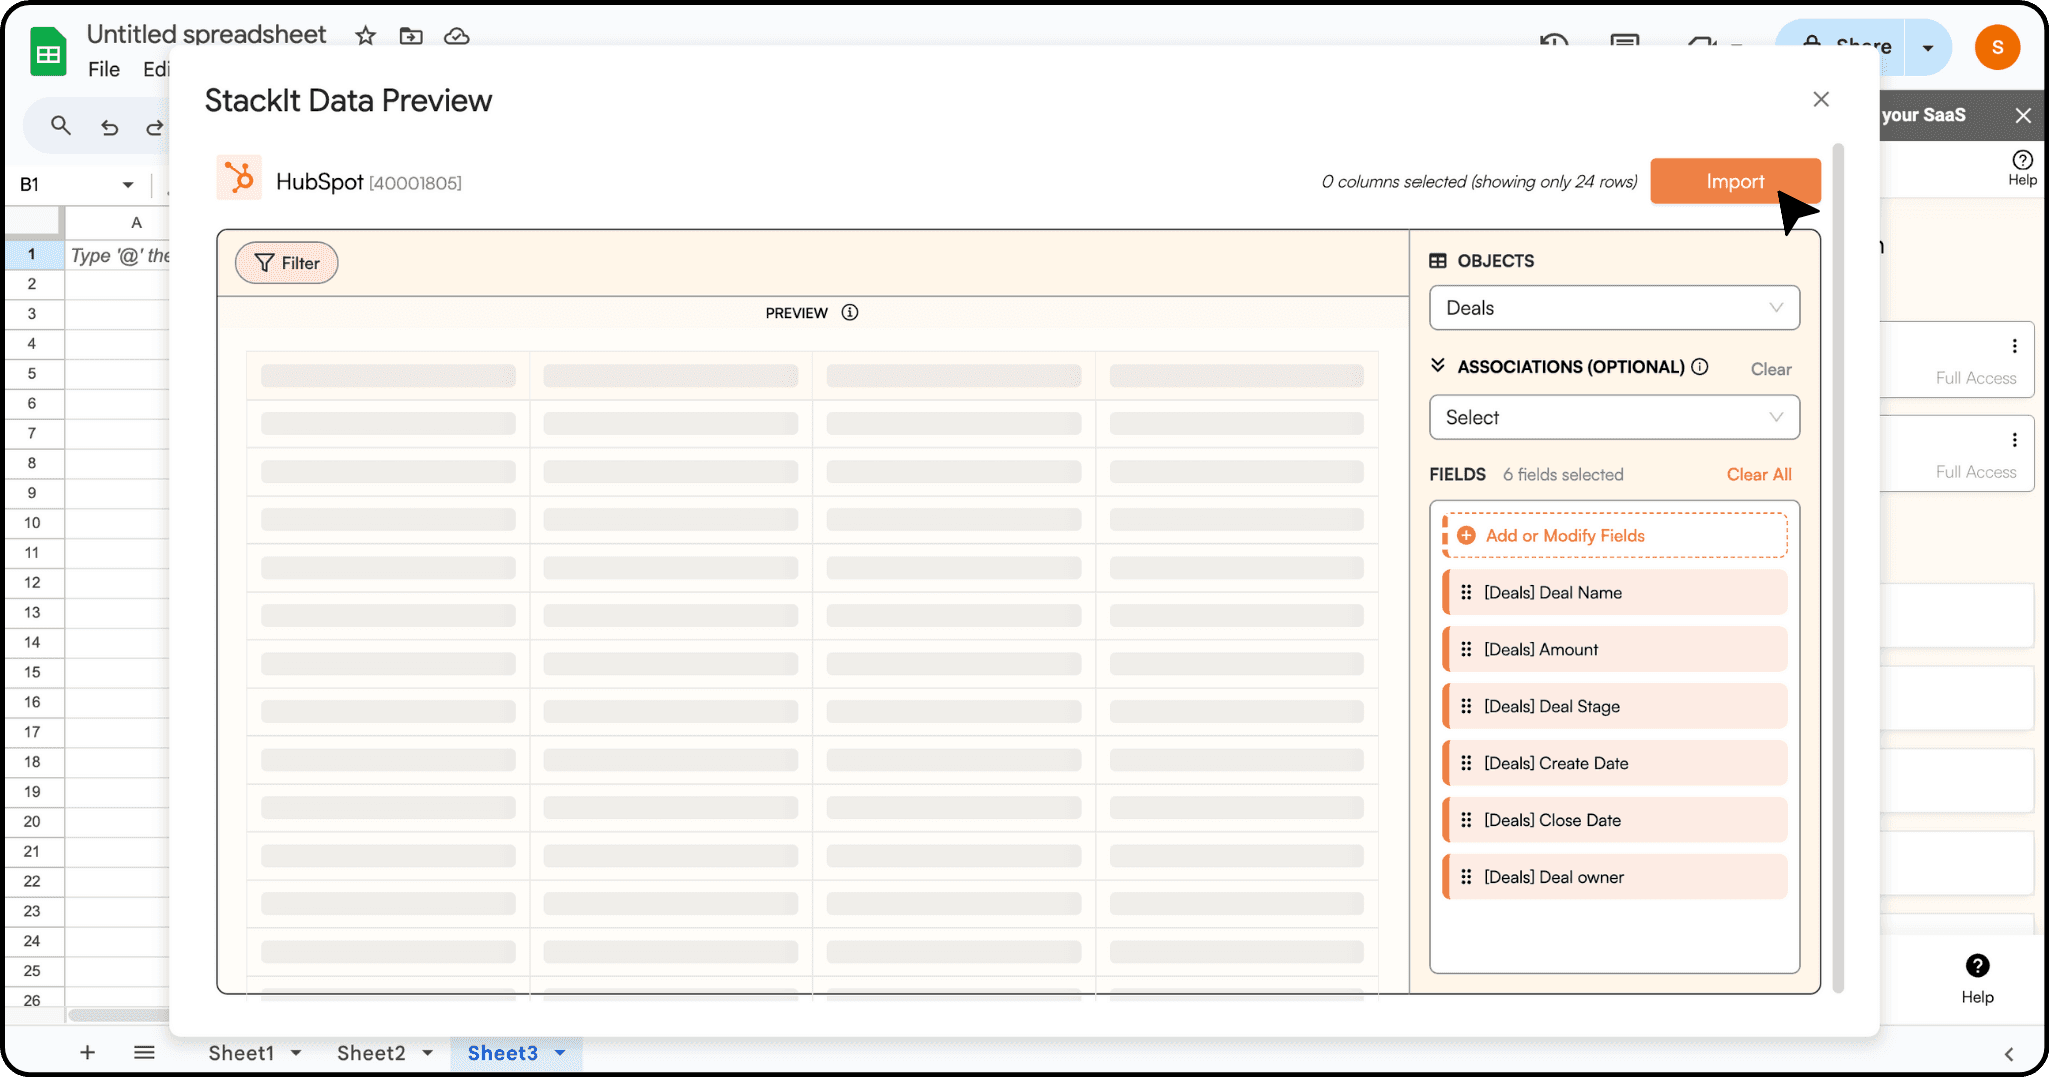
2. Preview your imports visually. Get a sneak peek of your data. Use StackIt's visual preview feature. This allows you to see your data before importing it into Google Sheets. Customize the columns according to your preferences and bid farewell to messy imports. You can also conveniently sort and filter your data during the preview stage.
3. Power of Google Sheets: Benefit from Google Sheets' collaborative data analysis capabilities, robust data visualization tools, and seamless integration with other Google services.
4. Automatic Refreshes: Keep your Google Sheets synchronized with HubSpot data effortlessly. Enjoy one-click refreshes or schedule regular updates to ensure your sheets are always up to date.
Step-by-Step Guide to Integrating HubSpot to Google Sheets Using StackIt:
Step 1 - Install StackIt: Navigate to the Extensions tab in Google Sheets, select Add-ons, and choose Get Add-ons.
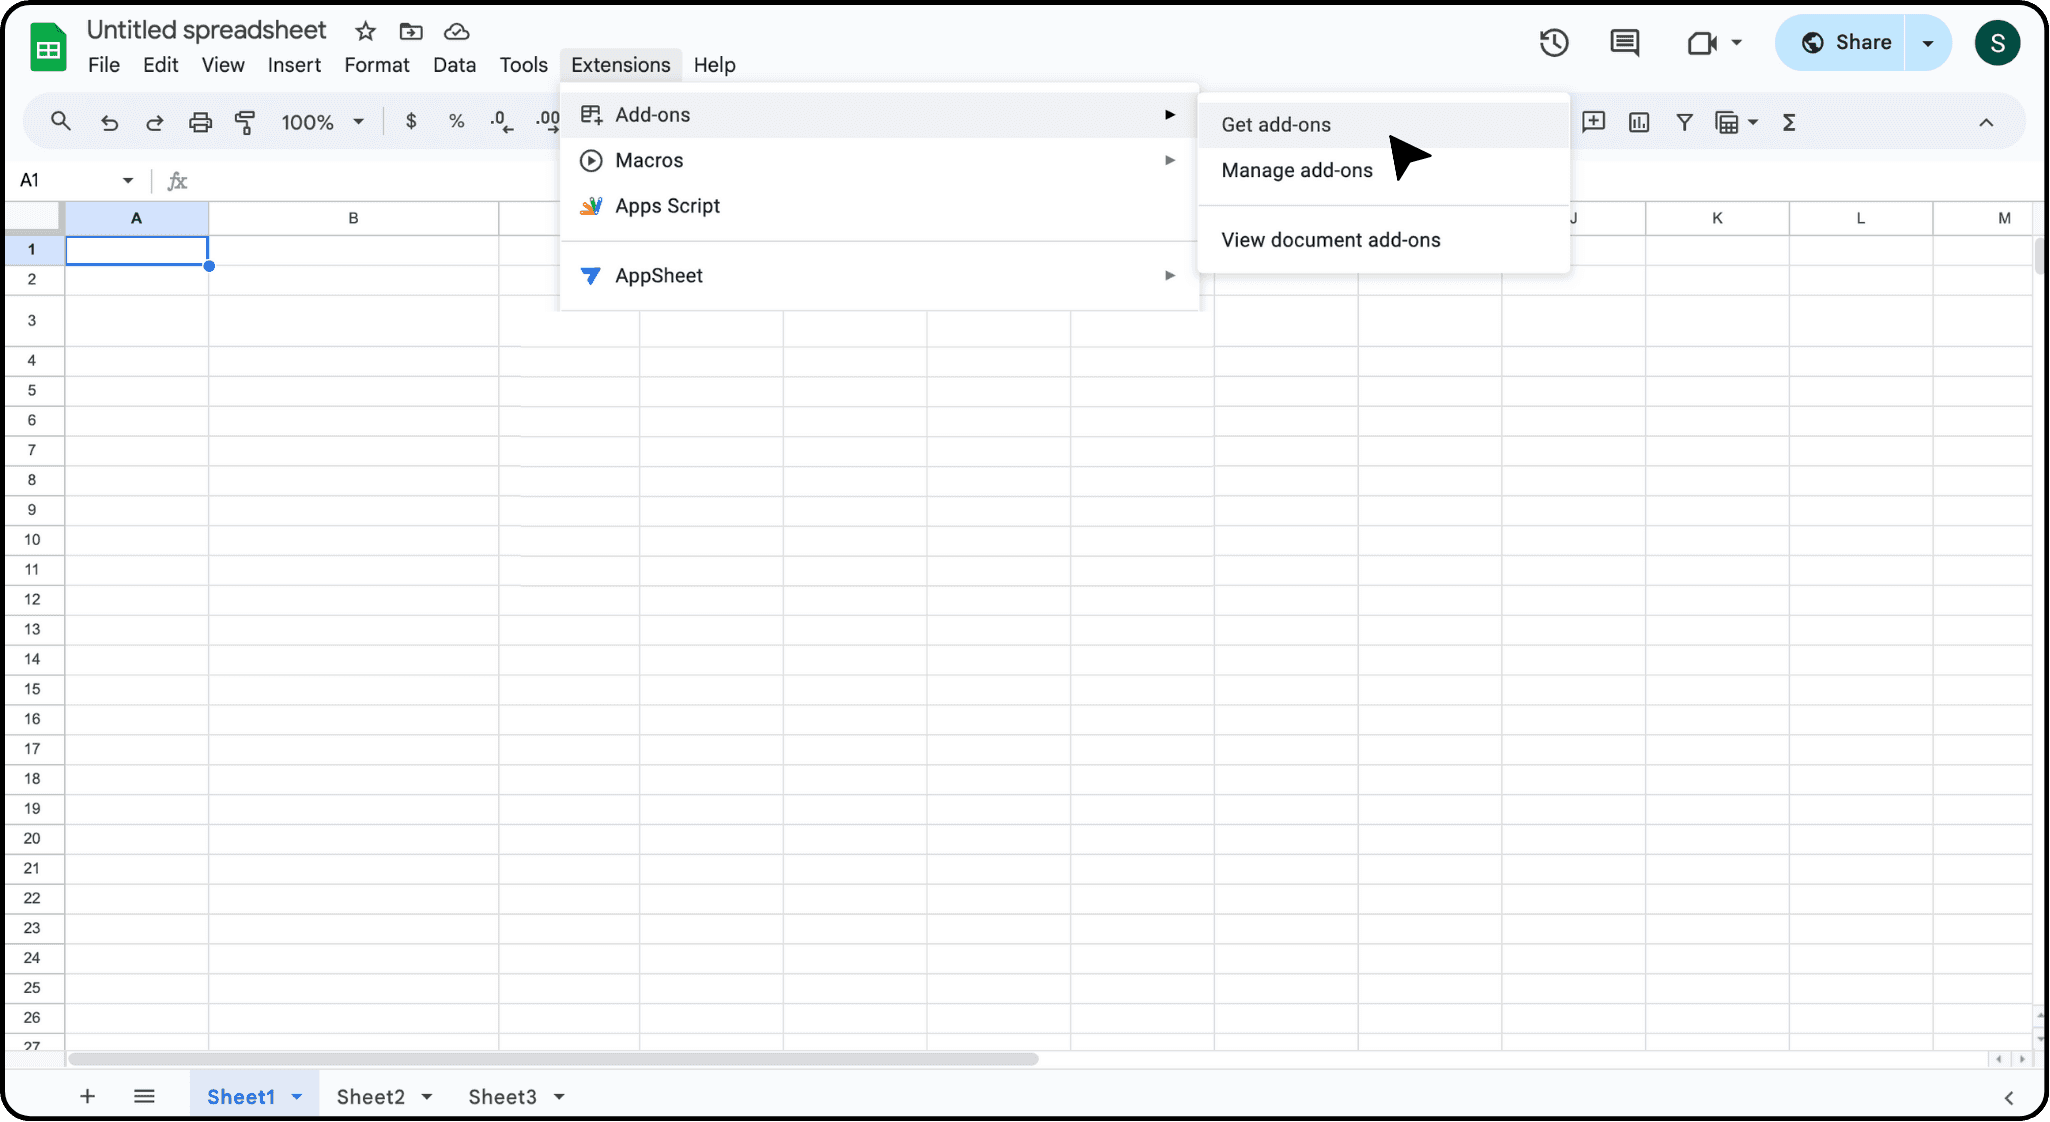
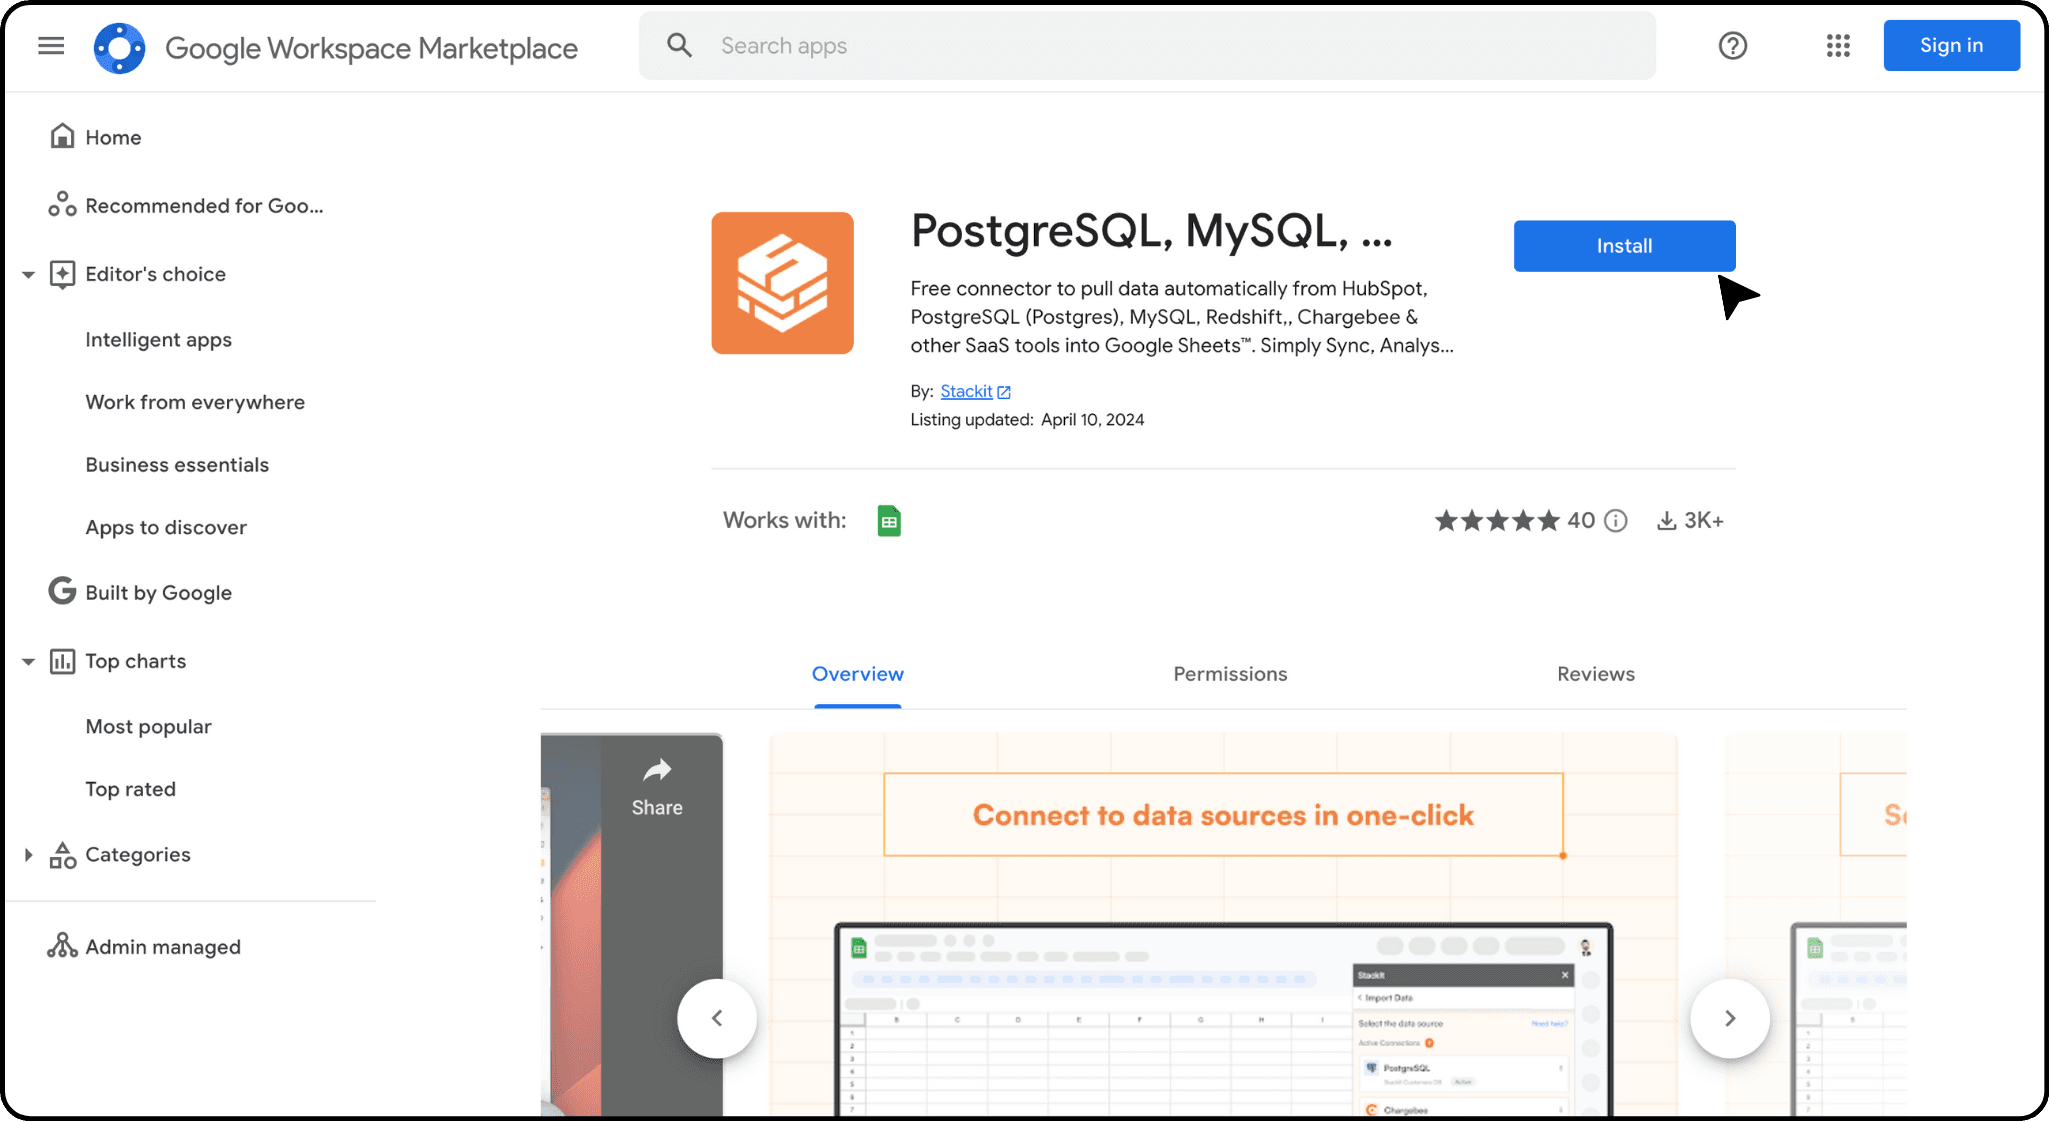
Search for StackIt in the Google Workspace Marketplace and install the StackIt Extension.
Step 2 - Launch StackIt: Return to the Extensions menu and launch StackIt 🚀. The StackIt panel will appear on the right side of your screen within Google Sheets.

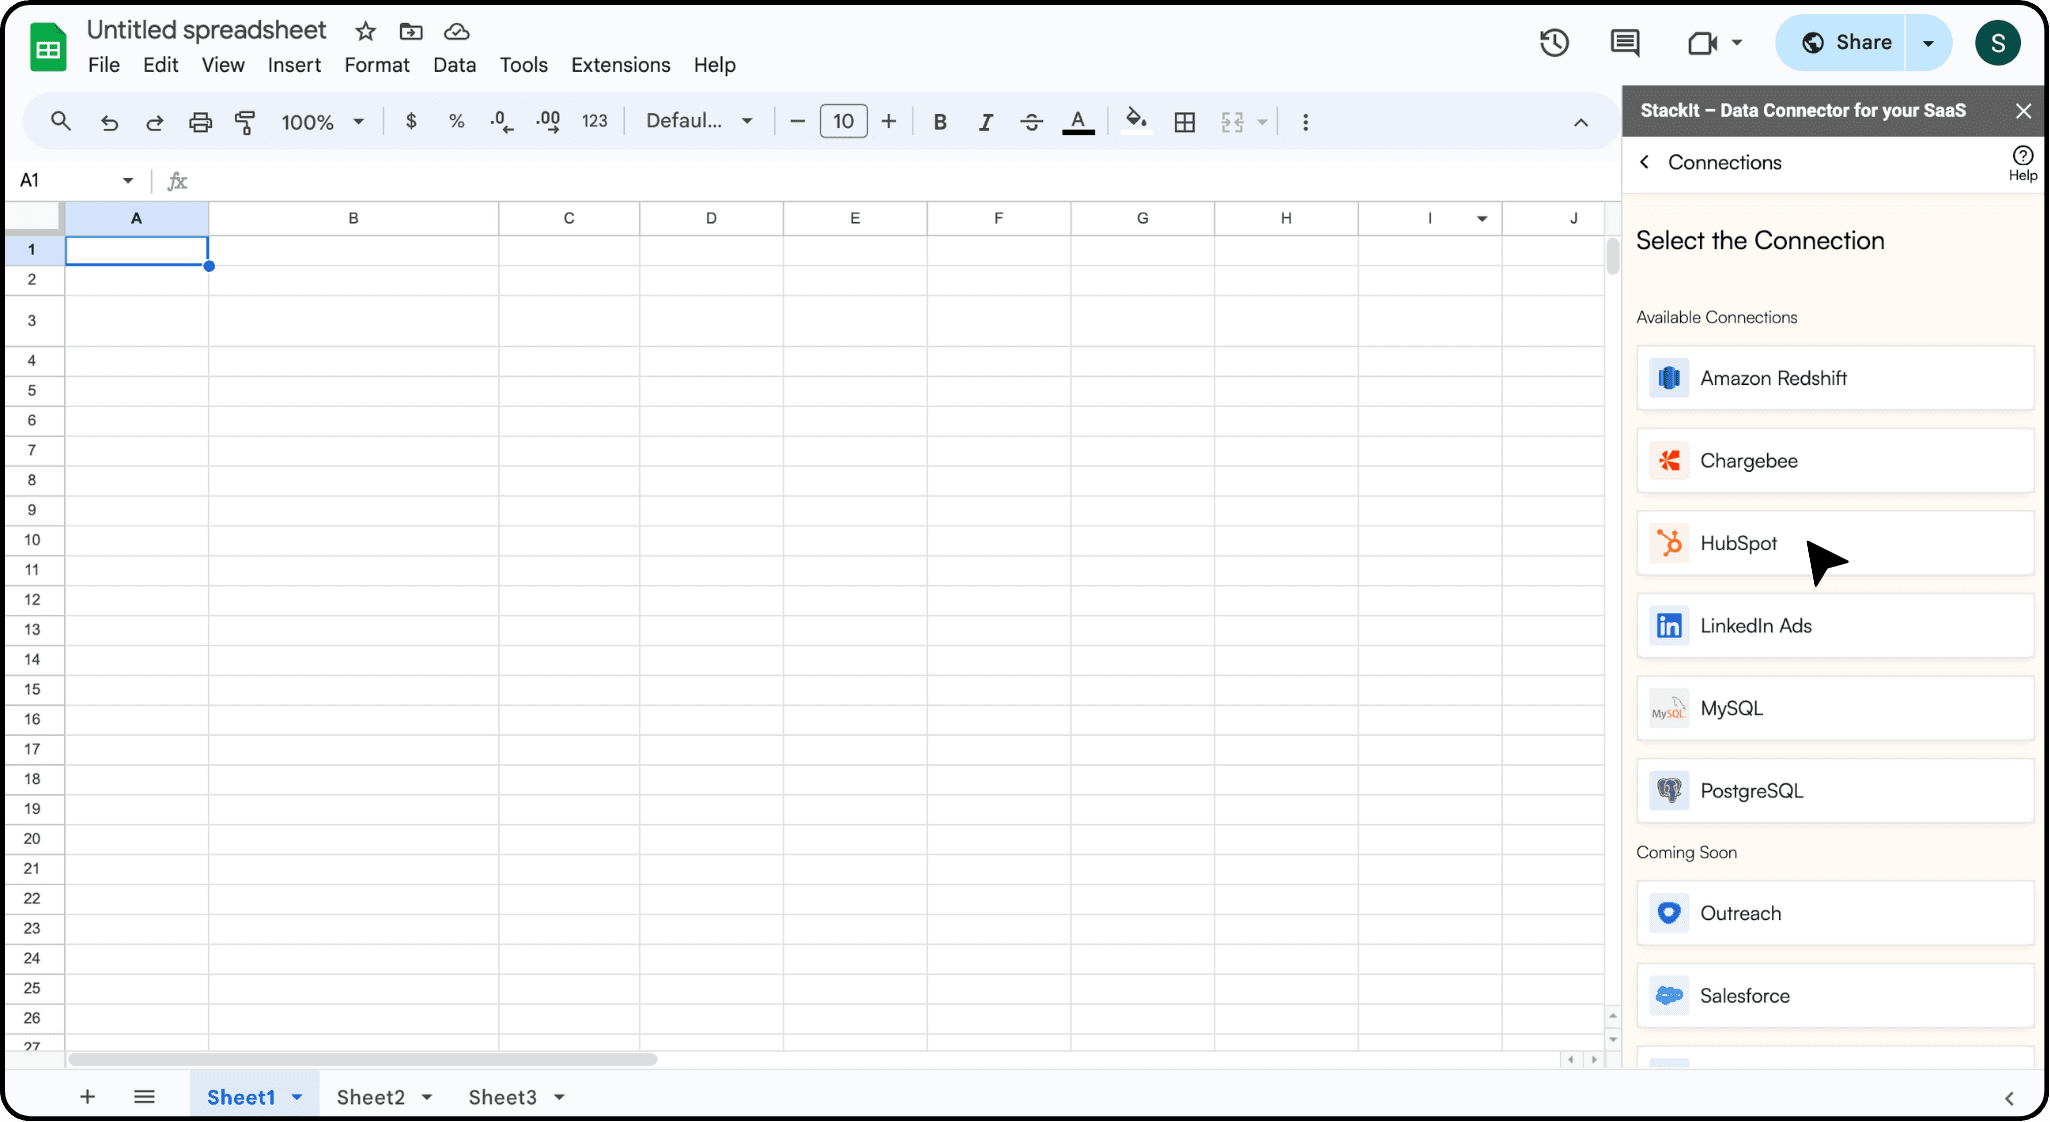
Step 3 - Select HubSpot as the Data Source: Click on Connect your first source
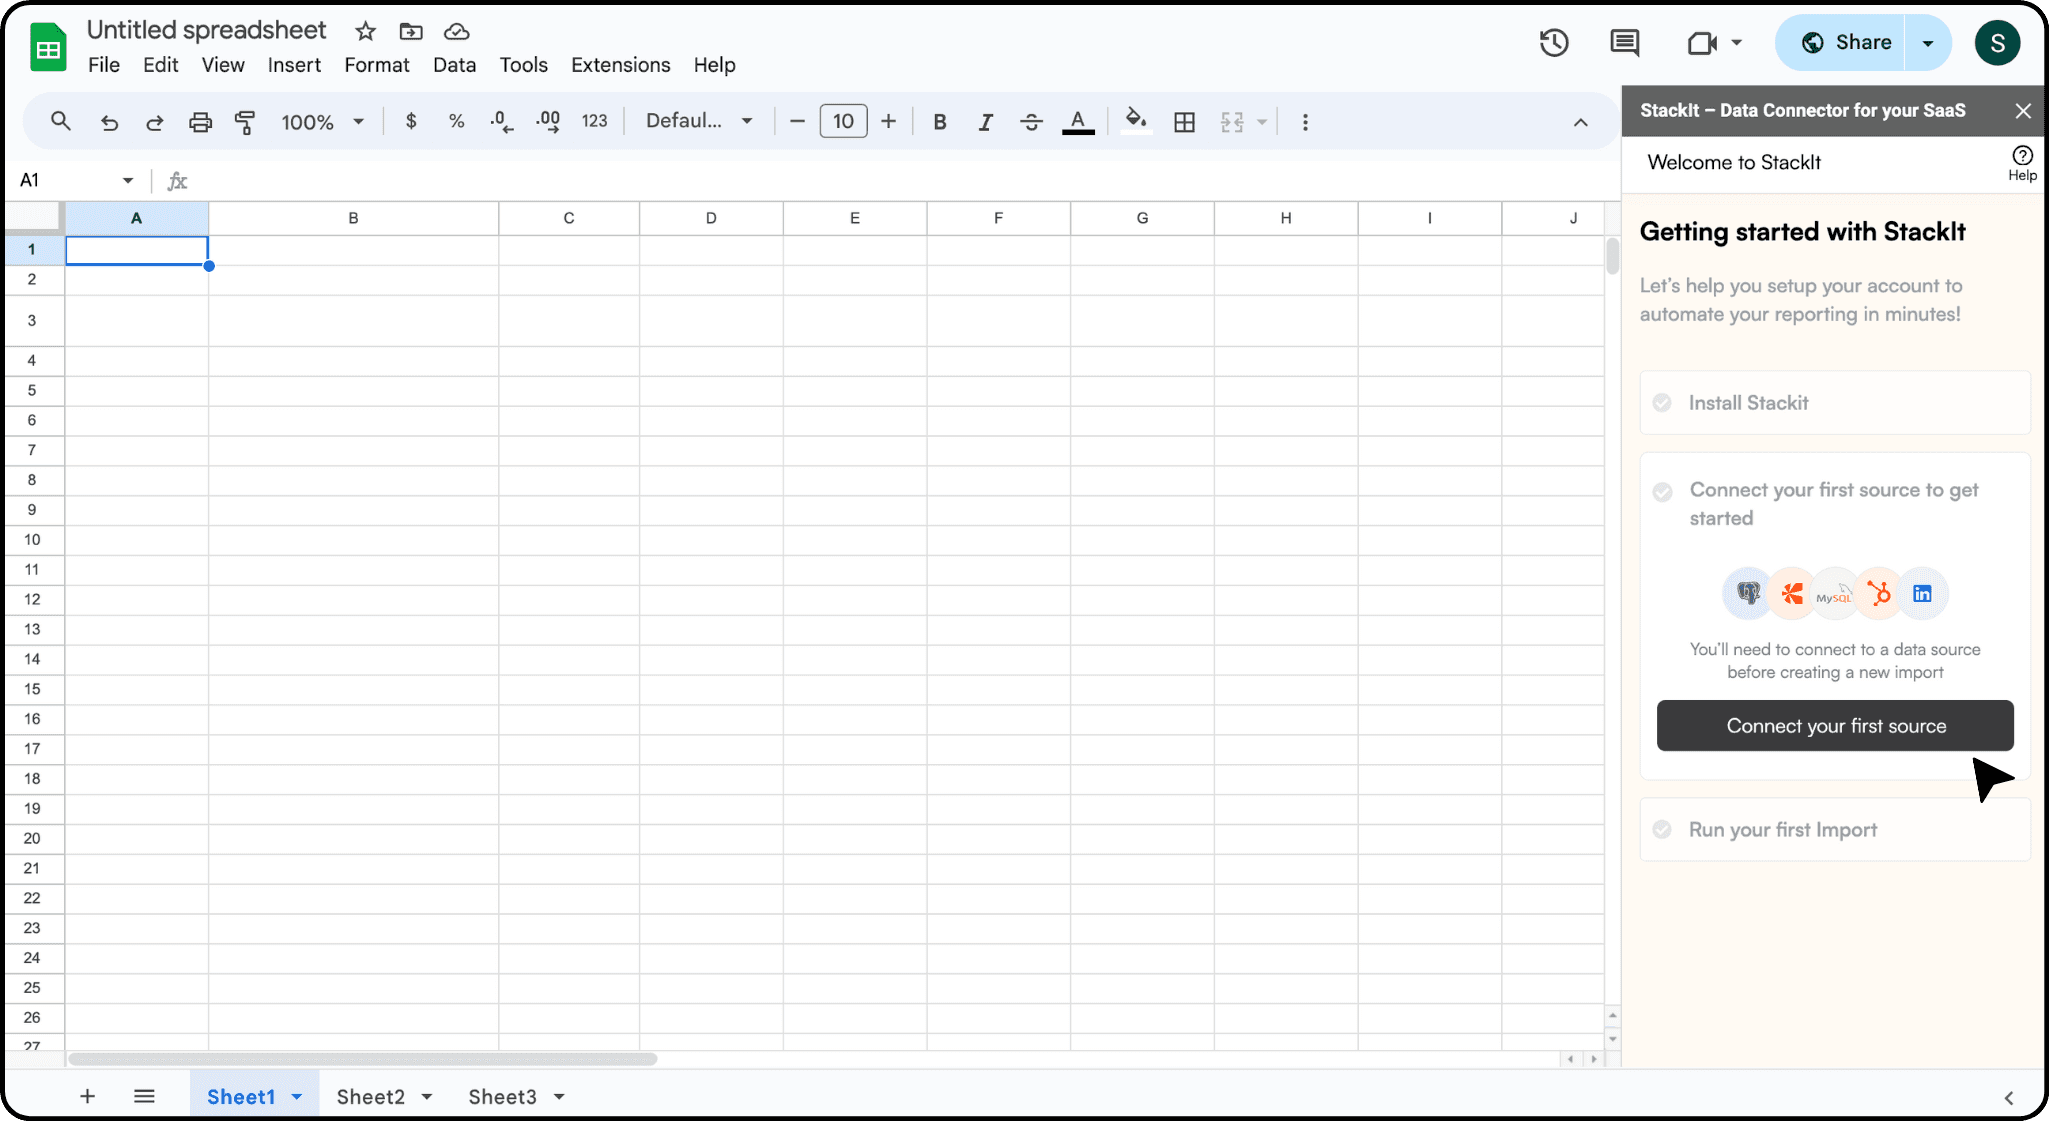
Choose HubSpot from the list of available Connections.
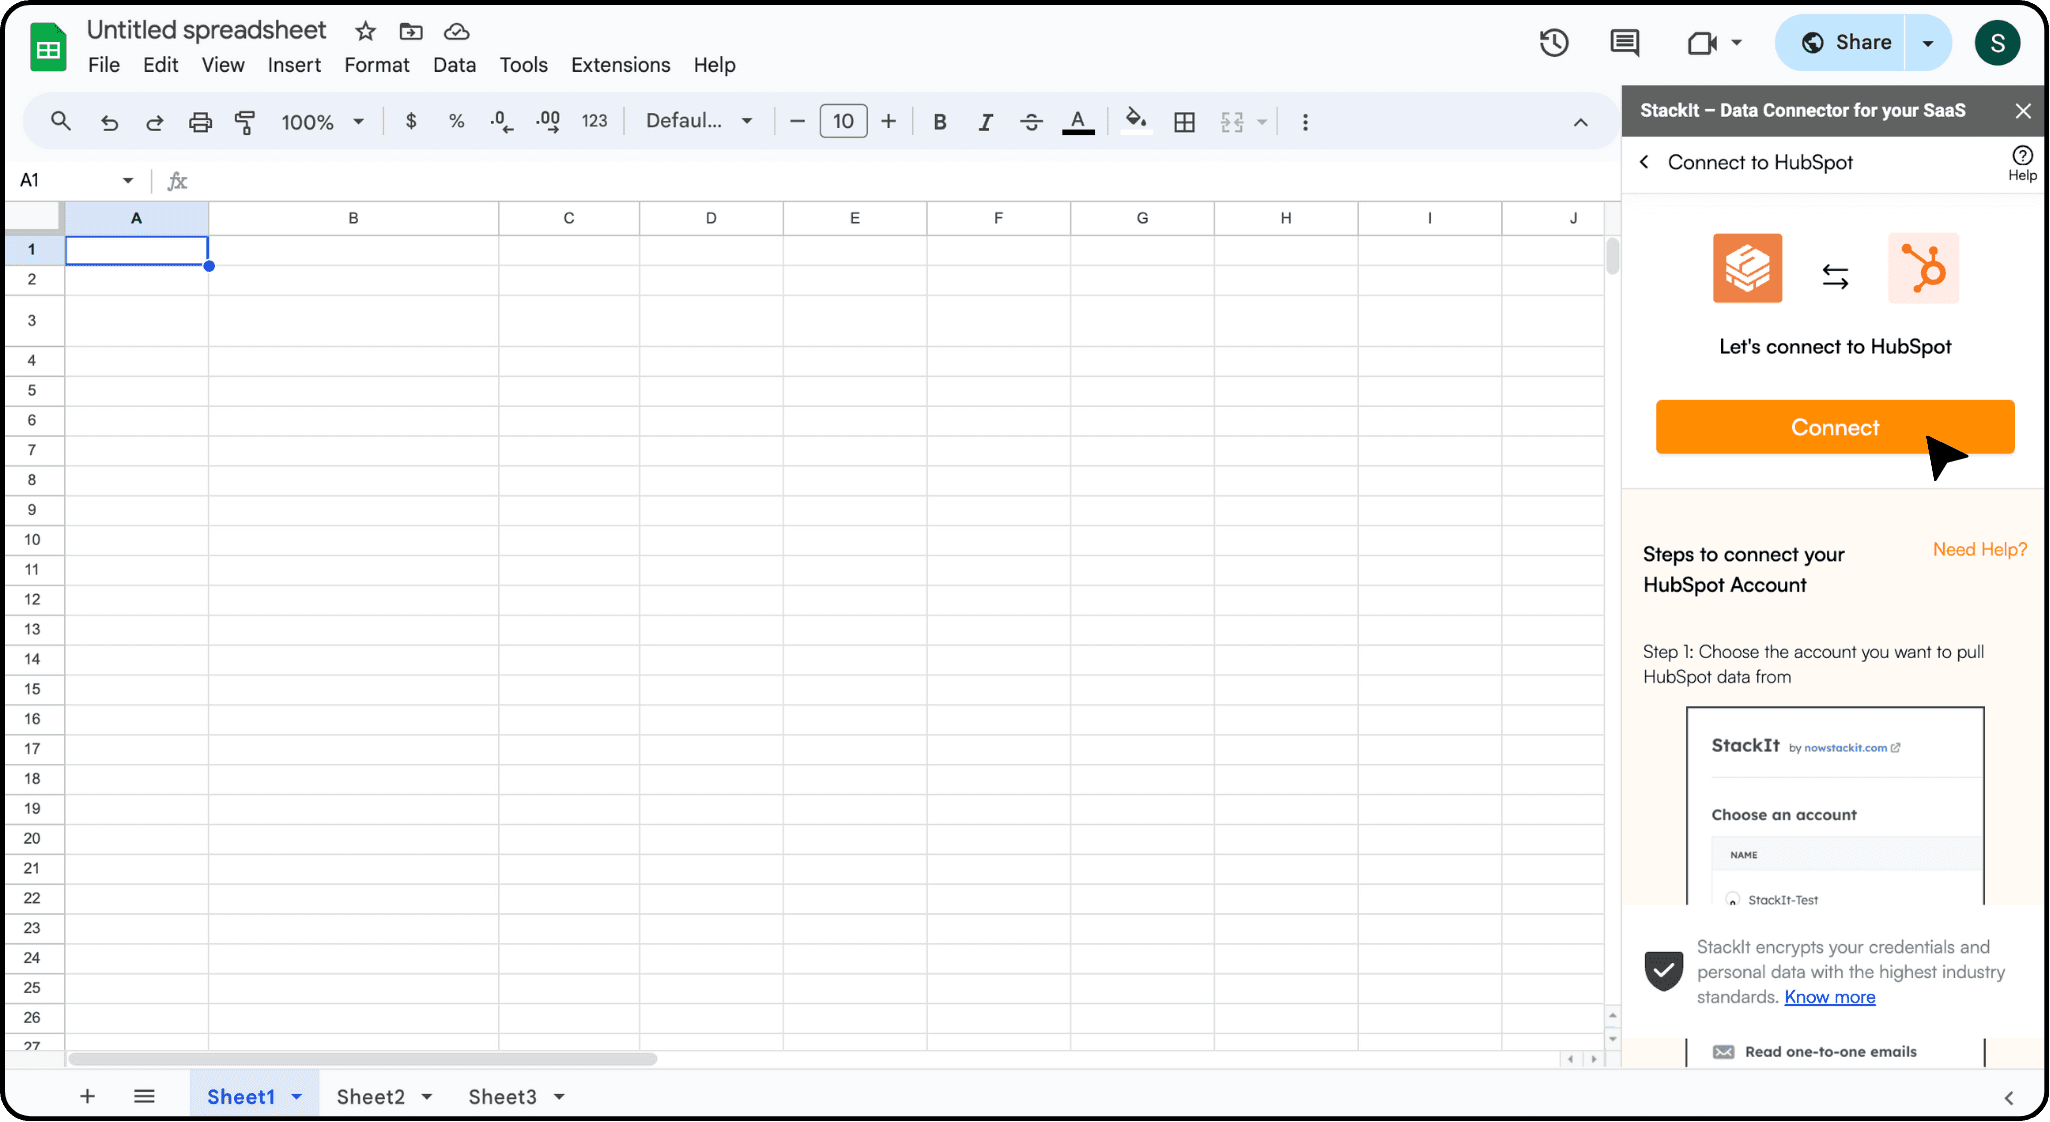
Step 4 - Follow the Prompts: Click on Connect and follow the on-screen instructions to connect your HubSpot account to Google Sheets seamlessly.
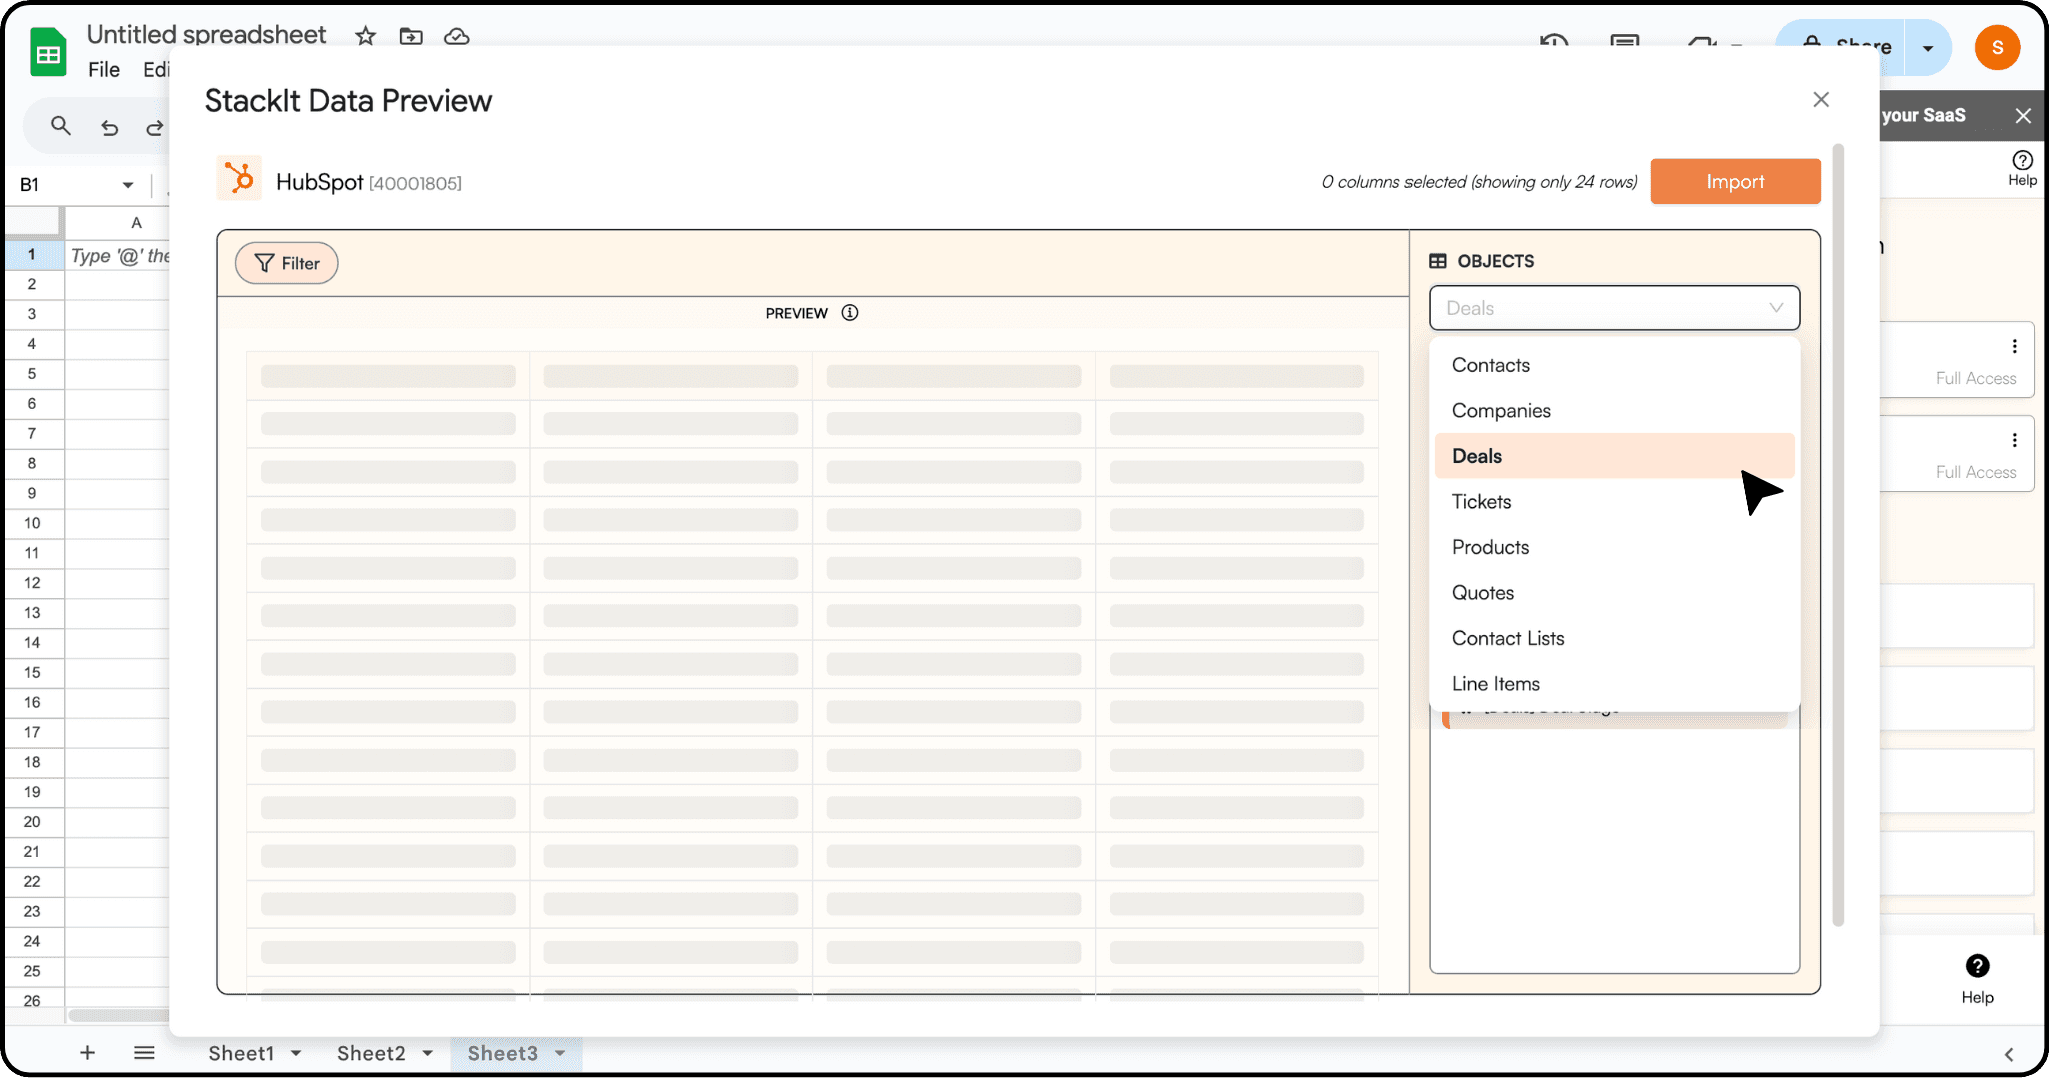
Step 5 - Choose Data Objects: Select the specific data objects you wish to import from HubSpot, such as Deals data.
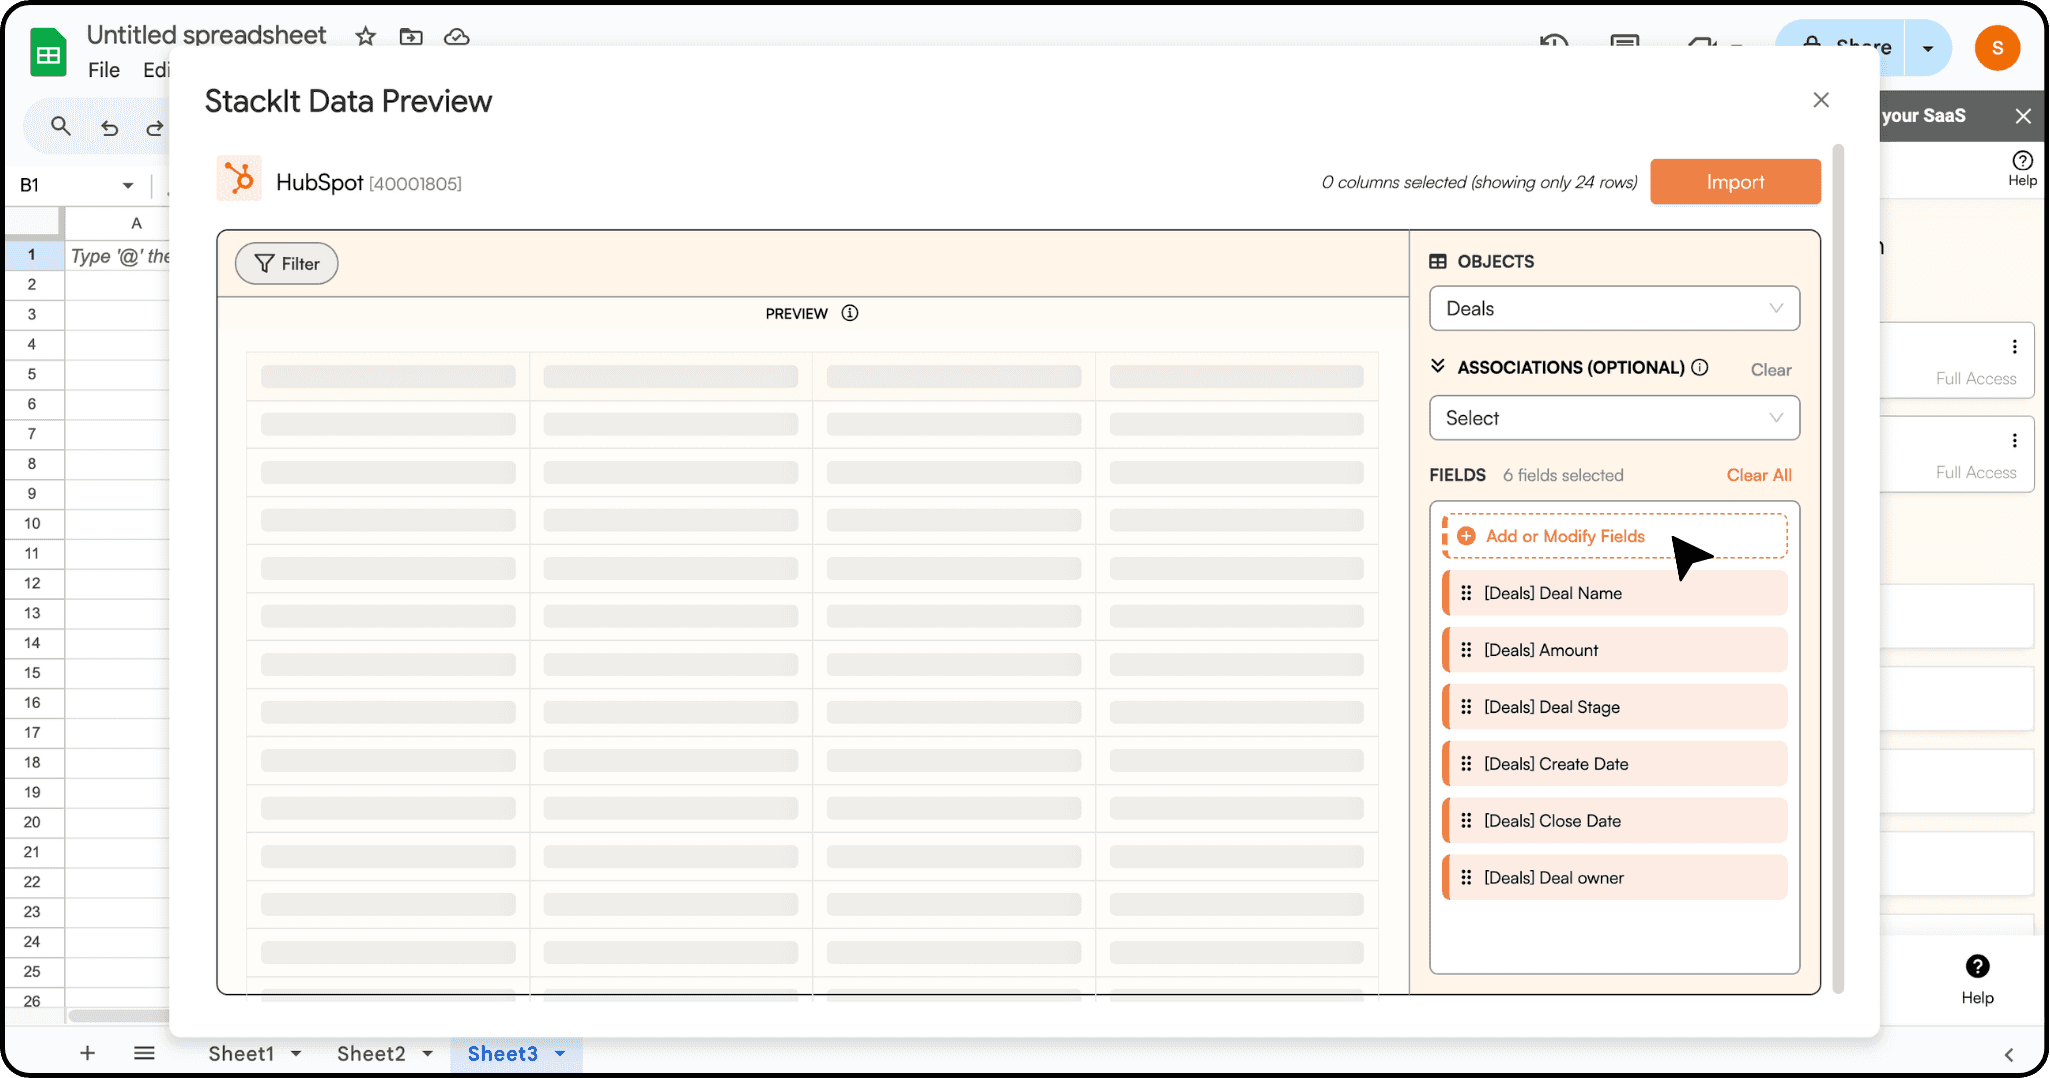
Step 6 - Customize Field Selection: Customize your data import by choosing which fields to include and preview your data visually before importing.
Step 7 - Initiate Import: Click on Import, and watch as your HubSpot data populates your Google spreadsheet instantly.
StackIt lets you refresh your imported data instantly with one click or set it to auto-refresh on a pre-set schedule.

This way, you can easily update HubSpot data in Google Sheets without having to do it manually. This ensures that the data stays up-to-date with minimal effort.
Method 2: Using HubSpot Workflows
Another avenue to establish a seamless HubSpot-Google Sheets integration involves utilizing HubSpot's native workflow feature. Although not as straightforward as StackIt, it provides flexibility for users who prefer working within the HubSpot ecosystem which comes with its own limitations.
Before diving into setting up workflows, ensure your HubSpot and Google Sheets accounts are linked through the HubSpot App Marketplace or a workflow.
Setting Up HubSpot Workflows with Google Sheets:
Step 1 - Define Workflow Trigger: navigate to the Workflows section. Click on the Create workflow button to start a new workflow. Then, Choose the trigger for your workflow. This could be an event such as a form submission or a specific action taken by a contact in HubSpot.
Step 2 - Adding Workflow Actions: Within the workflow editor, you'll need to add actions to your workflow. Look for options related to Google Sheets integration, such as Create a Google Sheet row or Update data in a Google Sheet.
Step 3 - Configuring Workflow Actions: Once you've selected the appropriate action, you'll need to configure it to specify which Google Sheet to send data to and which columns within the sheet should receive the data. Once done, Click on Save.
Once you're confident that your workflow is set up correctly, you can activate it to start automating the process of transferring data from HubSpot to Google Sheets.
While HubSpot workflows offer automation capabilities for data transfer to Google Sheets, it's essential to weigh these considerations and limitations to optimize the integration process effectively.
Considerations and Limitations:
Data Range Restrictions: HubSpot workflows impose limitations on the number of columns that can be updated in a Google Sheet, typically limited to the first 100 columns. This constraint may affect the scope of data that can be integrated and analyzed.
Data Labeling Requirements: It's imperative to ensure that all columns in the designated data range are appropriately labeled. Failure to label columns accurately may result in data discrepancies or errors during the integration process.
Manual Data Entry Implications: Manual data entry into the Google Sheet can disrupt the workflow and lead to inconsistencies. It's advisable to minimize manual interventions to maintain the integrity of the integrated data.
And for all the above reasons, using Hubspot-native workflows is recommended for one-time data import.
Related: HubSpot Native Google Sheets Integration vs. StackIt: A Comprehensive Comparison
Method 3: Using Zapier
Zapier presents an alternative solution for automating data transfer from HubSpot to Google Sheets through customizable workflows, known as Zaps. However, it's imperative to understand the intricacies involved in configuring Zaps for optimal integration.
Configuring Zaps for HubSpot-Google Sheets Integration:
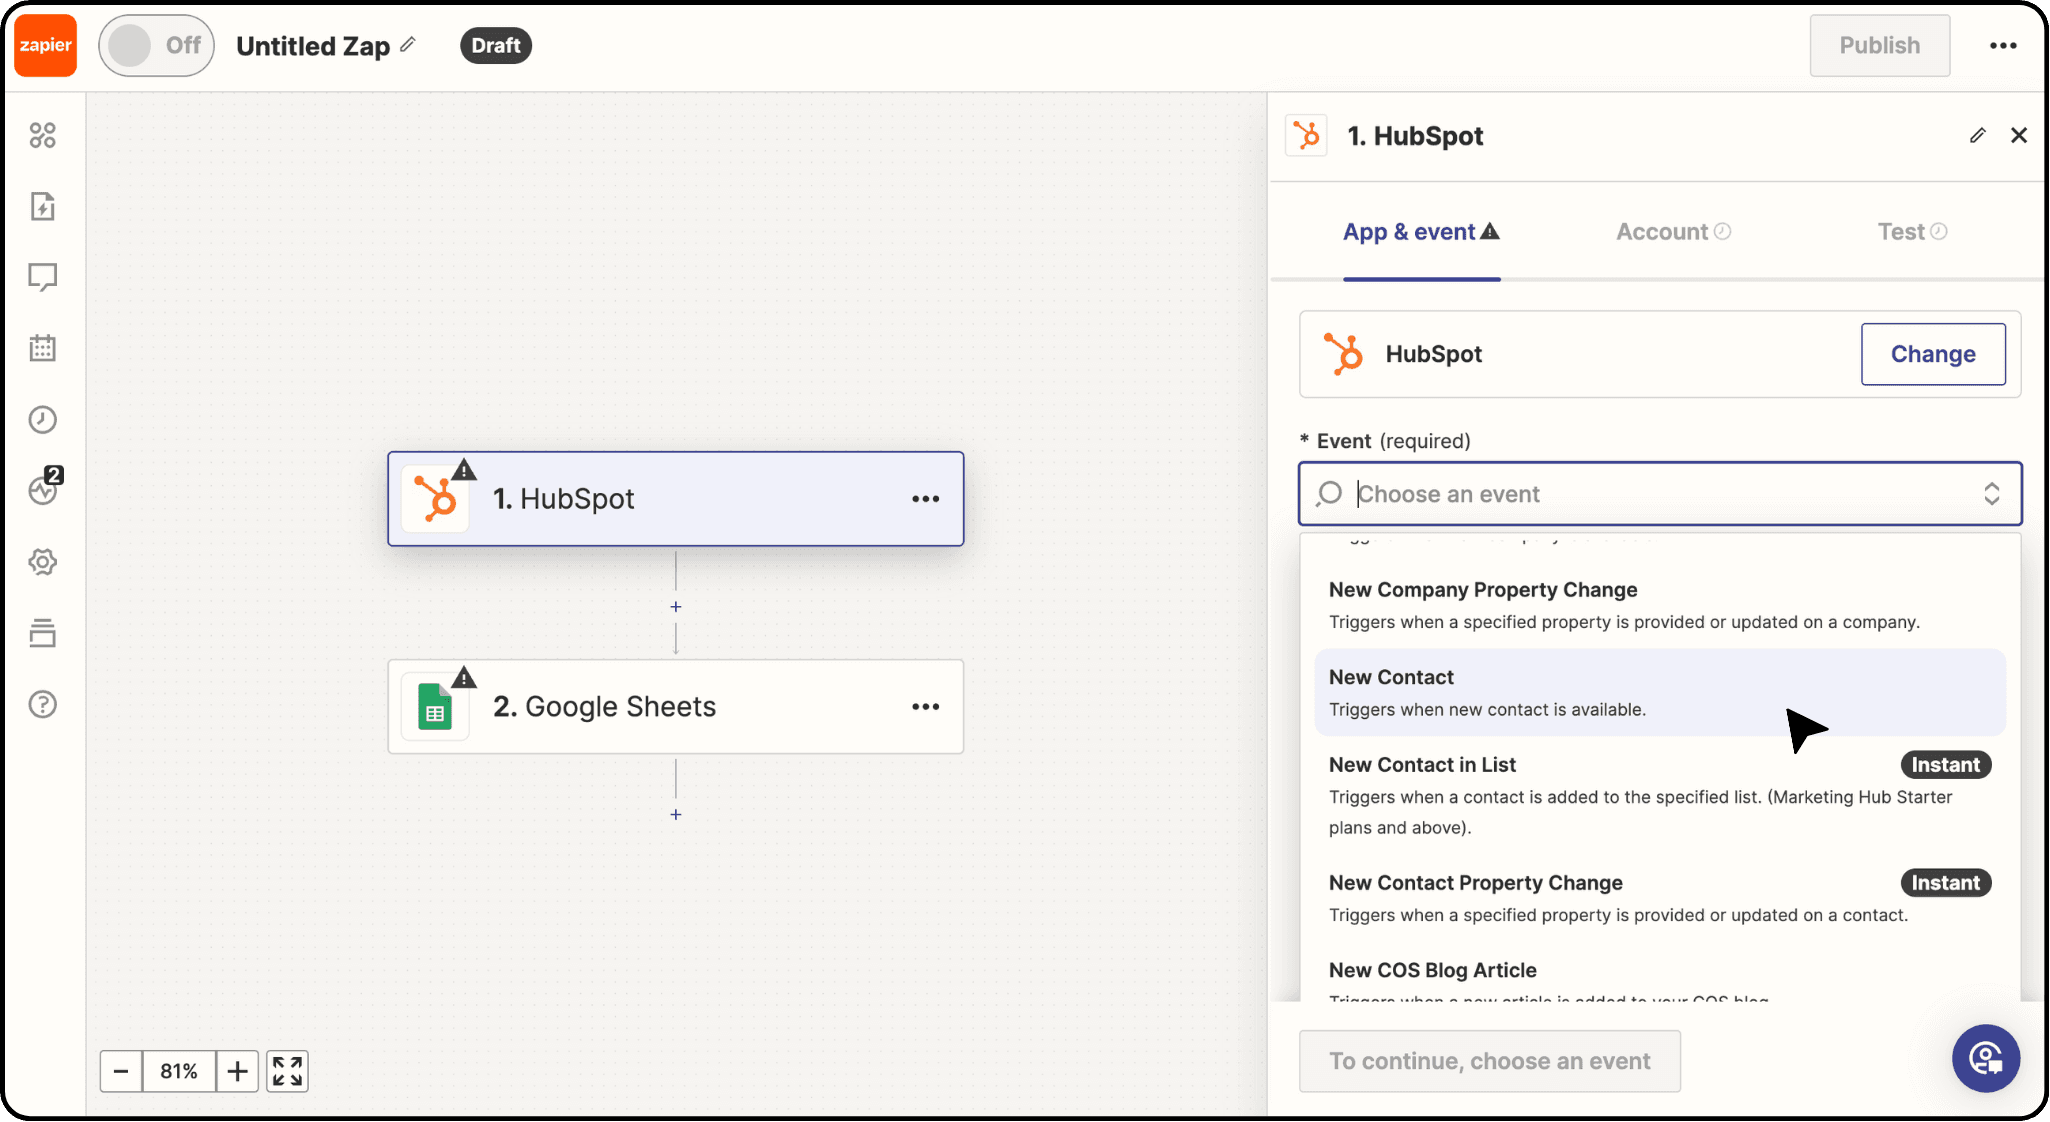
Step 1 - Authentication and App Selection: Begin by authenticating your HubSpot and Google Sheets accounts within the Zapier platform. Choose HubSpot as the triggering application and Google Sheets as the action application.
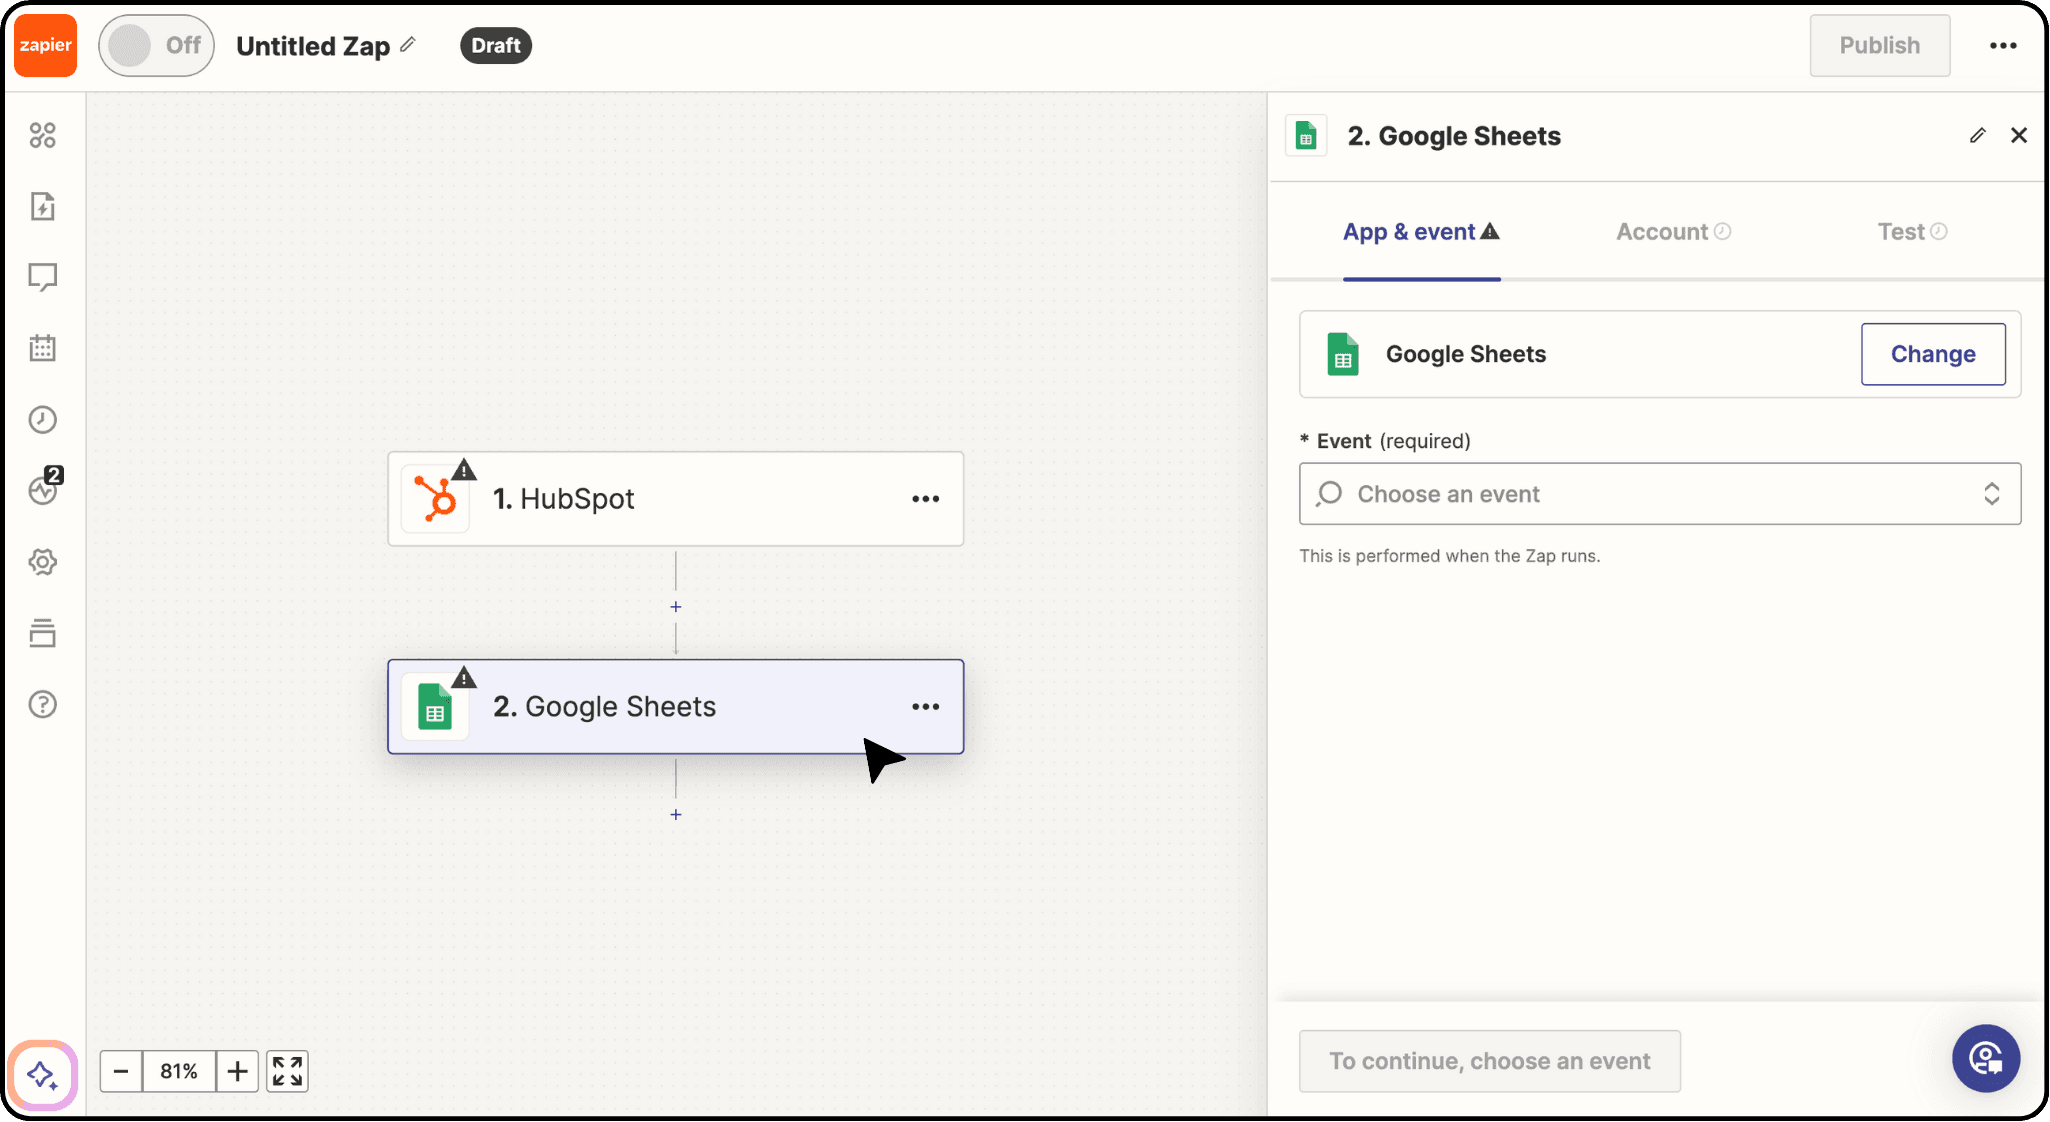
Step 2 - Defining Triggers and Actions: Specify the trigger event, such as the creation of a New Contact in HubSpot, and define the corresponding action to update data in Google Sheets accordingly.
Step 3 - Testing and Optimization: Once configured, click on Continue and thoroughly test your Zaps to ensure they function as intended. Zapier offers extensive documentation and support to help users troubleshoot any issues and optimize their workflows for efficiency.

While Zapier offers flexibility and automation for integrating HubSpot with Google Sheets, it's essential to navigate potential limitations and challenges to ensure a seamless integration experience.
Considerations and Challenges:
Pre-Defined Workflow Limitations: Zapier's pre-designed workflows may impose limitations on the types of data that can be transferred between HubSpot and Google Sheets. Custom data structures and complex workflows may require additional customization.
Coding Requirements for Advanced Integrations: Advanced integrations beyond Zapier's pre-configured options may necessitate coding skills to leverage the full capabilities of the HubSpot API. This may pose challenges for users without technical expertise.
In summary, while HubSpot workflows and Zapier offer alternative methods for integrating HubSpot with Google Sheets, they may require more setup and testing compared to dedicated integration tools like StackIt.
Effortlessly integrating HubSpot with Google Sheets is now a breeze with StackIt!
Say goodbye to manual data exports and repetitive tasks. With StackIt, streamline your workflows and boost productivity with just a single click.
Try out StackIt today on your own or book a demo to automate your data analysis and reporting workflows.
Connecting HubSpot to Google Sheets opens up a world of possibilities for streamlining your data management, reporting and analytics. By seamlessly integrating these two powerful platforms, you can enhance productivity, gain valuable insights, and drive better decision-making.
Whether you're a marketer tracking leads, a sales professional managing deals, or a business owner analyzing performance metrics, the ability to transfer data effortlessly between HubSpot and Google Sheets can significantly boost your efficiency and effectiveness.
Let’s explore various methods for establishing this connection and highlight the benefits of each approach.
Top 3 Methods to Integrate HubSpot to Google Sheets
When it comes to integrating HubSpot with Google Sheets, there are several methods available. Let's explore the three most efficient ways to achieve this seamless integration:
Using StackIt: Recommended for quick integration and automated data imports
Using Hubspot Workflows: Recommended for one-time data imports
Using Zapier: Recommended for limited, pre-designed workflows
Method 1: Using StackIt
Why opt for StackIt’s Google Sheets-Hubspot Integration?
1. Quick and Easy Integration: With StackIt's seamless integration with HubSpot, connecting your sheets becomes effortless. We've meticulously organized the data points to ensure easy accessibility in a format you're already familiar with.
2. Preview your imports visually. Get a sneak peek of your data. Use StackIt's visual preview feature. This allows you to see your data before importing it into Google Sheets. Customize the columns according to your preferences and bid farewell to messy imports. You can also conveniently sort and filter your data during the preview stage.
3. Power of Google Sheets: Benefit from Google Sheets' collaborative data analysis capabilities, robust data visualization tools, and seamless integration with other Google services.
4. Automatic Refreshes: Keep your Google Sheets synchronized with HubSpot data effortlessly. Enjoy one-click refreshes or schedule regular updates to ensure your sheets are always up to date.
Step-by-Step Guide to Integrating HubSpot to Google Sheets Using StackIt:
Step 1 - Install StackIt: Navigate to the Extensions tab in Google Sheets, select Add-ons, and choose Get Add-ons.
Search for StackIt in the Google Workspace Marketplace and install the StackIt Extension.
Step 2 - Launch StackIt: Return to the Extensions menu and launch StackIt 🚀. The StackIt panel will appear on the right side of your screen within Google Sheets.
Step 3 - Select HubSpot as the Data Source: Click on Connect your first source
Choose HubSpot from the list of available Connections.
Step 4 - Follow the Prompts: Click on Connect and follow the on-screen instructions to connect your HubSpot account to Google Sheets seamlessly.
Step 5 - Choose Data Objects: Select the specific data objects you wish to import from HubSpot, such as Deals data.
Step 6 - Customize Field Selection: Customize your data import by choosing which fields to include and preview your data visually before importing.
Step 7 - Initiate Import: Click on Import, and watch as your HubSpot data populates your Google spreadsheet instantly.
StackIt lets you refresh your imported data instantly with one click or set it to auto-refresh on a pre-set schedule.
This way, you can easily update HubSpot data in Google Sheets without having to do it manually. This ensures that the data stays up-to-date with minimal effort.
Method 2: Using HubSpot Workflows
Another avenue to establish a seamless HubSpot-Google Sheets integration involves utilizing HubSpot's native workflow feature. Although not as straightforward as StackIt, it provides flexibility for users who prefer working within the HubSpot ecosystem which comes with its own limitations.
Before diving into setting up workflows, ensure your HubSpot and Google Sheets accounts are linked through the HubSpot App Marketplace or a workflow.
Setting Up HubSpot Workflows with Google Sheets:
Step 1 - Define Workflow Trigger: navigate to the Workflows section. Click on the Create workflow button to start a new workflow. Then, Choose the trigger for your workflow. This could be an event such as a form submission or a specific action taken by a contact in HubSpot.
Step 2 - Adding Workflow Actions: Within the workflow editor, you'll need to add actions to your workflow. Look for options related to Google Sheets integration, such as Create a Google Sheet row or Update data in a Google Sheet.
Step 3 - Configuring Workflow Actions: Once you've selected the appropriate action, you'll need to configure it to specify which Google Sheet to send data to and which columns within the sheet should receive the data. Once done, Click on Save.
Once you're confident that your workflow is set up correctly, you can activate it to start automating the process of transferring data from HubSpot to Google Sheets.
While HubSpot workflows offer automation capabilities for data transfer to Google Sheets, it's essential to weigh these considerations and limitations to optimize the integration process effectively.
Considerations and Limitations:
Data Range Restrictions: HubSpot workflows impose limitations on the number of columns that can be updated in a Google Sheet, typically limited to the first 100 columns. This constraint may affect the scope of data that can be integrated and analyzed.
Data Labeling Requirements: It's imperative to ensure that all columns in the designated data range are appropriately labeled. Failure to label columns accurately may result in data discrepancies or errors during the integration process.
Manual Data Entry Implications: Manual data entry into the Google Sheet can disrupt the workflow and lead to inconsistencies. It's advisable to minimize manual interventions to maintain the integrity of the integrated data.
And for all the above reasons, using Hubspot-native workflows is recommended for one-time data import.
Related: HubSpot Native Google Sheets Integration vs. StackIt: A Comprehensive Comparison
Method 3: Using Zapier
Zapier presents an alternative solution for automating data transfer from HubSpot to Google Sheets through customizable workflows, known as Zaps. However, it's imperative to understand the intricacies involved in configuring Zaps for optimal integration.
Configuring Zaps for HubSpot-Google Sheets Integration:
Step 1 - Authentication and App Selection: Begin by authenticating your HubSpot and Google Sheets accounts within the Zapier platform. Choose HubSpot as the triggering application and Google Sheets as the action application.
Step 2 - Defining Triggers and Actions: Specify the trigger event, such as the creation of a New Contact in HubSpot, and define the corresponding action to update data in Google Sheets accordingly.
Step 3 - Testing and Optimization: Once configured, click on Continue and thoroughly test your Zaps to ensure they function as intended. Zapier offers extensive documentation and support to help users troubleshoot any issues and optimize their workflows for efficiency.
While Zapier offers flexibility and automation for integrating HubSpot with Google Sheets, it's essential to navigate potential limitations and challenges to ensure a seamless integration experience.
Considerations and Challenges:
Pre-Defined Workflow Limitations: Zapier's pre-designed workflows may impose limitations on the types of data that can be transferred between HubSpot and Google Sheets. Custom data structures and complex workflows may require additional customization.
Coding Requirements for Advanced Integrations: Advanced integrations beyond Zapier's pre-configured options may necessitate coding skills to leverage the full capabilities of the HubSpot API. This may pose challenges for users without technical expertise.
In summary, while HubSpot workflows and Zapier offer alternative methods for integrating HubSpot with Google Sheets, they may require more setup and testing compared to dedicated integration tools like StackIt.
Effortlessly integrating HubSpot with Google Sheets is now a breeze with StackIt!
Say goodbye to manual data exports and repetitive tasks. With StackIt, streamline your workflows and boost productivity with just a single click.
Try out StackIt today on your own or book a demo to automate your data analysis and reporting workflows.
FAQs
Is it possible to automatically refresh data imported from HubSpot to Google Sheets using StackIt?
Is it possible to automatically refresh data imported from HubSpot to Google Sheets using StackIt?
Can I pull data from custom fields in HubSpot using StackIt?
Can I pull data from custom fields in HubSpot using StackIt?
Does StackIt support automatic associations between different objects in HubSpot?
Does StackIt support automatic associations between different objects in HubSpot?
Automatic Data Pulls
Visual Data Preview
Set Alerts
other related blogs
Try it now