Product
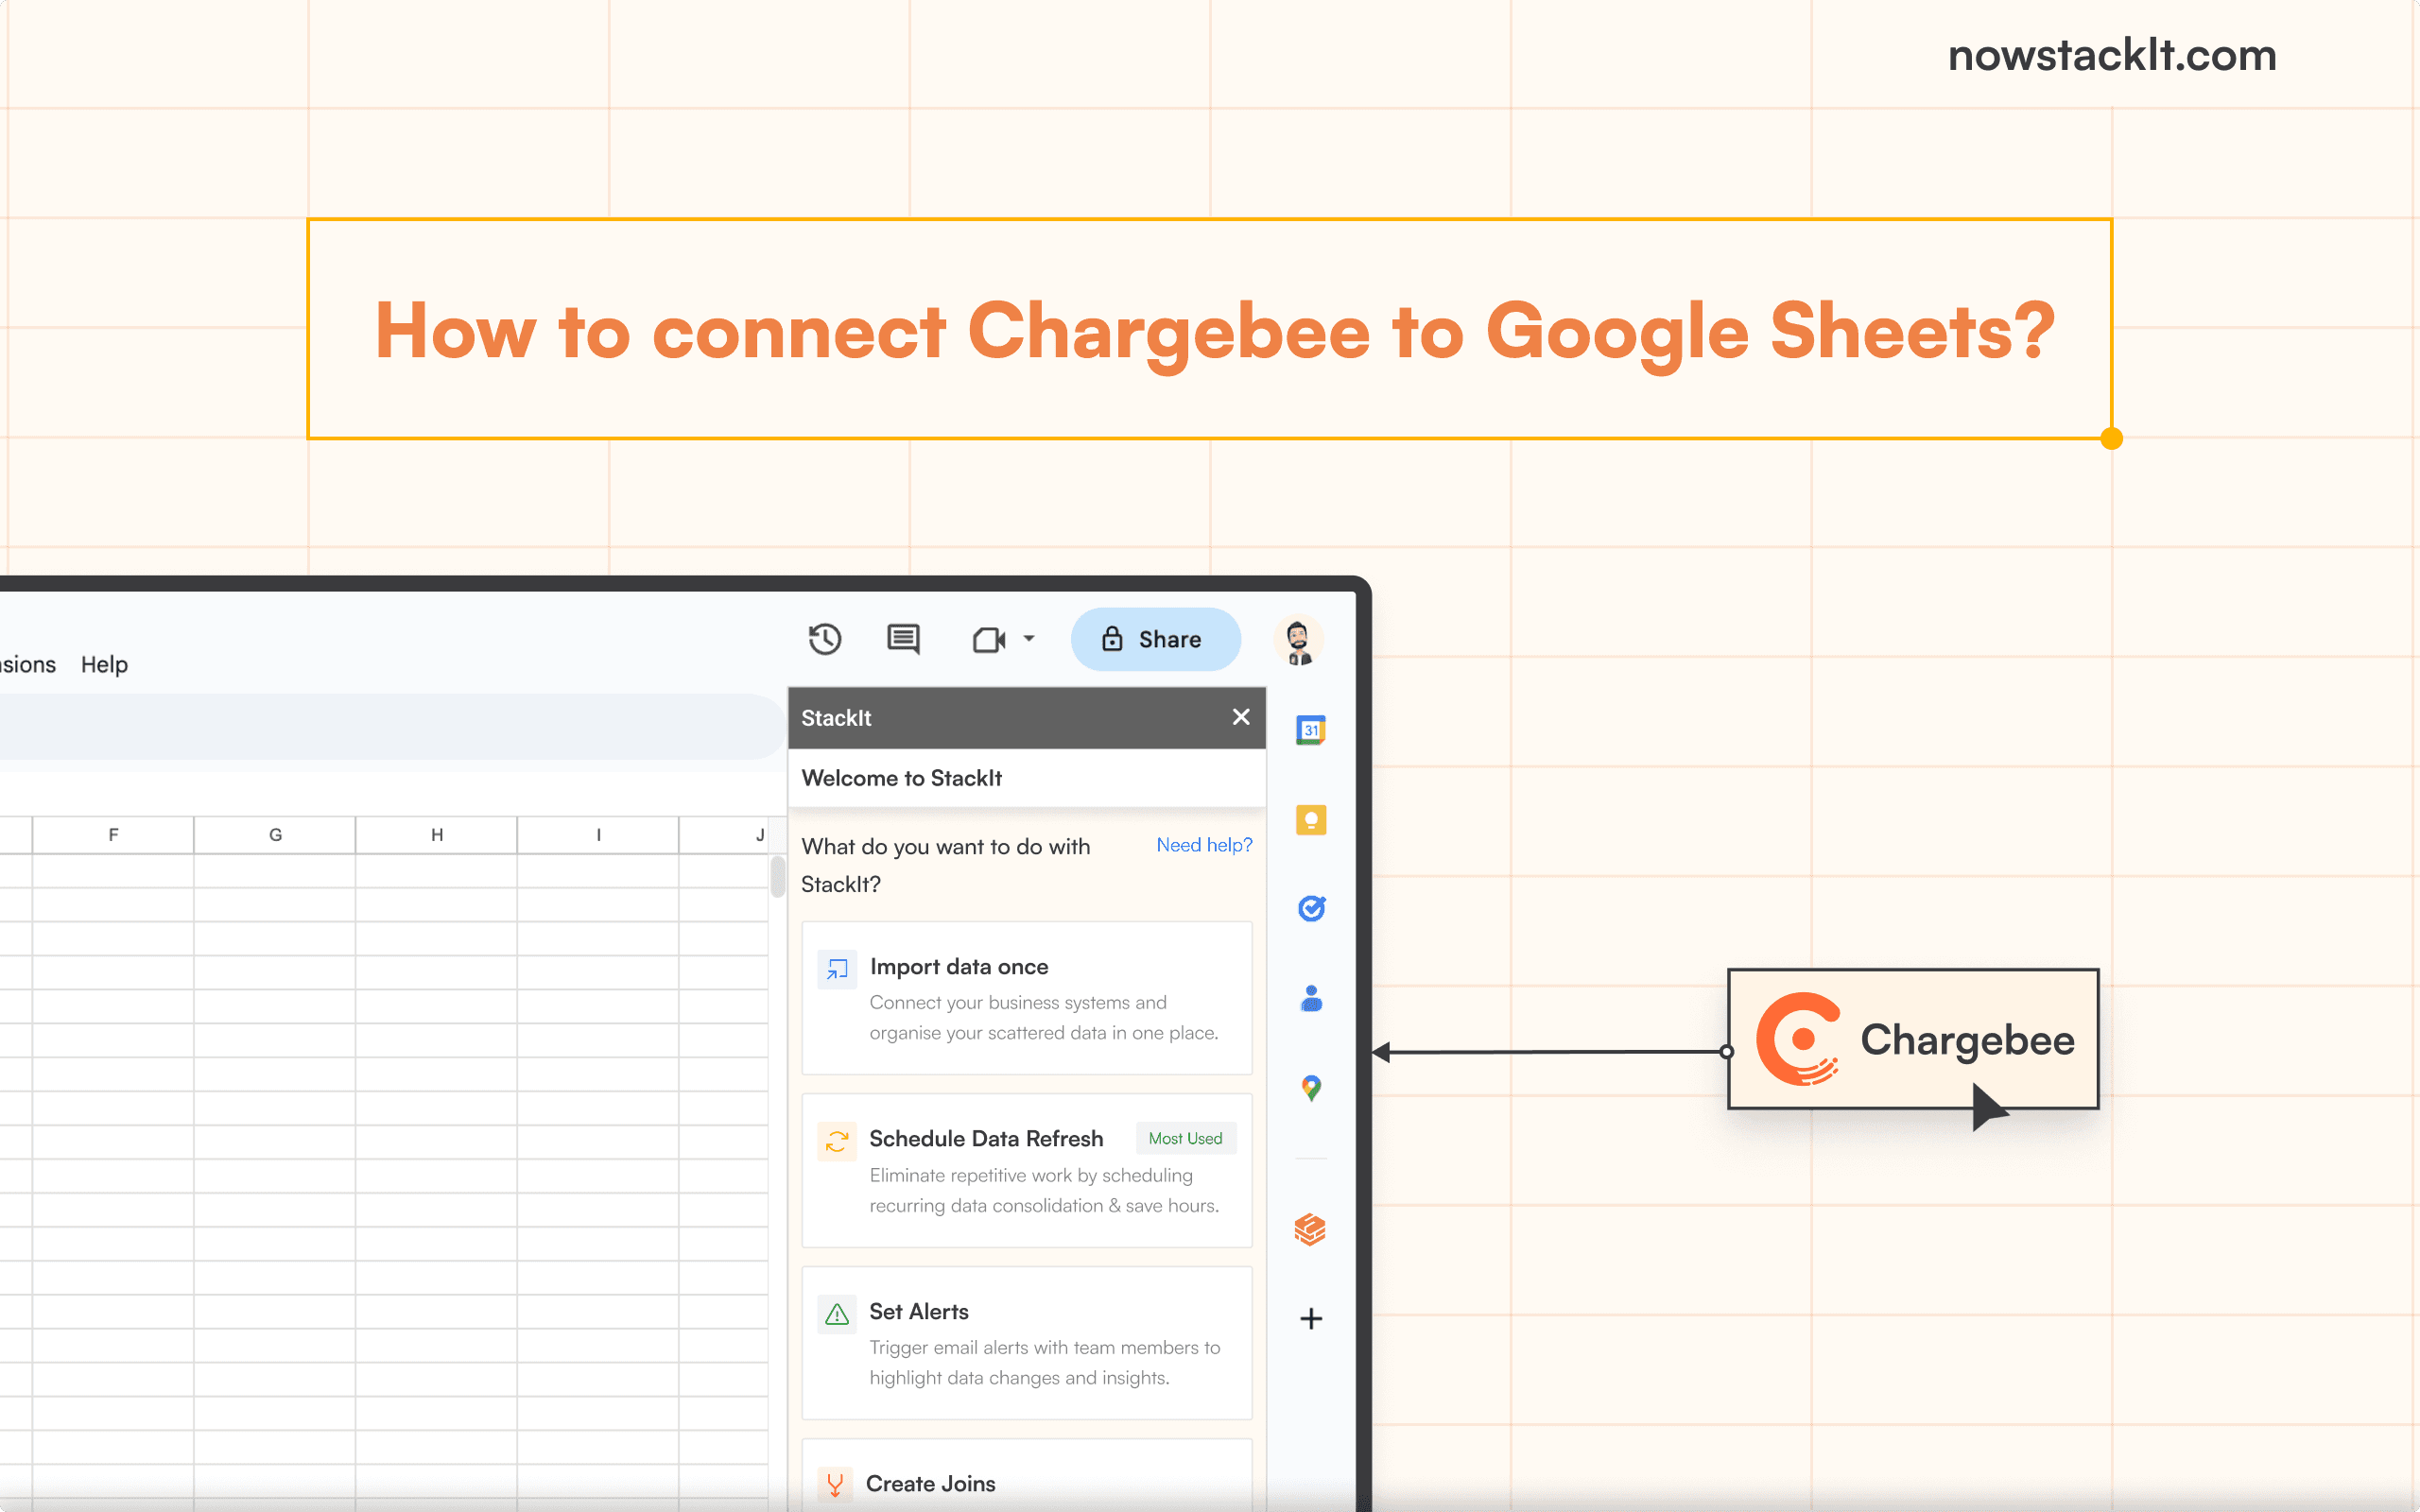
How to connect Chargebee to Google Sheets?
Learn how to connect Chargebee to Google Sheets. This guide offers installation steps and compares StackIt with Zapier for efficient data automation.
Table of Contents
Exporting data from Chargebee to Google Sheets often proves challenging due to the complexities and untidiness of Chargebee exports. But fear not, as this blog presents the simplest and quickest methods to achieve this.
Chargebee serves as a pivotal subscription billing and revenue management platform, streamlining subscription billing, payments, invoicing, and customer management processes for businesses.
Many users, despite Chargebee's built-in reporting and analytics features, opt to export their data to Google Sheets for more robust data analysis and visualization capabilities. Google Sheets offers unparalleled flexibility, customization, and seamless integration with other Google services.
Let’s explore various methods for establishing this connection and highlight the benefits of each approach.
Best Methods to Integrate Chargebee with Google Sheets
1. Using StackIt - Recommended for quick integration and automated data imports, and to work with historical data.
2. Using Zapier - Recommended for building multi-step workflow with extremely small data workflows.
Method 1 - Using StackIt
Unlike Zapier, which demands technical expertise and incurs high setup costs, StackIt offers a swift and hassle-free approach to connect Chargebee with Google Sheets, without any assistance.
Step-by-Step Guide: Integrating Chargebee with Google Sheets Using StackIt
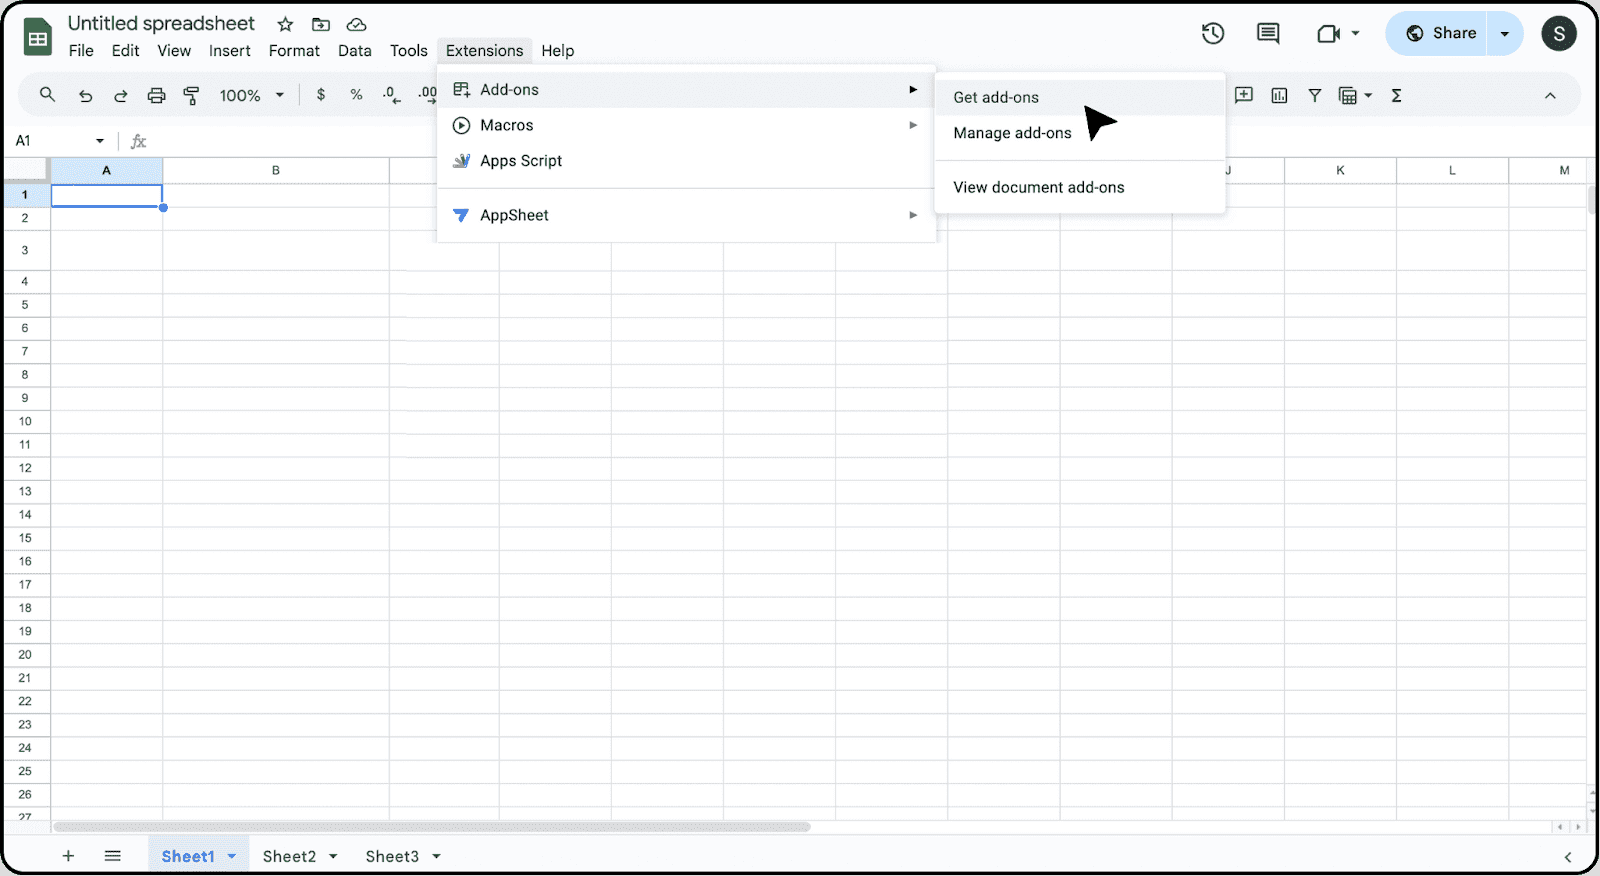
Step 1 - Accessing StackIt:
Head to the Extensions tab within Google Sheets, select Add-ons, and navigate to Get Add-ons.
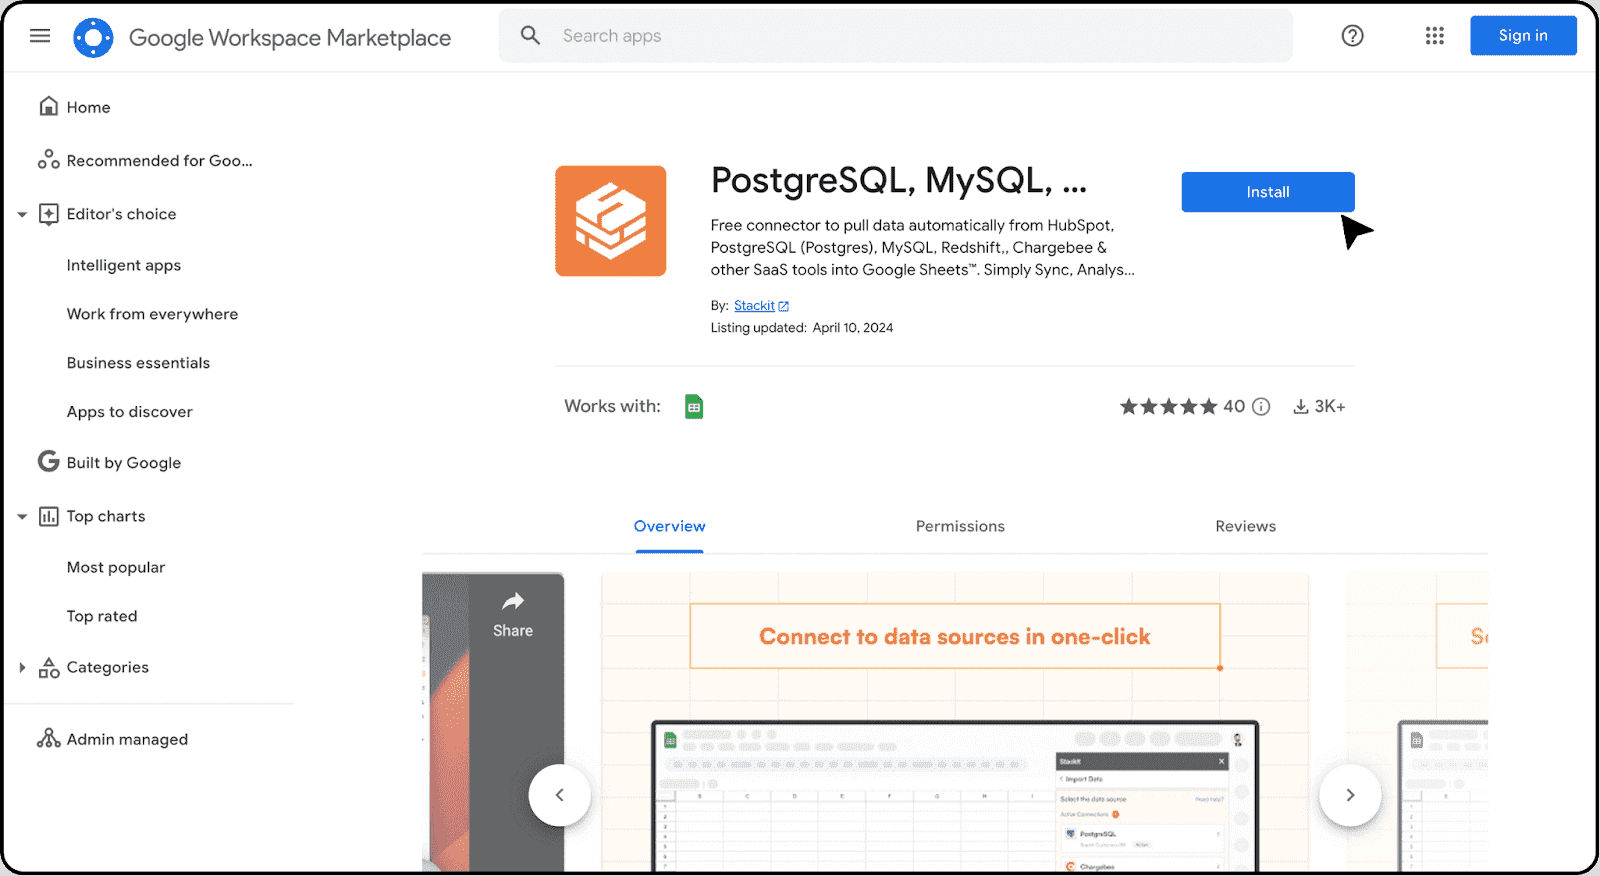
Search StackIt in the Google Workspace Marketplace and click on Install to initiate the installation process as guided.
You can also directly install StackIt from the Google Workspace Marketplace.
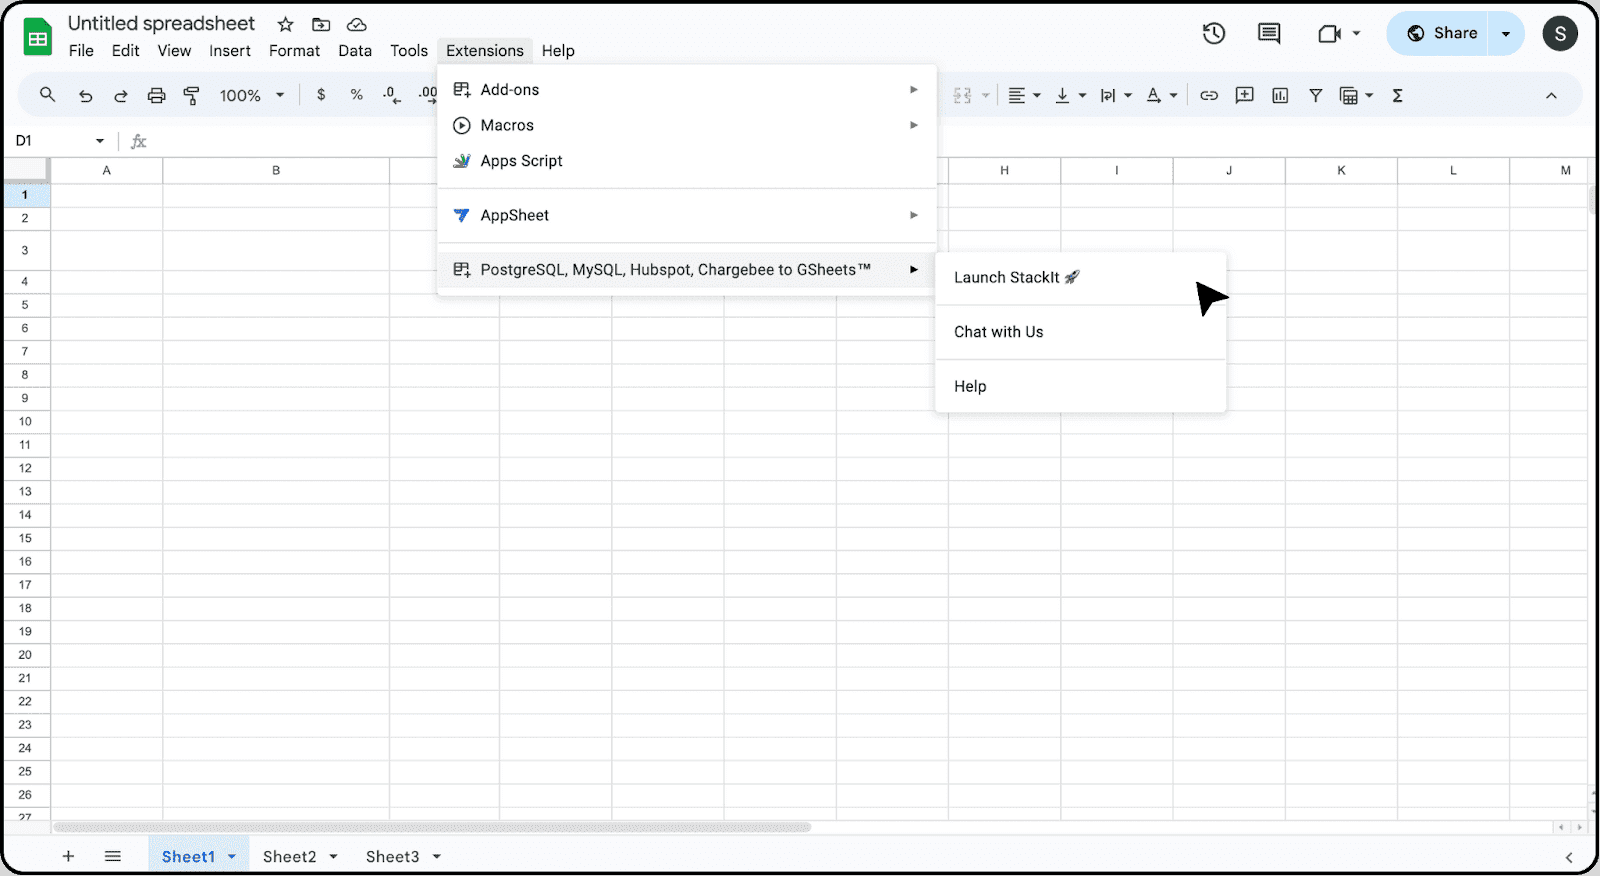
Step 2 - Launching StackIt:
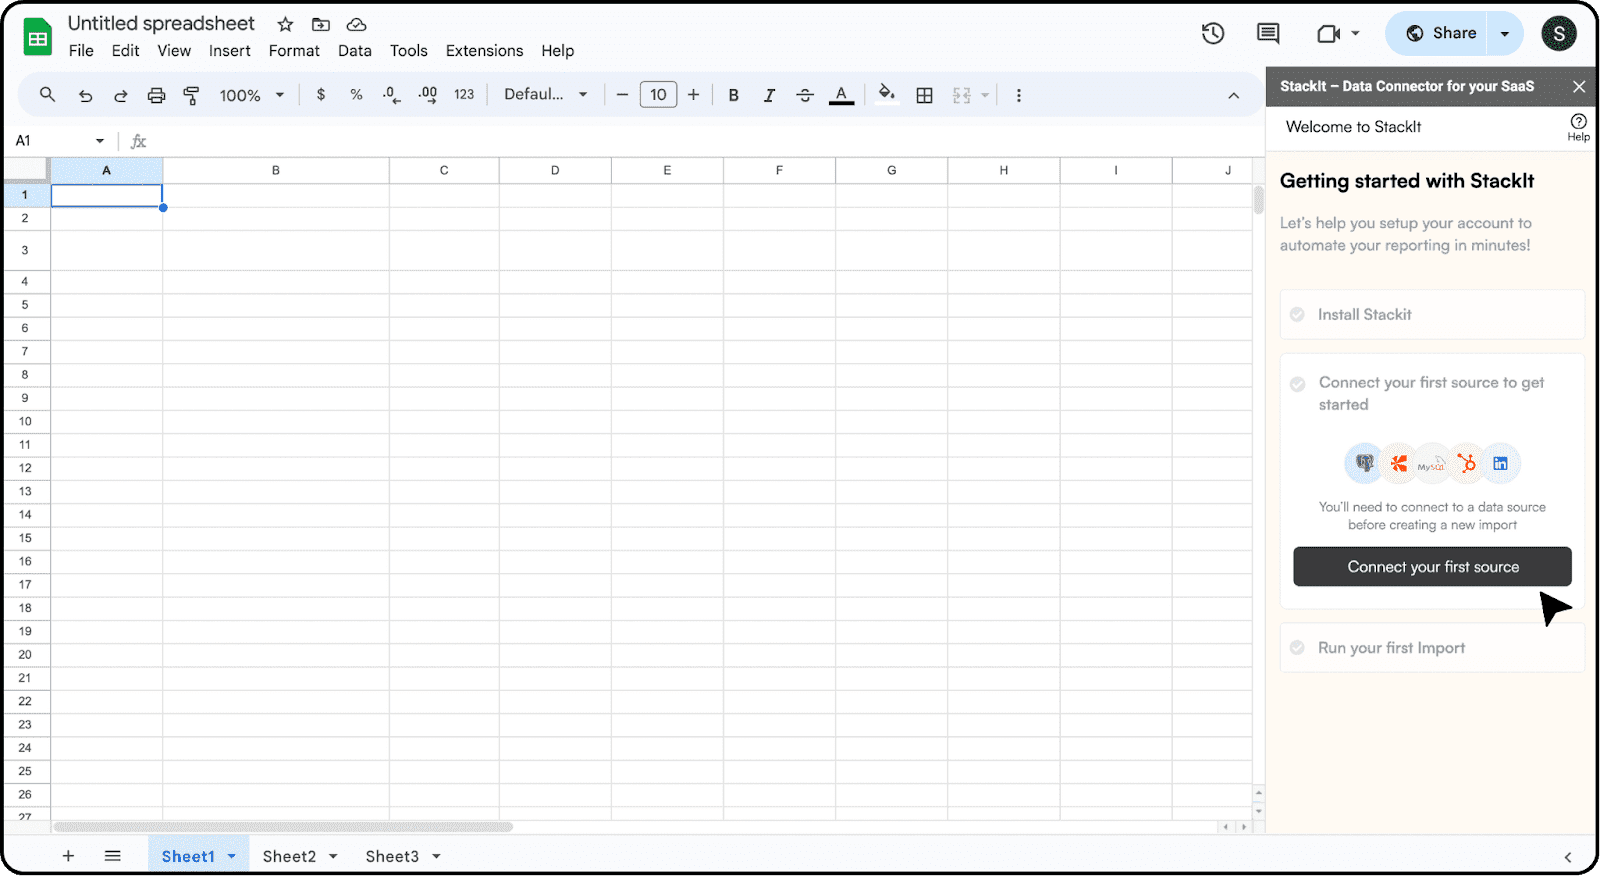
Return to the Extensions menu and Launch StackIt 🚀. StackIt will launch as a convenient side panel on the right-hand side of your screen within Google Sheets.
Step 3 - Connecting Chargebee:
Click on Connect your first source.
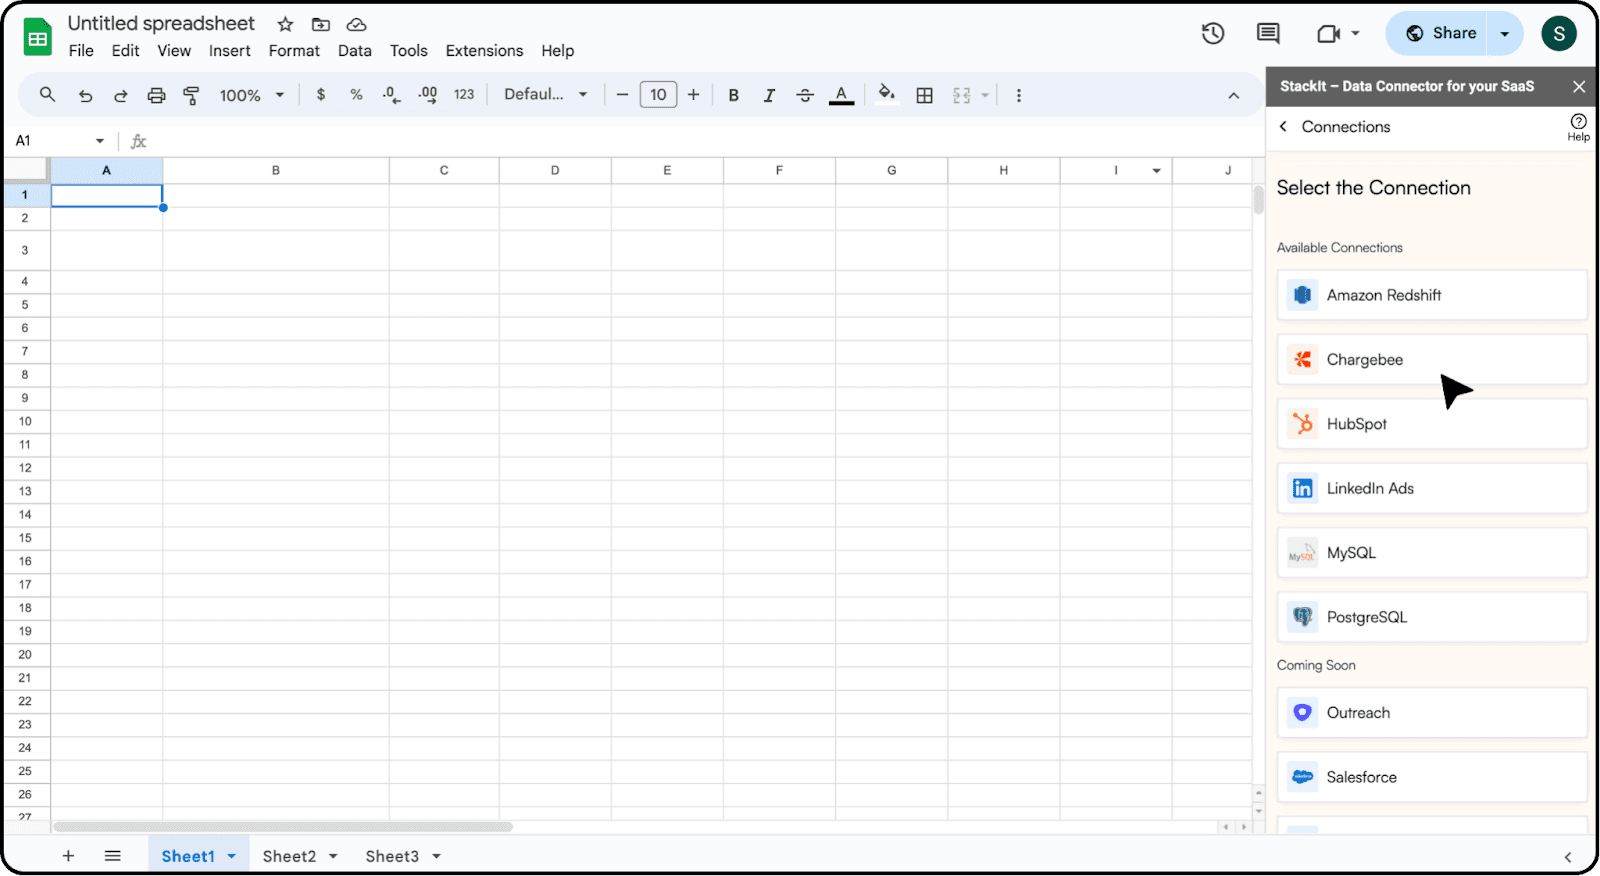
Select Chargebee from the list of available Connections.
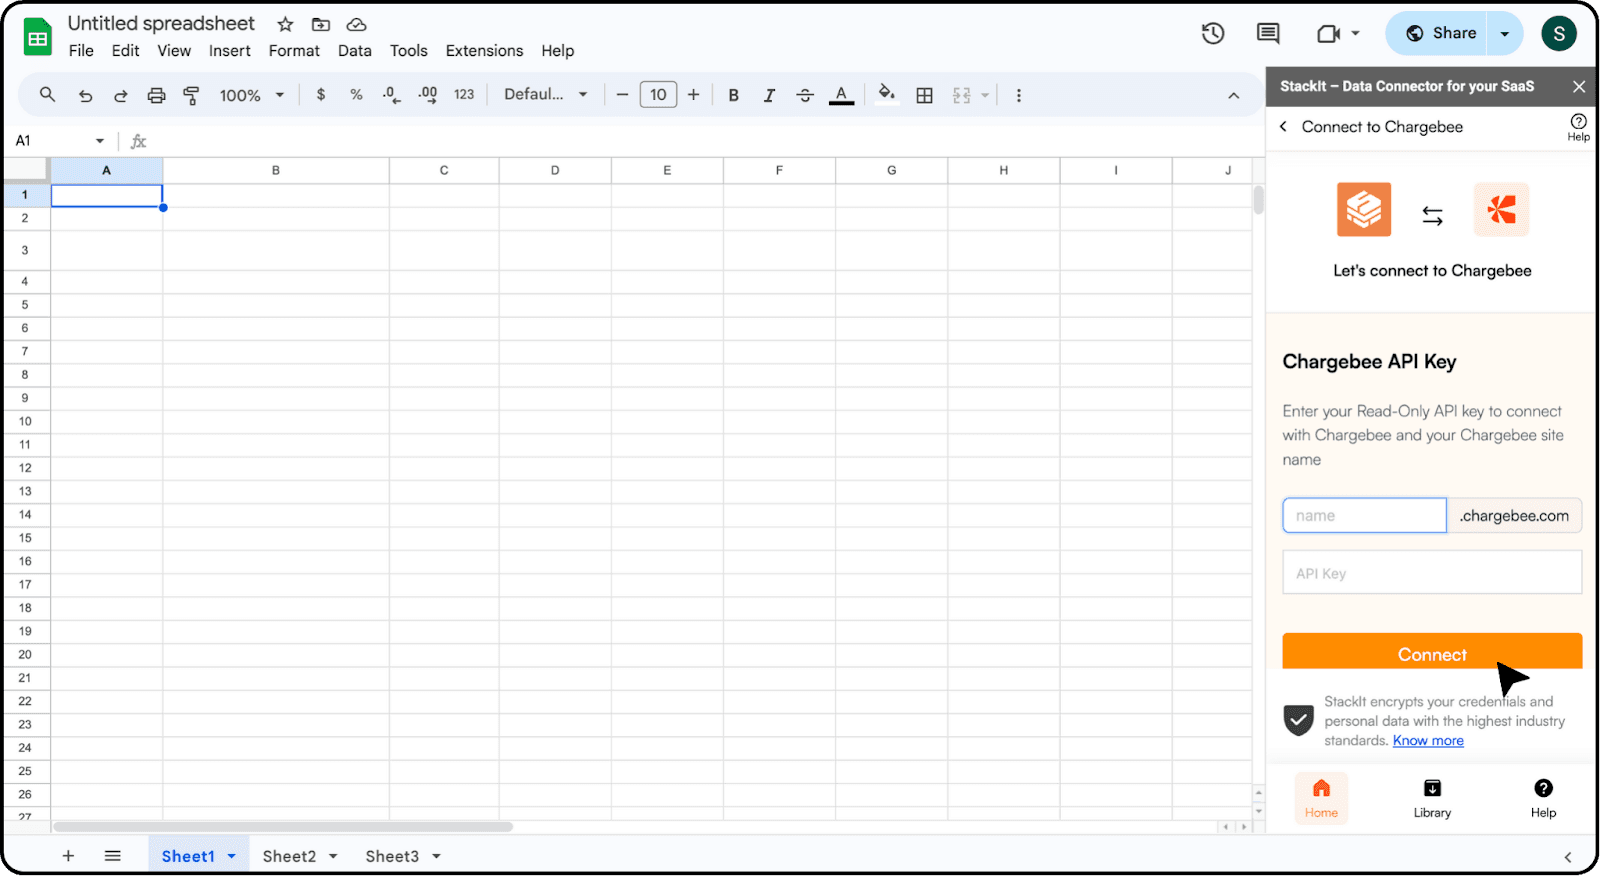
Enter your Chargebee Site name and Read-only API Key. If you don’t know where to find your Chargebee Site Name and API key, Check out the FAQs at the end of the blog.
Click on Connect and viola you have established a seamless connection between your Chargebee account and Google Sheets.
Step 4 - Data Selection:
Choose the desired data objects, such as Subscription data.
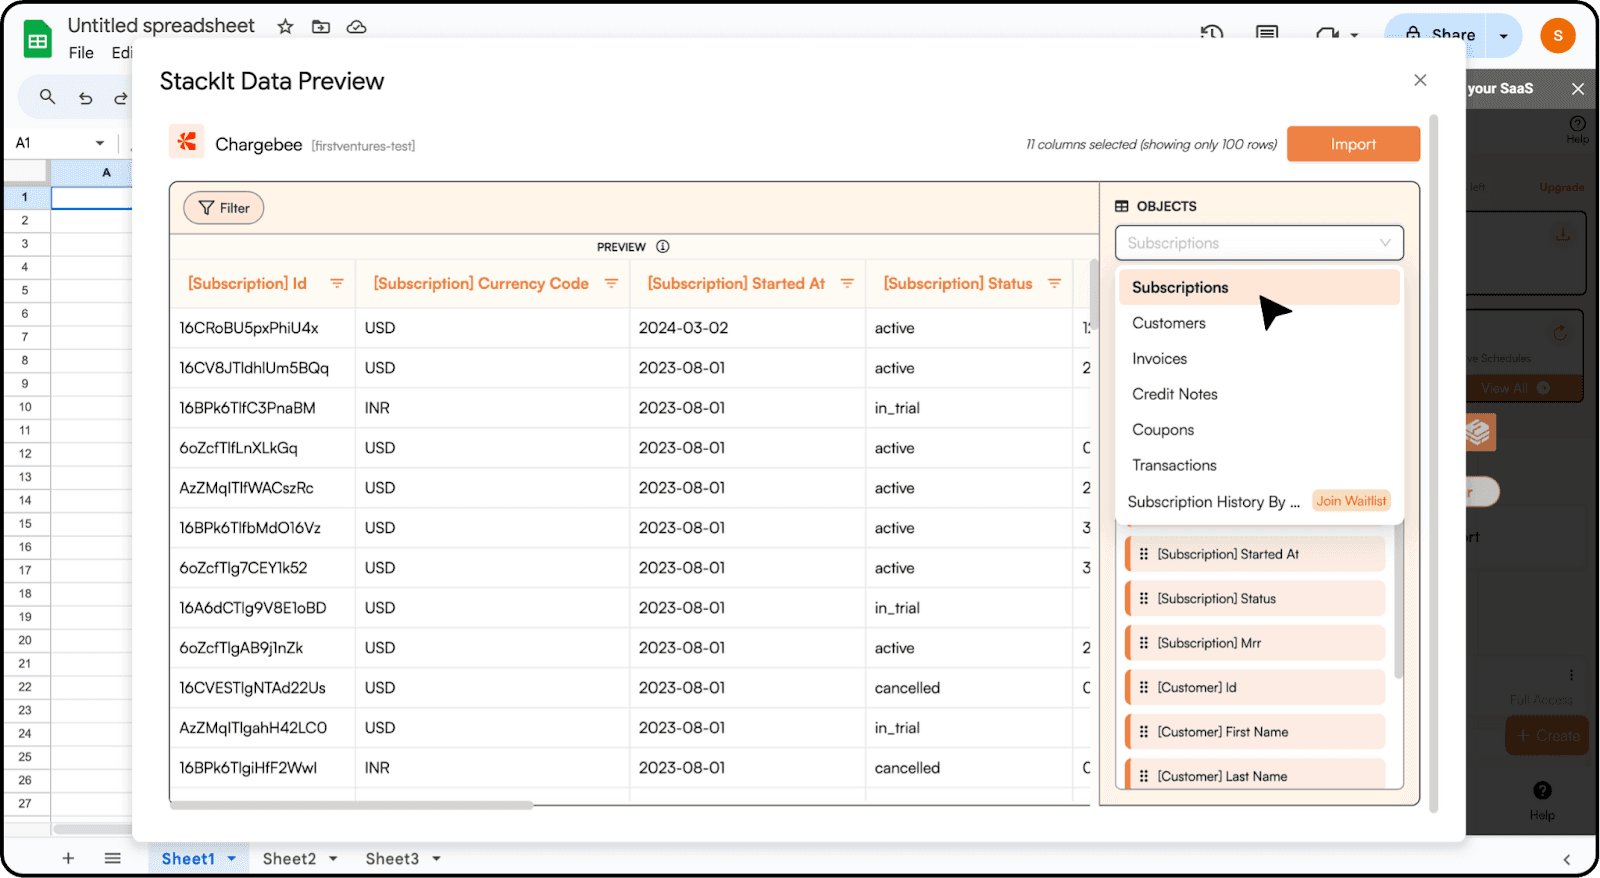
Select the relevant Fields for import.
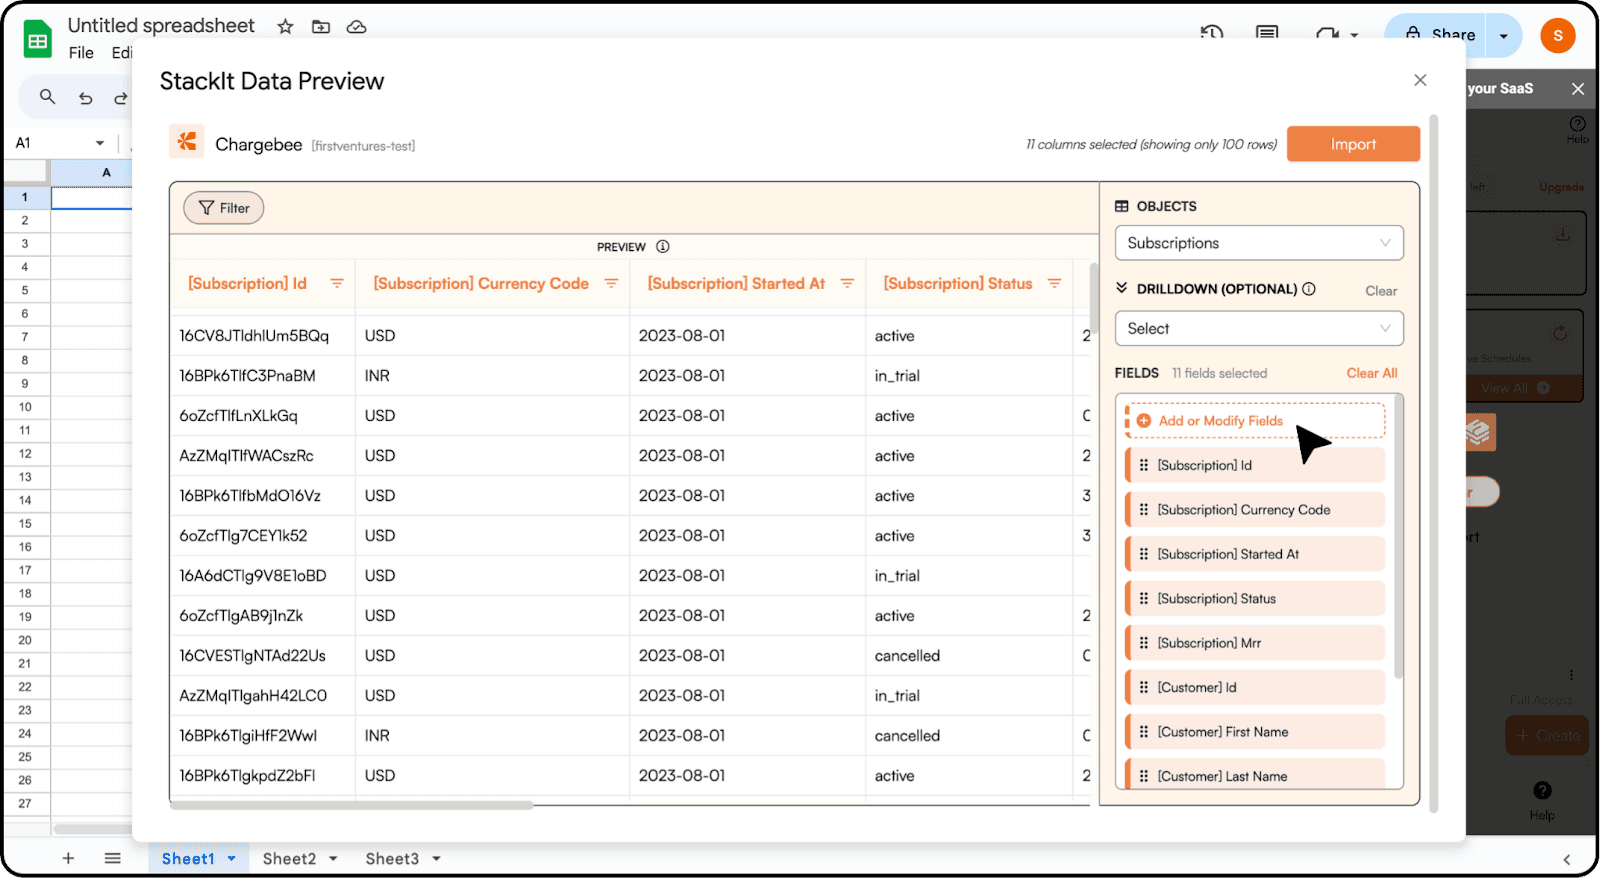
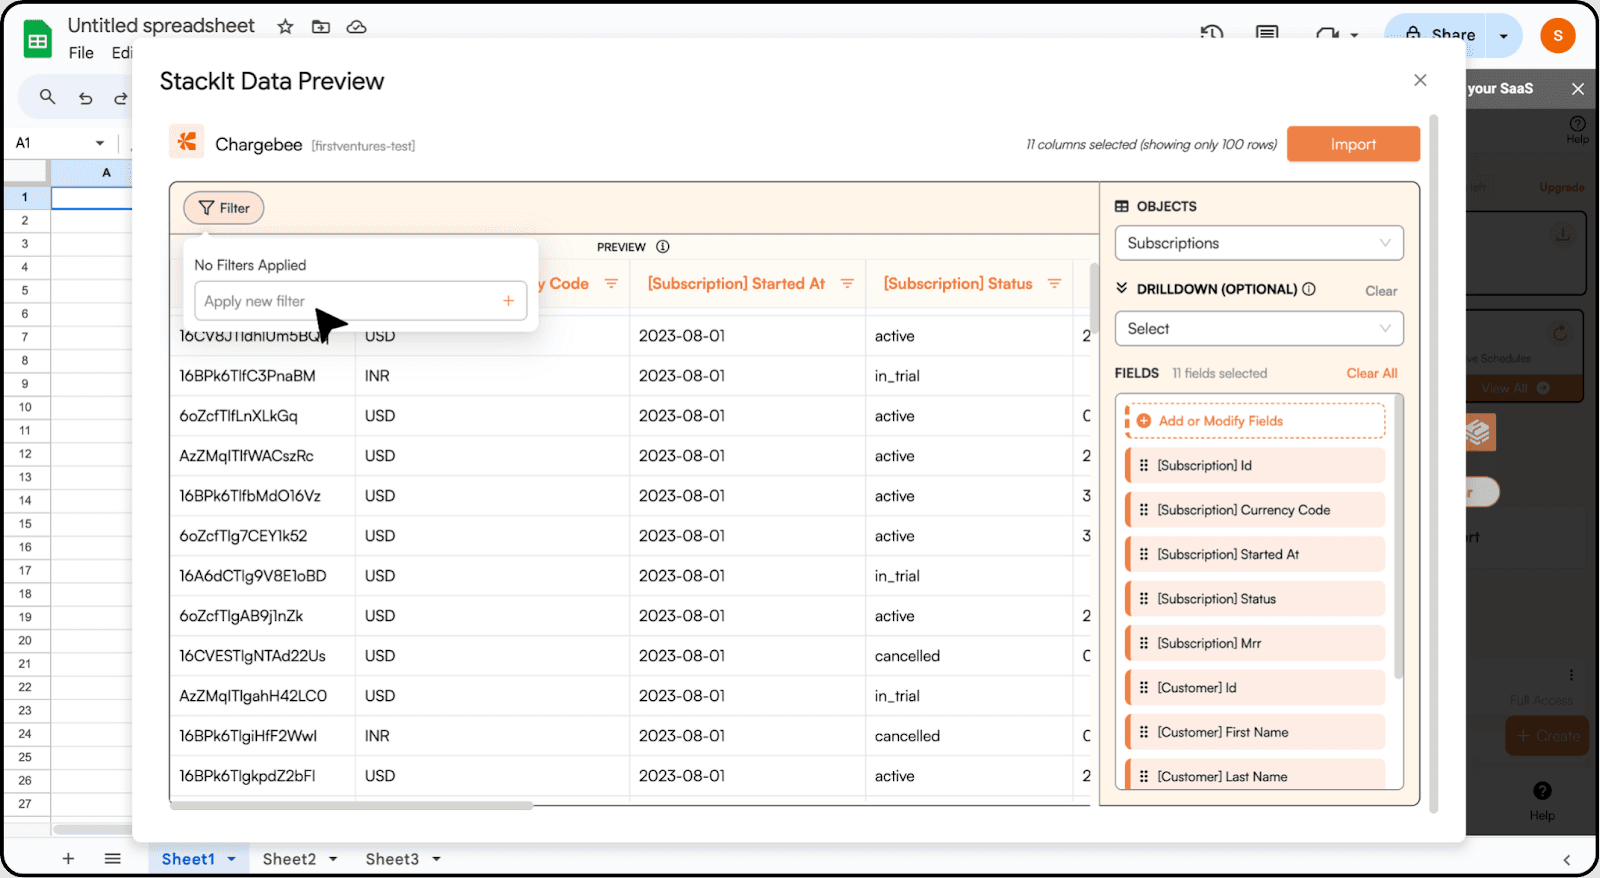
Preview your data and you can also apply filters for a refined import.
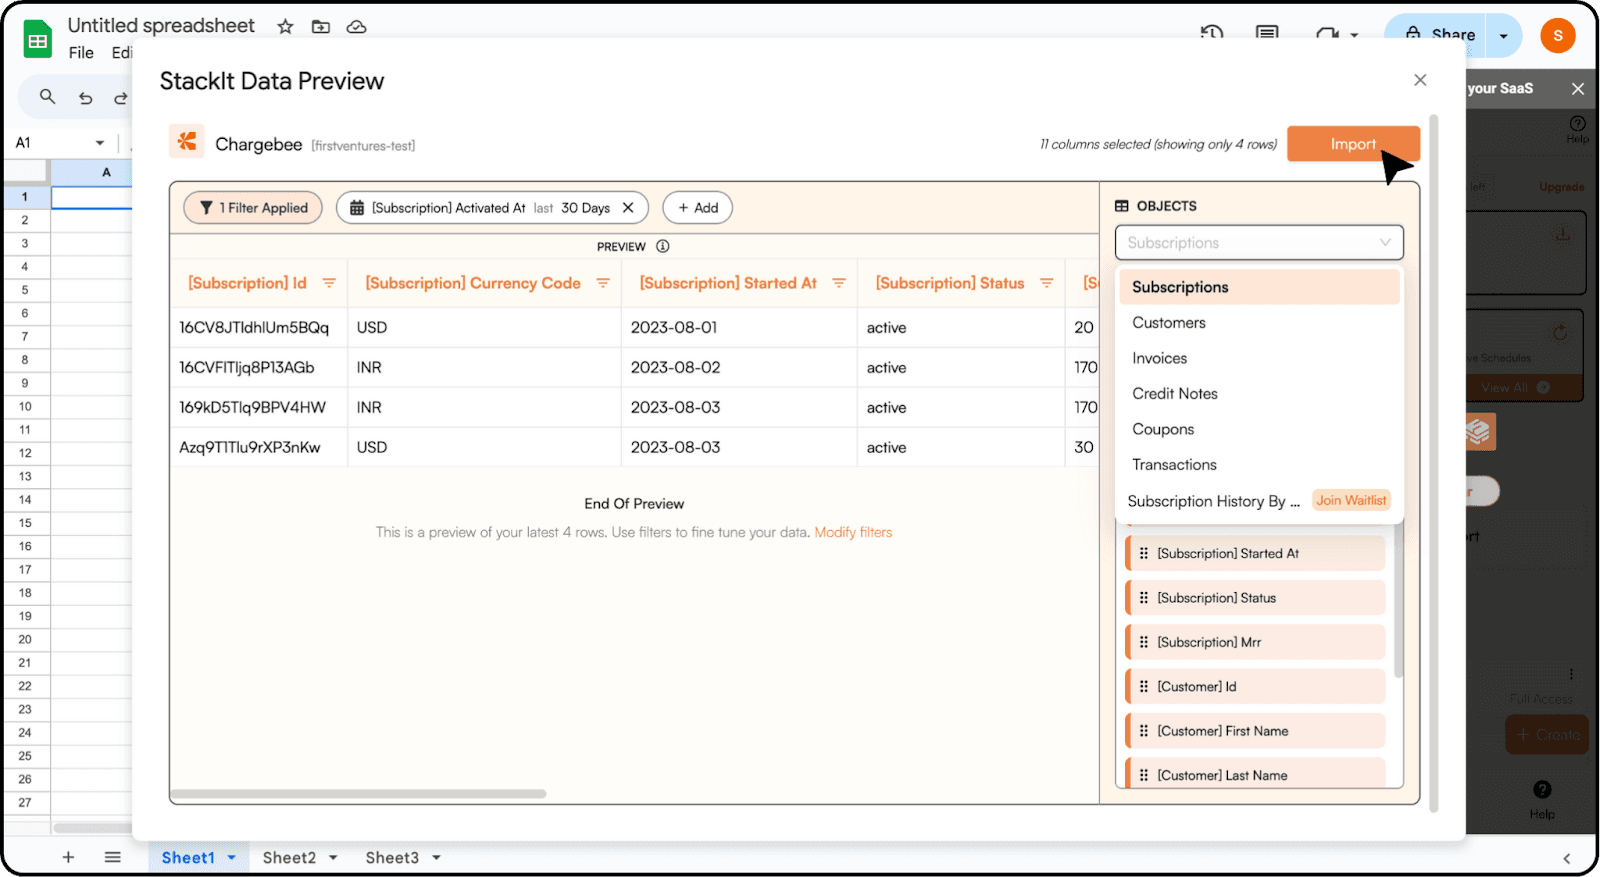
Step 5 - Finalizing Import:
With a single click on the Import button, effortlessly import clean, organized data from Chargebee into your Google Sheets.
Step 6: Set up a Schedule
StackIt lets you refresh your imported data instantly with one click or set it to auto-refresh on a pre-set schedule.
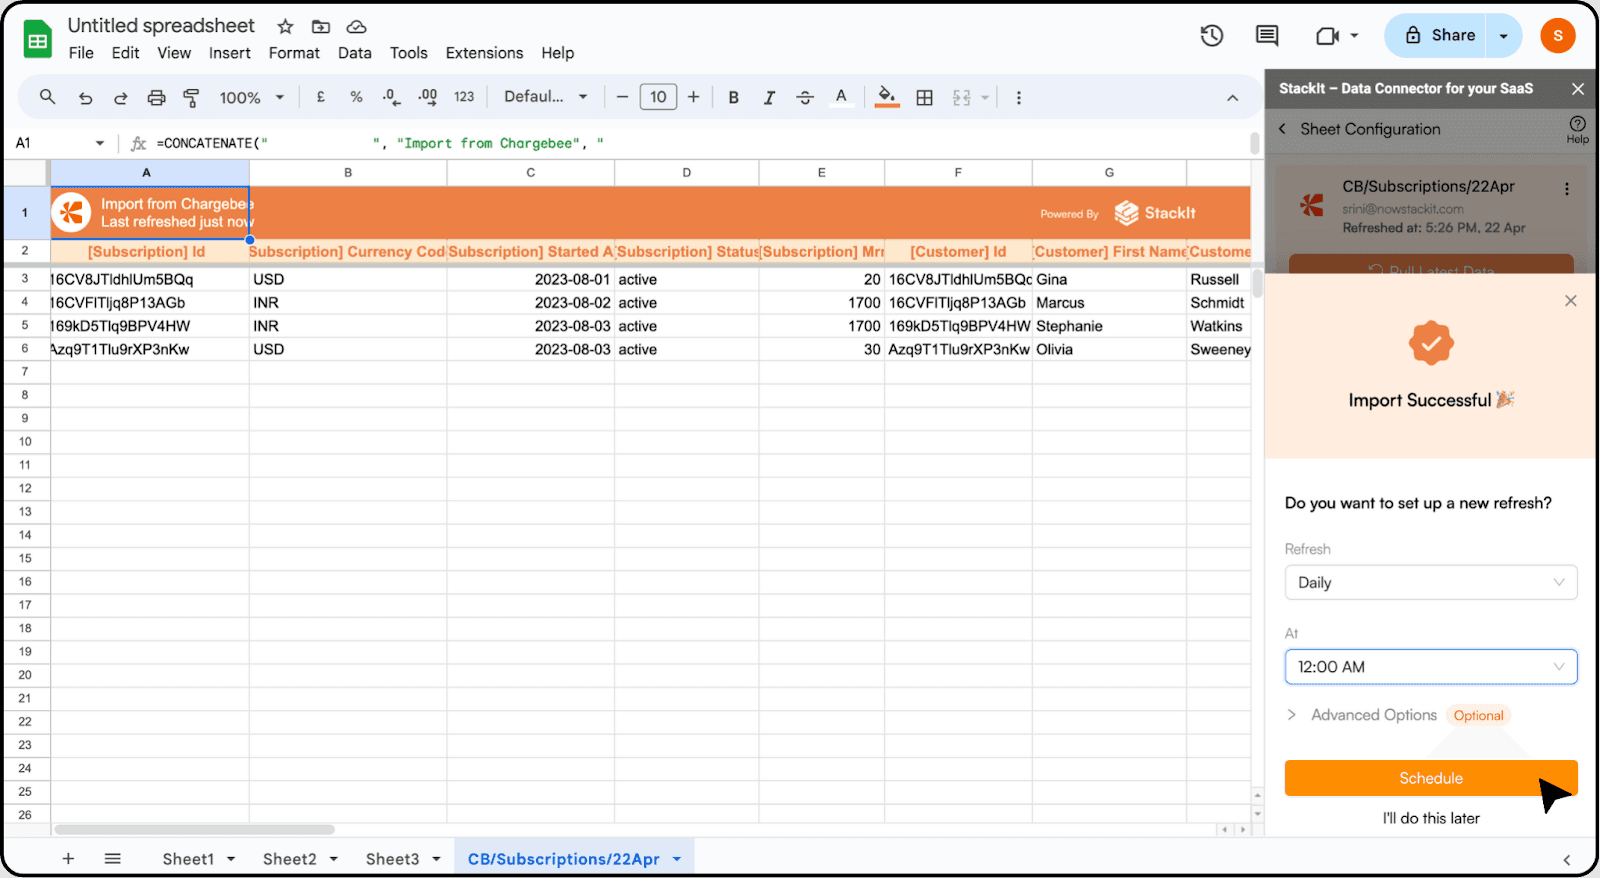
This way, you can easily update Chargebee data in Google Sheets without having to do it manually. This ensures that the data stays up-to-date with minimal effort.
Why Choose StackIt?
Quick and Seamless Integration: StackIt’s integration with Chargebee enables direct connection to your Google Sheets, meticulously organizing data points for easy accessibility in a familiar format.
Data Preview: Always import data that you actually need using the Data Preview. No more CSVs with 100s of columns that you don’t really need.
Gain a sneak peek into your import even before data lands on your sheet. Customize columns effortlessly, and refine your data during preview with sorting and filtering options. Leverage Google Sheets Advantages: Harness collaborative data analysis, powerful visualization tools, and seamless integration with other Google services by seamlessly importing Chargebee data into Google Sheets.
Automated Data Refresh: Keep your sheets synchronized with Chargebee effortlessly through one-click or scheduled refreshes, ensuring real-time data updates without manual intervention.
Method 2 - Using Zapier:
Zapier facilitates data transfer from Chargebee Billing to Google Sheets through automated workflows also known as Zaps.
Configuring a Zap entails:
Step 1 - Authentication and App Selection:
Authenticate your Chargebee and Google Sheets accounts within Zapier. Specify Chargebee as the triggering application and Google Sheets as the action application.
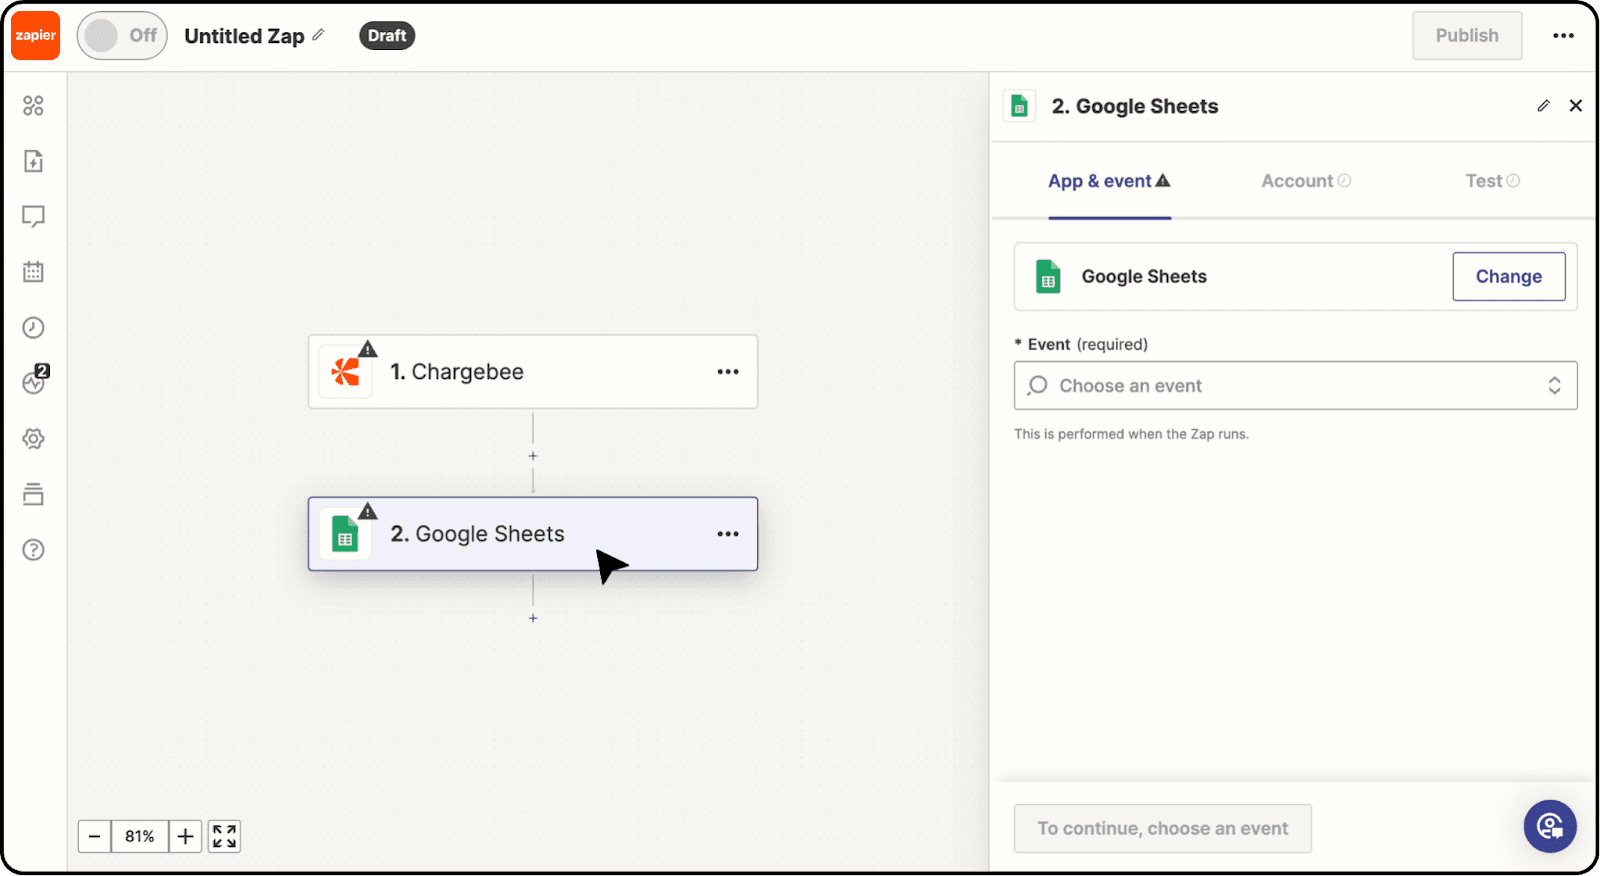
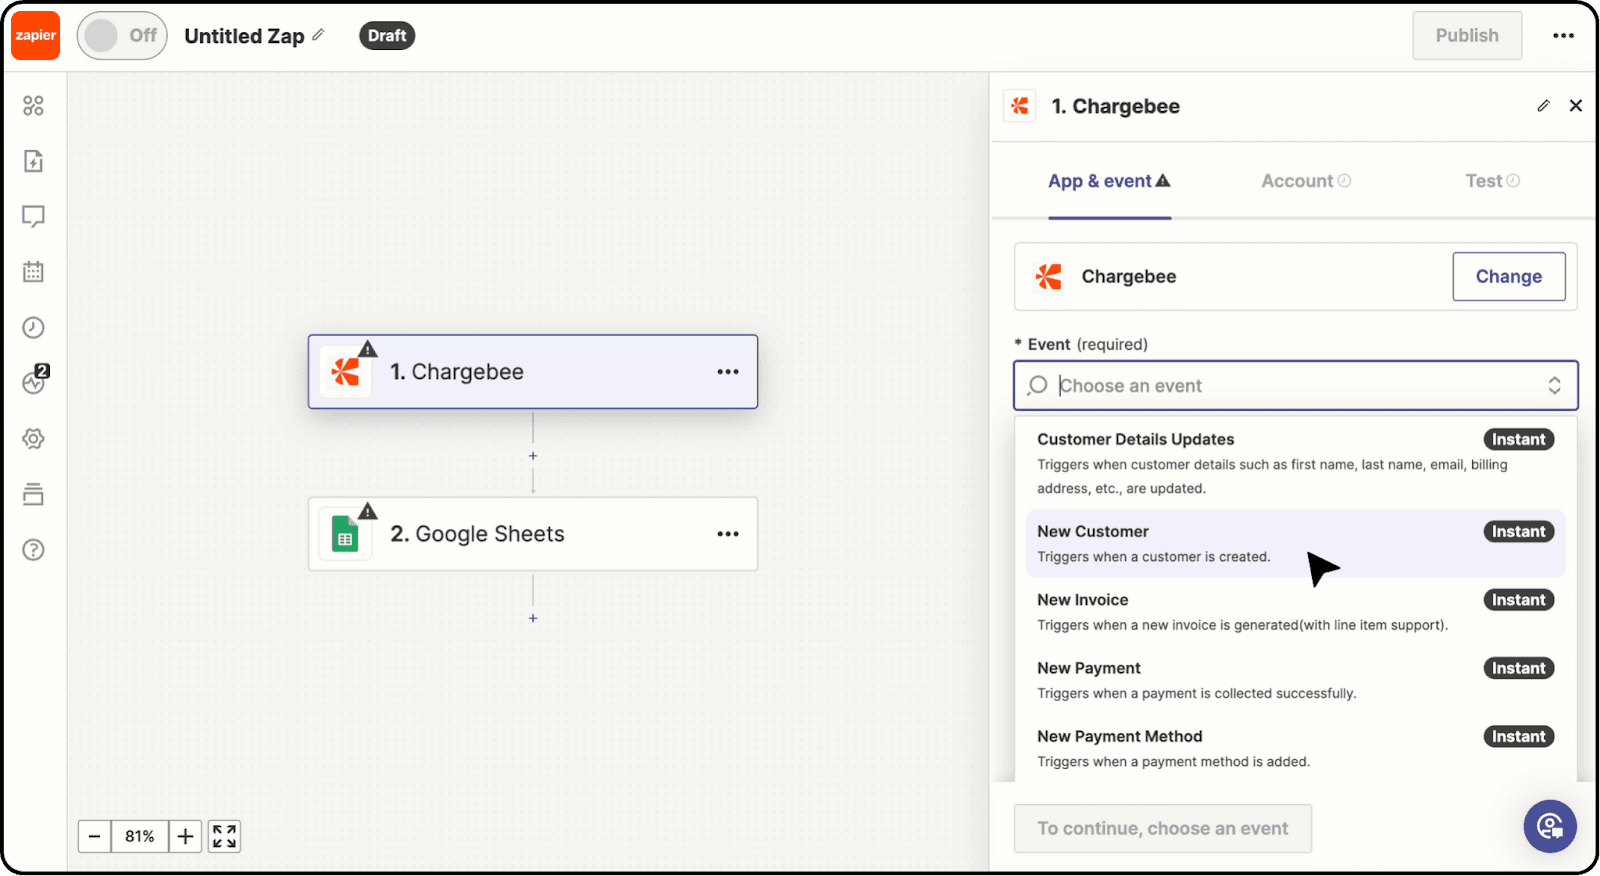
Step 2 - Defining Triggers and Actions:
Define trigger events, such as New Customer creation in Chargebee, and corresponding actions to update data in Google Sheets accordingly.
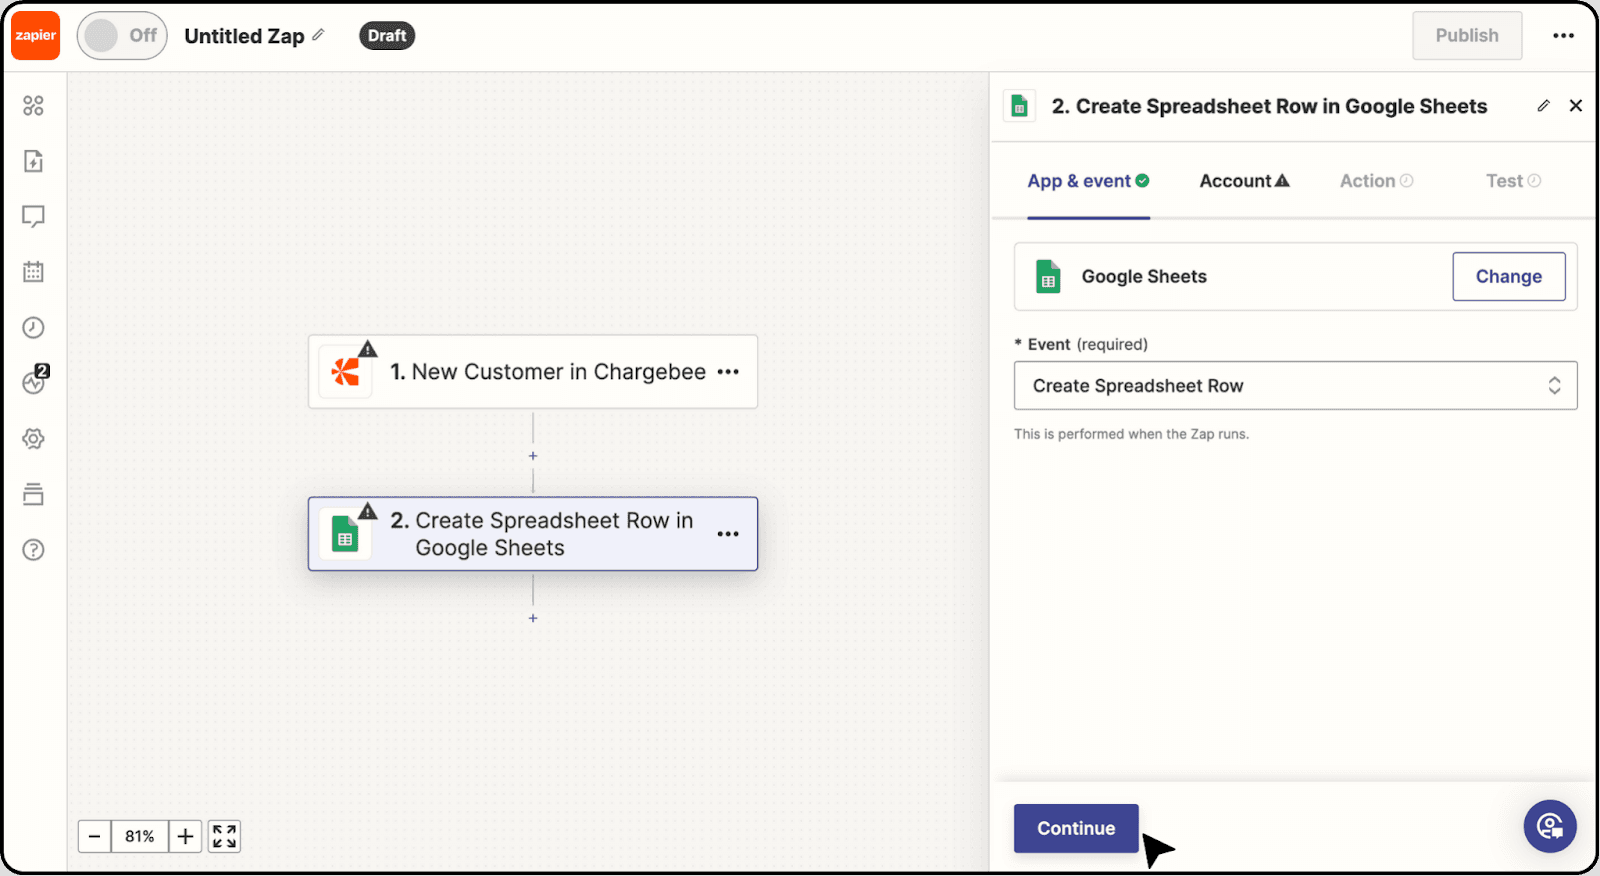
Step 3 - Testing and Optimization:
Click on Continue and thoroughly test configured Zaps to ensure seamless functionality. Zapier offers comprehensive documentation and support for troubleshooting and workflow optimization.
Pros of using Zapier:
Seamless Integration: Setting up Chargebee to Google Sheets integration requires no coding and is user-friendly.
Accessibility: Non-technical users can effortlessly configure and test automated workflows, catering to a broad user base.
Cons of Using Zapier:
Lack of historical data: Zapier works on an IFTTT model and is essentially a workflow builder. Since Zapier works on triggers, it doesn’t allow you to import historical data from Zapier.
Time-Consuming Setup: Configuring automated workflows demands time and effort in defining specific data to pull from Chargebee to Google Sheets.
Vulnerability to Errors: Zapier's Google Sheets trigger may encounter issues with spreadsheet alterations, potentially disrupting workflow continuity.
In Conclusion, StackIt emerges as the preferred solution for integrating Chargebee with Google Sheets, offering accessibility, security, and efficiency without coding complexities. While Zap workflows entail cost escalations, StackIt ensures robust and user-friendly data handling capabilities.
Effortlessly integrating Chargebee with Google Sheets is now a breeze with StackIt!
Say goodbye to manual data exports and repetitive tasks. With StackIt, streamline your workflows and boost productivity with just a single click. StackIt is also listed on the Chargebee Marketplace.
Try out StackIt today on your own or book a demo to automate your data analysis and reporting workflows.
Exporting data from Chargebee to Google Sheets often proves challenging due to the complexities and untidiness of Chargebee exports. But fear not, as this blog presents the simplest and quickest methods to achieve this.
Chargebee serves as a pivotal subscription billing and revenue management platform, streamlining subscription billing, payments, invoicing, and customer management processes for businesses.
Many users, despite Chargebee's built-in reporting and analytics features, opt to export their data to Google Sheets for more robust data analysis and visualization capabilities. Google Sheets offers unparalleled flexibility, customization, and seamless integration with other Google services.
Let’s explore various methods for establishing this connection and highlight the benefits of each approach.
Best Methods to Integrate Chargebee with Google Sheets
1. Using StackIt - Recommended for quick integration and automated data imports, and to work with historical data.
2. Using Zapier - Recommended for building multi-step workflow with extremely small data workflows.
Method 1 - Using StackIt
Unlike Zapier, which demands technical expertise and incurs high setup costs, StackIt offers a swift and hassle-free approach to connect Chargebee with Google Sheets, without any assistance.
Step-by-Step Guide: Integrating Chargebee with Google Sheets Using StackIt
Step 1 - Accessing StackIt:
Head to the Extensions tab within Google Sheets, select Add-ons, and navigate to Get Add-ons.
Search StackIt in the Google Workspace Marketplace and click on Install to initiate the installation process as guided.
You can also directly install StackIt from the Google Workspace Marketplace.
Step 2 - Launching StackIt:
Return to the Extensions menu and Launch StackIt 🚀. StackIt will launch as a convenient side panel on the right-hand side of your screen within Google Sheets.
Step 3 - Connecting Chargebee:
Click on Connect your first source.
Select Chargebee from the list of available Connections.
Enter your Chargebee Site name and Read-only API Key. If you don’t know where to find your Chargebee Site Name and API key, Check out the FAQs at the end of the blog.
Click on Connect and viola you have established a seamless connection between your Chargebee account and Google Sheets.
Step 4 - Data Selection:
Choose the desired data objects, such as Subscription data.
Select the relevant Fields for import.
Preview your data and you can also apply filters for a refined import.
Step 5 - Finalizing Import:
With a single click on the Import button, effortlessly import clean, organized data from Chargebee into your Google Sheets.
Step 6: Set up a Schedule
StackIt lets you refresh your imported data instantly with one click or set it to auto-refresh on a pre-set schedule.
This way, you can easily update Chargebee data in Google Sheets without having to do it manually. This ensures that the data stays up-to-date with minimal effort.
Why Choose StackIt?
Quick and Seamless Integration: StackIt’s integration with Chargebee enables direct connection to your Google Sheets, meticulously organizing data points for easy accessibility in a familiar format.
Data Preview: Always import data that you actually need using the Data Preview. No more CSVs with 100s of columns that you don’t really need.
Gain a sneak peek into your import even before data lands on your sheet. Customize columns effortlessly, and refine your data during preview with sorting and filtering options. Leverage Google Sheets Advantages: Harness collaborative data analysis, powerful visualization tools, and seamless integration with other Google services by seamlessly importing Chargebee data into Google Sheets.
Automated Data Refresh: Keep your sheets synchronized with Chargebee effortlessly through one-click or scheduled refreshes, ensuring real-time data updates without manual intervention.
Method 2 - Using Zapier:
Zapier facilitates data transfer from Chargebee Billing to Google Sheets through automated workflows also known as Zaps.
Configuring a Zap entails:
Step 1 - Authentication and App Selection:
Authenticate your Chargebee and Google Sheets accounts within Zapier. Specify Chargebee as the triggering application and Google Sheets as the action application.
Step 2 - Defining Triggers and Actions:
Define trigger events, such as New Customer creation in Chargebee, and corresponding actions to update data in Google Sheets accordingly.
Step 3 - Testing and Optimization:
Click on Continue and thoroughly test configured Zaps to ensure seamless functionality. Zapier offers comprehensive documentation and support for troubleshooting and workflow optimization.
Pros of using Zapier:
Seamless Integration: Setting up Chargebee to Google Sheets integration requires no coding and is user-friendly.
Accessibility: Non-technical users can effortlessly configure and test automated workflows, catering to a broad user base.
Cons of Using Zapier:
Lack of historical data: Zapier works on an IFTTT model and is essentially a workflow builder. Since Zapier works on triggers, it doesn’t allow you to import historical data from Zapier.
Time-Consuming Setup: Configuring automated workflows demands time and effort in defining specific data to pull from Chargebee to Google Sheets.
Vulnerability to Errors: Zapier's Google Sheets trigger may encounter issues with spreadsheet alterations, potentially disrupting workflow continuity.
In Conclusion, StackIt emerges as the preferred solution for integrating Chargebee with Google Sheets, offering accessibility, security, and efficiency without coding complexities. While Zap workflows entail cost escalations, StackIt ensures robust and user-friendly data handling capabilities.
Effortlessly integrating Chargebee with Google Sheets is now a breeze with StackIt!
Say goodbye to manual data exports and repetitive tasks. With StackIt, streamline your workflows and boost productivity with just a single click. StackIt is also listed on the Chargebee Marketplace.
Try out StackIt today on your own or book a demo to automate your data analysis and reporting workflows.
FAQs
How to find the sitename in Chargebee?
How to find the sitename in Chargebee?
How to find the API Key in Chargebee?
How to find the API Key in Chargebee?
Is it possible to automatically refresh data imported from Chargebee to Google Sheets using StackIt?
Is it possible to automatically refresh data imported from Chargebee to Google Sheets using StackIt?
Automatic Data Pulls
Visual Data Preview
Set Alerts
other related blogs

Try it now